
บทนำ - ยินดีต้อนรับสู่ Rust! 🦀
Rust คืออะไร?
Rust เป็นภาษาโปรแกรมระดับ Systems Programming ที่มุ่งเน้น 3 เรื่องหลัก: ความปลอดภัย (Safety), ความเร็ว (Speed), และ ความสามารถในการทำงานพร้อมกัน (Concurrency) โดยไม่ต้องมี Garbage Collector
🧠 ปรัชญาของ Rust (The Three Pillars)
Rust ถูกออกแบบมาเพื่อแก้ปัญหา Trade-off เดิมๆ ที่ว่า “ถ้าอยากได้ความปลอดภัย ต้องยอมแลกด้วยความเร็ว” ด้วย 3 เสาหลัก:
1. Memory Safety โดยไม่มี Garbage Collector
Rust ตรวจสอบความถูกต้องของหน่วยความจำตั้งแต่ตอน Compile (ผ่านระบบ Ownership) ไม่ต้องมี GC มาถ่วงตอน Runtime
| แนวทาง | ภาษา | ข้อดี/ข้อเสีย |
|---|---|---|
| Manual Memory | C/C++ | เร็วมาก แต่เสี่ยง Buffer Overflows / Memory Leaks |
| Garbage Collection | Java, Go, Python | ปลอดภัย แต่กินแรมและมีช่วงหยุด (GC Pause) |
| Ownership System | Rust | ปลอดภัย + เร็ว (Zero Runtime Overhead) ✅ |
2. Zero-Cost Abstractions
คุณสามารถเขียนโค้ด High-level (เช่น Iterators, Closures, Generics) ที่อ่านง่าย แต่เมื่อ Compile แล้วจะได้ Machine Code ที่เร็วเท่ากับการเขียนแบบ Low-level ด้วยมือ
📌 กฎเหล็ก: “สิ่งที่คุณไม่ได้ใช้ คุณไม่ต้องจ่าย และสิ่งที่คุณใช้ คุณไม่สามารถเขียนเองด้วยมือให้ดีกว่าที่ภาษาทำให้ได้”
3. Fearless Concurrency
Rust Compiler ช่วยป้องกัน Data Races ตั้งแต่ตอนเขียนโค้ด ทำให้นักพัฒนา “กล้า” เขียนโปรแกรมที่ทำงานขนานกัน (Multi-threading) ได้อย่างเต็มประสิทธิภาพโดยไม่ต้องกลัวบั๊กที่หาเจอยาก
🆚 เปรียบเทียบกับภาษาอื่น
| ด้าน | C/C++ | Go | Python | Rust |
|---|---|---|---|---|
| ความเร็ว | ⚡⚡⚡ | ⚡⚡ | ⚡ | ⚡⚡⚡ |
| Memory Safety | ❌ Manual | ✅ GC | ✅ GC | ✅ Ownership |
| Concurrency | ⚠️ ยาก | ✅ Goroutines | ⚠️ GIL | ✅ Fearless |
| Learning Curve | ⚠️ สูง | ✅ ง่าย | ✅ ง่าย | ⚠️ สูง |
| GC Pause | ไม่มี | มี | มี | ไม่มี |
💡 สรุป: Rust ให้ความเร็วเท่า C/C++ แต่ปลอดภัยเท่า Go/Java โดยไม่ต้องมี Garbage Collector!
ทำไมต้องเรียน Rust?
นอกเหนือจากความเทพทางเทคนิคแล้ว นี่คือเหตุผลที่คุณควรลงทุนเวลากับภาษานี้:
| เหตุผล | คำอธิบาย |
|---|---|
| 📦 Modern Tooling | Cargo คือ Package Manager ที่ดีที่สุดตัวหนึ่งของโลก จัดการ dependencies, build, test, docs ได้ในตัวเดียว |
| 💼 อุตสาหกรรมต้องการ | บริษัทระดับโลก (Microsoft, Google, AWS, Meta) ใช้ Rust ใน Core Infrastructure และต้องการคนเขียนเป็น |
| 🏆 Most Loved Language | ครองแชมป์ใน Stack Overflow Survey ติดต่อกันหลายปี นักพัฒนาที่ได้ลองใช้มักจะติดใจ |
| � Strict Compiler | Compiler ที่จู้จี้แต่ใจดี เหมือนมี Senior Dev คอยรีวิวและสอนโค้ดให้คุณตลอดเวลา |
Rust เหมาะกับงานอะไร?
| ประเภทงาน | ตัวอย่าง |
|---|---|
| 🖥️ Systems Programming | OS, Drivers, Compilers |
| 🌐 Web Services | Backend APIs, Microservices |
| ⚡ WebAssembly | High-performance Web Apps |
| 🛠️ CLI Tools | Command-line Applications |
| 📱 Embedded | IoT, Robotics |
| 🎮 Game Engines | Game Development |
| 🔐 Blockchain | Crypto, Smart Contracts |
🌍 ใครใช้ Rust?
บริษัทชั้นนำระดับโลกเปลี่ยนมาใช้ Rust เพราะความปลอดภัยและประสิทธิภาพ:
| บริษัท | โปรเจกต์ | ทำไมถึงเลือก Rust |
|---|---|---|
| Microsoft | Windows kernel | Memory safety ใน OS |
| Android (Binder) | ลดช่องโหว่ด้านความปลอดภัย | |
| Meta | Mononoke | Concurrency ที่ดีกว่า |
| AWS | Firecracker | Low latency สำหรับ Lambda |
| Cloudflare | Pingora | แทน nginx, เร็วกว่า 3 เท่า |
| Discord | Read States | Go → Rust, ลด latency spike |
| Linux | Rust for Linux | ภาษาที่ 2 หลัง C ใน kernel |
💡 รู้หรือไม่? Discord เคยมีปัญหา latency spike ทุก 2 นาที เมื่อเปลี่ยนจาก Go เป็น Rust ปัญหาหายไปเลย!
📜 ประวัติความเป็นมา
Graydon Hoare พนักงานของ Mozilla เริ่มพัฒนา Rust เป็นโปรเจกต์ส่วนตัวในปี 2006 (ตั้งชื่อตามเชื้อราสนิมที่มีความทนทาน) ก่อนที่ Mozilla จะเห็นศักยภาพและสนับสนุนอย่างเป็นทางการในปี 2009
🗓️ Rust Timeline
| ปี | เหตุการณ์สำคัญ |
|---|---|
| 2006 | เริ่มพัฒนาเป็น Side Project |
| 2009 | Mozilla ประกาศสนับสนุนอย่างเป็นทางการ |
| 2010 | เปิดตัวต่อสาธารณะครั้งแรก |
| 2015 | 🎉 Rust 1.0 เปิดตัว (Stable Release) พร้อมรับประกัน Backward Compatibility |
| 2018 | Rust 2018 Edition (ปรับปรุงครั้งใหญ่, เพิ่ม async/await ในเวลาต่อมา) |
| 2021 | ก่อตั้ง Rust Foundation (AWS, Google, Microsoft, Huawei, Mozilla) |
| 2024 | 🐧 Rust เข้าสู่ Linux Kernel อย่างเป็นทางการ (ภาษาที่ 2 ถัดจาก C) |
หนังสือเล่มนี้มีอะไรบ้าง?
📊 ภาพรวม
| เนื้อหา | จำนวน |
|---|---|
| 📖 บทเรียน | 20 บท |
| ✍️ แบบฝึกหัด | 100+ ข้อ |
| ❓ Quiz | 100+ คำถาม |
| 📋 Cheatsheet | ครบทุกหัวข้อ |
| 🔗 Resources | แหล่งเรียนรู้เพิ่มเติม |
🎯 Edition
หนังสือเล่มนี้ใช้ Rust Edition 2024 ซึ่งเป็นเวอร์ชันล่าสุด
หนังสือเล่มนี้สำหรับใคร?
หนังสือเล่มนี้เขียนขึ้นสำหรับ ผู้เริ่มต้น ที่:
- 🆕 ไม่เคยเขียนโปรแกรมมาก่อน - เราจะอธิบายทุกอย่างตั้งแต่พื้นฐาน
- 🔄 มีประสบการณ์ภาษาอื่น - และอยากเรียน Rust
โครงสร้างหนังสือ
หนังสือแบ่งออกเป็น 5 ส่วน:
Part 1: พื้นฐาน (บทที่ 1-4)
เริ่มต้นจากการติดตั้ง เขียน Hello World ไปจนถึงพื้นฐานการเขียนโปรแกรม
Part 2: Core Concepts (บทที่ 5-9)
หัวใจสำคัญของ Rust - Ownership ⭐, Structs, Enums, Error Handling
Part 3: Advanced Concepts (บทที่ 10-14)
Generics, Traits, Lifetimes, Modules, Testing, Iterators, Smart Pointers
Part 4: Concurrency & Advanced (บทที่ 15-18)
การเขียนโปรแกรมแบบ concurrent, async/await, unsafe, macros
Part 5: Real World (บทที่ 19-20)
Web Development และ Final Project - สร้างโปรเจกต์จริง
วิธีใช้หนังสือเล่มนี้
💡 คำแนะนำ
- 📚 อ่านตามลำดับ - แต่ละบทต่อยอดจากบทก่อนหน้า
- ⌨️ ลงมือทำ - พิมพ์โค้ดเอง อย่า copy-paste
- 🔬 ทดลอง - แก้โค้ดดู ลองผิดลองถูก
- ✍️ ทำแบบฝึกหัด - ท้ายบทจะมีแบบฝึกหัดให้ทำ
- ❓ ทำ Quiz - ทดสอบความเข้าใจ
📝 สัญลักษณ์ที่ใช้
ตลอดทั้งเล่ม คุณจะเห็นกล่องข้อความเหล่านี้:
📌 หมายเหตุ: ข้อมูลเพิ่มเติมที่น่าสนใจ
💡 เคล็ดลับ: คำแนะนำที่จะทำให้เขียนโค้ดได้ดีขึ้น
⚠️ คำเตือน: สิ่งที่ควรระวัง
🎯 ลองทำดู: แบบฝึกหัดให้ลองทำ
เครื่องมือที่ต้องการ
ก่อนเริ่มเรียน ติดตั้งสิ่งเหล่านี้:
| เครื่องมือ | คำอธิบาย |
|---|---|
| Rust | ภาษา Rust + Cargo |
| VS Code | Text Editor แนะนำ |
| rust-analyzer | Extension สำหรับ VS Code |
พร้อมแล้วหรือยัง?
มาเริ่มการเดินทางกับ Rust กันเลย! 🚀
👉 ไปบทที่ 1: Getting Started - เริ่มต้นกับ Rust
☕ สนับสนุนผู้เขียน
ถ้าหนังสือเล่มนี้มีประโยชน์และช่วยให้คุณเข้าใจ Rust มากขึ้น คุณสามารถเลี้ยงกาแฟผมได้ที่: Buy Me a Coffee ☕
🦀 Happy Coding with Rust!
บทที่ 1: Getting Started - เริ่มต้นกับ Rust 🚀
ยินดีต้อนรับสู่การเขียนโปรแกรมด้วย Rust! ในบทนี้เราจะ:
- ✅ ติดตั้ง Rust บนคอมพิวเตอร์ของคุณ
- ✅ เขียนโปรแกรม “Hello, World!”
- ✅ เรียนรู้พื้นฐานการใช้ Cargo
สิ่งที่จะได้เรียนรู้
| หัวข้อ | คำอธิบาย |
|---|---|
| การติดตั้ง | ติดตั้ง Rust ด้วย rustup |
| Hello World | เขียนโปรแกรมแรกของคุณ |
| Cargo | เครื่องมือจัดการโปรเจกต์ |
เริ่มกันเลย!
การติดตั้ง Rust
ติดตั้งด้วย rustup
rustup เป็นเครื่องมืออย่างเป็นทางการสำหรับติดตั้งและจัดการ Rust
🛠️ Rust Toolchain Overview
+-------------------------------------------------------------------+
|                  Rust Development Toolchain                       |
+-------------------------------------------------------------------+
|                                                                   |
|  rustup (Toolchain Manager)                                       |
|  +-- rustc (Compiler)      <-- compile .rs to executable          |
|  +-- cargo (Build Tool)    <-- manage project + dependencies      |
|  +-- rustfmt (Formatter)   <-- auto format code                   |
|  +-- clippy (Linter)       <-- best practices suggestions         |
|  +-- rust-docs (Docs)      <-- offline documentation              |
|                                                                   |
|  IDE Setup (Recommended)                                          |
|  +-------------------------------------------------------+        |
|  |  VS Code + rust-analyzer extension                    |        |
|  |  * Auto-complete                                      |        |
|  |  * Error highlighting                                 |        |
|  |  * Go to definition                                   |        |
|  |  * Inline type hints                                  |        |
|  +-------------------------------------------------------+        |
|                                                                   |
+-------------------------------------------------------------------+
สำหรับ Windows
- ดาวน์โหลด rustup จาก https://rustup.rs
- เปิดไฟล์ที่ดาวน์โหลดมาและทำตามขั้นตอน
- อาจต้องติดตั้ง Visual Studio Build Tools ด้วย
สำหรับ macOS และ Linux
เปิด Terminal แล้วพิมพ์คำสั่ง:
curl --proto '=https' --tlsv1.2 -sSf https://sh.rustup.rs | sh
ทำตามขั้นตอนที่แสดงบนหน้าจอ
ตรวจสอบการติดตั้ง
หลังติดตั้งแล้ว ปิดและเปิด Terminal ใหม่ แล้วพิมพ์:
rustc --version
ถ้าติดตั้งสำเร็จ จะเห็นข้อความคล้ายๆ นี้:
rustc 1.83.0 (90b35a623 2024-11-26)
ลองตรวจสอบ Cargo ด้วย:
cargo --version
จะได้:
cargo 1.83.0 (5ffbef321 2024-10-29)
อัปเดต Rust
Rust ออกเวอร์ชันใหม่ทุก 6 สัปดาห์ อัปเดตได้ด้วย:
rustup update
เลือก IDE / Text Editor
แนะนำให้ใช้ VS Code พร้อม extension:
- rust-analyzer - สำคัญมาก!
- Even Better TOML
- Error Lens
หรือจะใช้ RustRover ซึ่งเป็น IDE เฉพาะสำหรับ Rust จาก JetBrains ก็ได้
สรุป
✅ ติดตั้ง Rust ด้วย rustup
✅ ตรวจสอบด้วย rustc --version
✅ ติดตั้ง VS Code + rust-analyzer
👉 ต่อไป: Hello World
Hello, World!
มาเขียนโปรแกรมแรกกัน! ตามธรรมเนียมของการเรียนภาษาใหม่ เราจะเริ่มด้วย “Hello, World!”
สร้างไฟล์โปรแกรม
- สร้างโฟลเดอร์สำหรับโปรเจกต์:
mkdir hello_world
cd hello_world
- สร้างไฟล์
main.rs:
fn main() {
    println!("Hello, World!");
}
รันโปรแกรม
Compile และรัน:
rustc main.rs
./main        # บน macOS/Linux
.\main.exe    # บน Windows
ผลลัพธ์:
Hello, World!
🎉 ยินดีด้วย! คุณเพิ่งเขียนโปรแกรม Rust โปรแกรมแรก!
ทำความเข้าใจโค้ด
มาวิเคราะห์โค้ดทีละบรรทัด:
fn main() {
    println!("Hello, World!");
}
fn main()
fn main() {fn- คำสั่งสำหรับประกาศ function (ฟังก์ชัน)main- ชื่อฟังก์ชัน พิเศษเพราะเป็นจุดเริ่มต้นของโปรแกรม()- ไม่มี parameter (ค่าที่ส่งเข้ามา){ }- ขอบเขตของฟังก์ชัน (function body)
หมายเหตุ: ทุกโปรแกรม Rust ต้องมีฟังก์ชัน
mainเป็นจุดเริ่มต้น
println!("Hello, World!");
println!("Hello, World!");println!- เป็น macro (สังเกตเครื่องหมาย!) ใช้พิมพ์ข้อความออกหน้าจอ"Hello, World!"- string (ข้อความ) ที่จะพิมพ์;- จบคำสั่ง (statement)
เคล็ดลับ: ใน Rust เครื่องหมาย
!หลังชื่อหมายถึง macro ไม่ใช่ function เราจะเรียนเรื่อง macro ในบทหลังๆ
รูปแบบการเขียน (Style)
Rust มีมาตรฐานการเขียนโค้ด:
- Indentation - ใช้ 4 spaces (ไม่ใช่ tab)
- ชื่อฟังก์ชัน - ใช้ snake_case เช่น
my_function - วงเล็บปีกกา - เปิดในบรรทัดเดียวกับ function
// ✅ ถูกต้อง
fn main() {
    println!("Hello!");
}

// ❌ ไม่ใช่ style มาตรฐาน
fn main2()
{
    println!("Hello!");
}
ใช้คำสั่ง rustfmt เพื่อจัดรูปแบบโค้ดอัตโนมัติ:
rustfmt main.rs
ลองทำดู! 🎯
- แก้โค้ดให้พิมพ์ชื่อของคุณ
- ลองเพิ่ม
println!อีกบรรทัด - ลองลบ
;ดูว่าเกิดอะไรขึ้น
สรุป
| สิ่งที่เรียนรู้ | คำอธิบาย |
|---|---|
fn main() | จุดเริ่มต้นโปรแกรม |
println!() | พิมพ์ข้อความ |
; | จบคำสั่ง |
rustc | Compile โปรแกรม |
👉 ต่อไป: Cargo เบื้องต้น
Cargo เบื้องต้น
Cargo เป็นเครื่องมือจัดการโปรเจกต์และ package manager ของ Rust มาพร้อมกับ rustup
Cargo ทำอะไรได้บ้าง?
- 📦 สร้างโปรเจกต์ใหม่
- 🔨 Build โค้ด
- ▶️ รันโปรแกรม
- 📥 จัดการ dependencies (libraries ที่ใช้)
- 🧪 รัน tests
- 📖 สร้าง documentation
สร้างโปรเจกต์ใหม่
cargo new hello_cargo
cd hello_cargo
Cargo จะสร้างโครงสร้างโฟลเดอร์ให้:
hello_cargo/
+-- Cargo.toml
\-- src/
    \-- main.rs
ทำความเข้าใจโครงสร้าง
Cargo.toml
[package]
name = "hello_cargo"
version = "0.1.0"
edition = "2024"

[dependencies]
[package]- ข้อมูลโปรเจกต์name- ชื่อโปรเจกต์version- เวอร์ชันedition- Rust edition (ปกติใช้ปีล่าสุด)
[dependencies]- รายการ libraries ที่ใช้
src/main.rs
fn main() {
    println!("Hello, world!");
}
โค้ดเริ่มต้นที่ Cargo สร้างให้
คำสั่ง Cargo ที่ใช้บ่อย
Build โปรเจกต์
cargo build
จะสร้างไฟล์ executable ใน target/debug/:
target/debug/hello_cargo
Build แบบ Release (เร็วกว่า)
cargo build --release
ไฟล์จะอยู่ใน target/release/ - เหมาะสำหรับ production
รันโปรแกรม
cargo run
คำสั่งนี้จะ build และ run ในคำสั่งเดียว สะดวกมาก!
   Compiling hello_cargo v0.1.0
    Finished dev [unoptimized + debuginfo] target(s) in 0.50s
     Running target/debug/hello_cargo
Hello, world!
ตรวจสอบโค้ด (ไม่ build)
cargo check
เร็วกว่า cargo build เพราะไม่สร้างไฟล์ executable ใช้ตรวจสอบว่าโค้ด compile ได้หรือไม่
เพิ่ม Dependencies
เมื่อต้องการใช้ library ภายนอก ให้เพิ่มใน Cargo.toml:
[dependencies]
rand = "0.8"
จากนั้นรัน:
cargo build
Cargo จะดาวน์โหลด library ให้อัตโนมัติ
หมายเหตุ: Library ของ Rust เรียกว่า crate หา crates ได้ที่ crates.io
สรุปคำสั่ง Cargo
| คำสั่ง | หน้าที่ |
|---|---|
cargo new <name> | สร้างโปรเจกต์ใหม่ |
cargo build | Compile โปรเจกต์ |
cargo run | Compile และ run |
cargo check | ตรวจสอบโค้ด |
cargo build --release | Build สำหรับ production |
ลองทำดู! 🎯
- สร้างโปรเจกต์ใหม่ชื่อ
my_project - แก้ไข
main.rsให้พิมพ์ข้อความอื่น - รันด้วย
cargo run - ลอง
cargo checkดู
สรุปบทที่ 1
ในบทนี้คุณได้เรียนรู้:
- ✅ ติดตั้ง Rust ด้วย rustup
- ✅ เขียนโปรแกรม Hello World
- ✅ ใช้งาน Cargo เบื้องต้น
👉 ต่อไป: บทที่ 2: Variables & Data Types
บทที่ 2: Variables & Data Types - ตัวแปรและชนิดข้อมูล
ในบทนี้เราจะเรียนรู้พื้นฐานที่สำคัญของทุกภาษาโปรแกรม นั่นคือ ตัวแปร และ ชนิดข้อมูล
สิ่งที่จะได้เรียนรู้
| หัวข้อ | คำอธิบาย |
|---|---|
| Mutability | ตัวแปรแบบเปลี่ยนค่าได้และเปลี่ยนไม่ได้ |
| Data Types | ชนิดข้อมูลต่างๆ ใน Rust |
| Constants | ค่าคงที่และ Shadowing |
ทำไมต้องเข้าใจ?
ใน Rust ตัวแปรมีความพิเศษ:
- Immutable by default - ตัวแปรเปลี่ยนค่าไม่ได้โดยปกติ
- Type inference - Rust เดาชนิดข้อมูลให้ได้
- Strongly typed - ต้องระบุชนิดข้อมูลให้ชัดเจน
เริ่มกันเลย!
Mutability - ความสามารถในการเปลี่ยนแปลงค่า
ประกาศตัวแปรด้วย let
ใน Rust เราใช้ let เพื่อประกาศตัวแปร:
fn main() {
    let x = 5;
    println!("x = {}", x);
}
ผลลัพธ์:
x = 5
ตัวแปรเปลี่ยนค่าไม่ได้ (Immutable)
ตัวแปรใน Rust เปลี่ยนค่าไม่ได้โดยปกติ!
fn main() {
    let x = 5;
    println!("x = {}", x);
    x = 6; // ❌ Error!
}
Error:
error[E0384]: cannot assign twice to immutable variable `x`
ทำไมถึงเป็นแบบนี้?
เพราะ immutable ทำให้โค้ดปลอดภัยและคาดเดาได้ง่ายกว่า เมื่อค่าไม่เปลี่ยน เราไม่ต้องกังวลว่าจะมีโค้ดส่วนอื่นแก้ไขค่าโดยไม่รู้ตัว
ตัวแปรเปลี่ยนค่าได้ (Mutable)
ถ้าต้องการเปลี่ยนค่า ให้เพิ่ม mut:
fn main() {
    let mut x = 5;
    println!("x = {}", x);

    x = 6; // ✅ OK เพราะใช้ mut
    println!("x = {}", x);
}
ผลลัพธ์:
x = 5
x = 6
เมื่อไหร่ควรใช้ mut?
✅ ใช้ mut เมื่อ:
- ต้องการสะสมค่า (เช่น ตัวนับ, ผลรวม)
- ต้องการแก้ไขข้อมูลใน loop
fn main() {
    let mut sum = 0;

    sum = sum + 1;
    sum = sum + 2;
    sum = sum + 3;

    println!("sum = {}", sum); // 6
}
❌ ไม่ต้องใช้ mut เมื่อ:
- ค่าไม่เปลี่ยนแปลง
- ต้องการความปลอดภัย
fn main() {
    let name = "Rust";
    let pi = 3.14159;

    println!("Learning {} with pi = {}", name, pi);
}
Shadowing (การซ่อนตัวแปร)
Rust อนุญาตให้ประกาศตัวแปรชื่อเดิมซ้ำได้:
fn main() {
    let x = 5;
    println!("x = {}", x); // 5

    let x = x + 1; // สร้างตัวแปรใหม่ชื่อ x
    println!("x = {}", x); // 6

    let x = x * 2;
    println!("x = {}", x); // 12
}
Shadowing vs mut
| Shadowing | mut |
|---|---|
| สร้างตัวแปรใหม่ | แก้ไขตัวแปรเดิม |
| เปลี่ยนชนิดได้ | เปลี่ยนชนิดไม่ได้ |
ใช้ let ซ้ำ | ไม่ต้องใช้ let |
fn main() {
    // Shadowing - เปลี่ยนชนิดได้
    let spaces = "   ";      // &str (string)
    let spaces = spaces.len(); // usize (number)
    println!("spaces = {}", spaces); // 3

    // mut - เปลี่ยนชนิดไม่ได้
    // let mut spaces = "   ";
    // spaces = spaces.len(); // ❌ Error! ชนิดต่างกัน
}
ลองทำดู! 🎯
- ประกาศตัวแปร
ageและพยายามเปลี่ยนค่า ดูว่า error อะไร - เพิ่ม
mutแล้วลองอีกครั้ง - ลอง shadowing: ประกาศ
let x = 5;แล้วตามด้วยlet x = "hello";
สรุป
| แนวคิด | คำอธิบาย |
|---|---|
let x = 5; | ตัวแปร immutable |
let mut x = 5; | ตัวแปร mutable |
| Shadowing | ประกาศตัวแปรชื่อเดิมซ้ำ |
👉 ต่อไป: ชนิดข้อมูล
ชนิดข้อมูล (Data Types)
Rust เป็นภาษา statically typed หมายความว่าต้องรู้ชนิดของตัวแปรทั้งหมดตอน compile
ประเภทของข้อมูล
Rust แบ่งชนิดข้อมูลเป็น 2 กลุ่มหลัก:
- Scalar Types - ค่าเดี่ยว
- Compound Types - ค่าหลายค่ารวมกัน
Scalar Types
1. Integer (จำนวนเต็ม)
| ขนาด | Signed (มีลบ) | Unsigned (บวกเท่านั้น) |
|---|---|---|
| 8-bit | i8 | u8 |
| 16-bit | i16 | u16 |
| 32-bit | i32 | u32 |
| 64-bit | i64 | u64 |
| 128-bit | i128 | u128 |
| arch | isize | usize |
fn main() {
    let a: i32 = 42;        // จำนวนเต็ม 32-bit
    let b: u8 = 255;        // จำนวนเต็มบวก 8-bit (0-255)
    let c = 1000;           // i32 (default)
    let d: isize = -500;    // ขึ้นกับ CPU (32 หรือ 64 bit)

    println!("a={}, b={}, c={}, d={}", a, b, c, d);
}
รูปแบบการเขียนตัวเลข
fn main() {
    let decimal = 98_222;      // Decimal (ใส่ _ ให้อ่านง่าย)
    let hex = 0xff;            // Hexadecimal
    let octal = 0o77;          // Octal
    let binary = 0b1111_0000;  // Binary
    let byte = b'A';           // Byte (u8 only)

    println!("{}, {}, {}, {}, {}", decimal, hex, octal, binary, byte);
    // 98222, 255, 63, 240, 65
}
2. Floating-Point (ทศนิยม)
fn main() {
    let x = 2.0;      // f64 (default, แม่นยำกว่า)
    let y: f32 = 3.0; // f32 (ใช้หน่วยความจำน้อยกว่า)

    println!("x={}, y={}", x, y);
}
การคำนวณ
fn main() {
    let sum = 5 + 10;           // บวก
    let difference = 95.5 - 4.3; // ลบ
    let product = 4 * 30;        // คูณ
    let quotient = 56.7 / 32.2;  // หาร
    let remainder = 43 % 5;      // เศษ (modulo)

    println!("sum={}", sum);               // 15
    println!("difference={}", difference); // 91.2
    println!("product={}", product);       // 120
    println!("quotient={}", quotient);     // 1.76...
    println!("remainder={}", remainder);   // 3
}
3. Boolean (ค่าความจริง)
fn main() {
    let t = true;
    let f: bool = false;

    println!("t={}, f={}", t, f);

    // ใช้ในเงื่อนไข
    if t {
        println!("This is true!");
    }
}
4. Character (ตัวอักษร)
fn main() {
    let c = 'z';
    let z: char = 'ℤ';
    let heart_eyed_cat = '😻';
    let thai = 'ก';

    println!("{}, {}, {}, {}", c, z, heart_eyed_cat, thai);
}
หมายเหตุ:
charใน Rust ใช้ 4 bytes และรองรับ Unicode ทั้งหมด ใช้ single quote'a'(ไม่ใช่ double quote"a")
Compound Types
1. Tuple (ทูเพิล)
Tuple รวมค่าหลายชนิดไว้ด้วยกัน มีขนาดคงที่
fn main() {
    let tup: (i32, f64, u8) = (500, 6.4, 1);

    // Destructuring - แยกค่าออกมา
    let (x, y, z) = tup;
    println!("x={}, y={}, z={}", x, y, z);

    // เข้าถึงด้วย index
    let five_hundred = tup.0;
    let six_point_four = tup.1;
    let one = tup.2;

    println!("{}, {}, {}", five_hundred, six_point_four, one);
}
Unit Type
Tuple ว่าง () เรียกว่า unit ใช้แทน “ไม่มีค่า”
fn main() {
    let unit: () = ();
    println!("unit = {:?}", unit); // ()
}
2. Array (อาร์เรย์)
Array รวมค่าชนิดเดียวกันไว้ด้วยกัน มีขนาดคงที่
fn main() {
    // ประกาศ array
    let a = [1, 2, 3, 4, 5];

    // ระบุชนิดและขนาด
    let b: [i32; 5] = [1, 2, 3, 4, 5];

    // สร้าง array ที่มีค่าเหมือนกันทั้งหมด
    let c = [3; 5]; // [3, 3, 3, 3, 3]

    println!("a = {:?}", a);
    println!("b = {:?}", b);
    println!("c = {:?}", c);
}
การเข้าถึง Elements
fn main() {
    let a = [1, 2, 3, 4, 5];

    let first = a[0];  // 1
    let second = a[1]; // 2

    println!("first={}, second={}", first, second);
}
คำเตือน: ถ้าเข้าถึง index ที่ไม่มีอยู่ โปรแกรมจะ panic!
let a = [1, 2, 3];
let x = a[10]; // ❌ panic!
Type Annotation vs Type Inference
Rust สามารถเดาชนิดข้อมูลได้:
fn main() {
    // Type Inference - Rust เดาให้
    let x = 5;       // i32
    let y = 2.0;     // f64
    let z = true;    // bool

    // Type Annotation - ระบุเอง
    let a: i64 = 5;
    let b: f32 = 2.0;
    let c: bool = true;
}
ลองทำดู! 🎯
- ประกาศตัวแปรแต่ละชนิดและ print ออกมา
- สร้าง tuple ที่มี (ชื่อ, อายุ, ส่วนสูง) และแยกค่าออกมา
- สร้าง array ของวันในสัปดาห์
สรุป
| ประเภท | ตัวอย่าง | คำอธิบาย |
|---|---|---|
| Integer | i32, u64 | จำนวนเต็ม |
| Float | f32, f64 | ทศนิยม |
| Boolean | bool | true/false |
| Character | char | ตัวอักษร Unicode |
| Tuple | (i32, f64) | ค่าหลายชนิด |
| Array | [i32; 5] | ค่าชนิดเดียว ขนาดคงที่ |
👉 ต่อไป: Constants & Shadowing
Constants & Shadowing
Constants (ค่าคงที่)
Constants คือค่าที่ไม่มีวันเปลี่ยนแปลง ใช้ const แทน let
const MAX_POINTS: u32 = 100_000;
const PI: f64 = 3.14159265359;
const APP_NAME: &str = "My Rust App";

fn main() {
    println!("Max points: {}", MAX_POINTS);
    println!("Pi: {}", PI);
    println!("App: {}", APP_NAME);
}
กฎของ Constants
- ต้องระบุชนิด - ไม่สามารถให้ Rust เดาได้
- ต้องเป็นค่าคงที่ - ไม่ได้มาจากการคำนวณตอน runtime
- ใช้ได้ทุกที่ - รวมถึง global scope
- SCREAMING_SNAKE_CASE - ใช้ตัวพิมพ์ใหญ่และ underscore
#![allow(unused)]
fn main() {
// ✅ ถูกต้อง
const MAX_SIZE: usize = 100;

// ❌ ไม่ได้ - ต้องระบุชนิด
// const MIN_SIZE = 10;

// ❌ ไม่ได้ - ค่าต้องคงที่
// const RANDOM: u32 = rand::random();
}
Static Variables
Static คล้าย constant แต่มี memory address คงที่
static LANGUAGE: &str = "Rust";
static mut COUNTER: u32 = 0; // ⚠️ ต้องใช้ unsafe

fn main() {
    println!("Language: {}", LANGUAGE);
}
คำเตือน:
static mutต้องใช้ในunsafeblock และควรหลีกเลี่ยงถ้าเป็นไปได้
const vs static vs let
| คุณสมบัติ | const | static | let |
|---|---|---|---|
| เปลี่ยนค่าได้ | ❌ | ❌ (ยกเว้น mut) | ✅ (ถ้า mut) |
| ต้องระบุชนิด | ✅ | ✅ | ❌ |
| Global scope | ✅ | ✅ | ❌ |
| มี memory address | ❌ | ✅ | ✅ |
| Inline ได้ | ✅ | ❌ | ❌ |
Shadowing (ทบทวน)
Shadowing คือการประกาศตัวแปรชื่อเดิมซ้ำ:
fn main() {
    let x = 5;

    // Shadow ด้วยค่าใหม่
    let x = x + 1;

    {
        // Shadow ใน inner scope
        let x = x * 2;
        println!("Inner x: {}", x); // 12
    }

    println!("Outer x: {}", x); // 6
}
ประโยชน์ของ Shadowing
1. เปลี่ยนชนิดข้อมูลได้
fn main() {
    let spaces = "   ";        // &str
    let spaces = spaces.len(); // usize

    println!("spaces: {}", spaces); // 3
}
2. แปลงค่าโดยไม่ต้องสร้างชื่อใหม่
fn main() {
    let input = "42";
    let input: i32 = input.parse().unwrap();

    println!("input: {}", input); // 42
}
3. ใช้ใน Scope ที่ต้องการ
fn main() {
    let x = 1;

    {
        let x = 2;
        println!("x in block: {}", x); // 2
    }

    println!("x outside: {}", x); // 1
}
ตัวอย่างการใช้งานจริง
Configuration Constants
const MAX_CONNECTIONS: u32 = 100;
const TIMEOUT_SECONDS: u64 = 30;
const API_VERSION: &str = "v1.0";

fn main() {
    println!("Server config:");
    println!("  Max connections: {}", MAX_CONNECTIONS);
    println!("  Timeout: {} seconds", TIMEOUT_SECONDS);
    println!("  API version: {}", API_VERSION);
}
Mathematical Constants
const PI: f64 = 3.14159265358979323846;
const E: f64 = 2.71828182845904523536;

fn main() {
    let radius = 5.0;
    let area = PI * radius * radius;

    println!("Circle area: {:.2}", area); // 78.54
}
ลองทำดู! 🎯
- สร้าง constants สำหรับแอพของคุณ (ชื่อแอพ, เวอร์ชัน)
- ลอง shadow ตัวแปรเพื่อแปลง string เป็น number
- สร้าง constants สำหรับค่า RGB ของสี
สรุปบทที่ 2
ในบทนี้คุณได้เรียนรู้:
- ✅ Immutable และ Mutable variables
- ✅ Scalar types: integers, floats, booleans, characters
- ✅ Compound types: tuples และ arrays
- ✅ Constants และ Shadowing
👉 ต่อไป: บทที่ 3: Functions
บทที่ 3: Functions - ฟังก์ชัน
ฟังก์ชัน เป็นหัวใจสำคัญของการเขียนโปรแกรม ช่วยให้เราจัดระเบียบและนำโค้ดกลับมาใช้ซ้ำได้
สิ่งที่จะได้เรียนรู้
| หัวข้อ | คำอธิบาย |
|---|---|
| การสร้างฟังก์ชัน | syntax และ naming conventions |
| Parameters | การส่งค่าเข้าฟังก์ชัน |
| Return Values | การส่งค่ากลับ |
ทำไมต้องใช้ฟังก์ชัน?
- 🔄 Reusability - ใช้โค้ดซ้ำได้หลายครั้ง
- 📦 Organization - จัดระเบียบโค้ดให้อ่านง่าย
- 🐛 Debugging - หา bug ได้ง่ายกว่า
- 🧪 Testing - ทดสอบแยกส่วนได้
เริ่มกันเลย!
การสร้างฟังก์ชัน
Syntax พื้นฐาน
fn function_name() {
    // body
}
📐 Function Anatomy
+-------------------------------------------------------------------+
|                  Function Anatomy in Rust                         |
+-------------------------------------------------------------------+
|                                                                   |
|   fn   calculate_sum  (  a: i32  ,  b: i32  )  ->  i32   {        |
|   ^         ^            ^--^       ^--^        ^--^      ^       |
|   |         |            |  |       |  |        |  |      |       |
|   |         |            |  type    |  type     |  return |       |
|   |         |            param      param       |  type   body    |
|   |         function name                       return            |
|   keyword                                                         |
|                                                                   |
|       a + b    <--- Expression (no semicolon) = return value      |
|   }                                                               |
|                                                                   |
+-------------------------------------------------------------------+
|   Tip: No semicolon after expression = return that value          |
+-------------------------------------------------------------------+
ตัวอย่าง
fn main() {
    println!("Hello from main!");

    another_function();
}

fn another_function() {
    println!("Hello from another function!");
}
ผลลัพธ์:
Hello from main!
Hello from another function!
Naming Conventions
ใน Rust ใช้ snake_case สำหรับชื่อฟังก์ชัน:
#![allow(unused)]
fn main() {
// ✅ ถูกต้อง - snake_case
fn calculate_area() {}
fn get_user_name() {}
fn process_data() {}

// ❌ ไม่ใช่ convention ของ Rust
fn CalculateArea() {} // PascalCase
fn calculateArea() {} // camelCase
}
ตำแหน่งของฟังก์ชัน
ฟังก์ชันสามารถประกาศไว้ที่ไหนก็ได้ในไฟล์:
fn main() {
    greet(); // เรียกฟังก์ชันที่อยู่ข้างล่าง ✅
}

fn greet() {
    println!("Hello!");
}
หมายเหตุ: ต่างจากบางภาษา (เช่น C) ที่ต้องประกาศฟังก์ชันก่อนเรียกใช้ Rust ไม่สนใจลำดับการประกาศ
ฟังก์ชันซ้อนกัน (ไม่ได้!)
ใน Rust ไม่สามารถประกาศฟังก์ชันซ้อนในฟังก์ชันได้:
// ❌ ไม่ได้
fn outer() {
    fn inner() { // Error!
        println!("Inner");
    }
    inner();
}
เคล็ดลับ: ถ้าต้องการ nested function ใช้ closure แทน:
fn main() {
    // ✅ ใช้ closure แทน nested function
    let greet = |name: &str| {
        println!("Hello, {}!", name);
    };

    greet("Rust");
    greet("World");

    // closure ที่จับตัวแปรจากภายนอก
    let multiplier = 3;
    let multiply = |x: i32| x * multiplier;

    println!("5 * 3 = {}", multiply(5)); // 15
}
ตัวอย่างจริง
fn main() {
    print_welcome_message();
    print_separator();
    print_goodbye_message();
}

fn print_welcome_message() {
    println!("╔═══════════════════════╗");
    println!("║   Welcome to Rust!    ║");
    println!("╚═══════════════════════╝");
}

fn print_separator() {
    println!("─────────────────────────");
}

fn print_goodbye_message() {
    println!("Thanks for learning Rust!");
}
ลองทำดู! 🎯
- สร้างฟังก์ชัน
print_nameที่พิมพ์ชื่อของคุณ - สร้างฟังก์ชัน
print_ageที่พิมพ์อายุ - เรียกใช้ทั้งสองฟังก์ชันจาก
main
สรุป
| แนวคิด | คำอธิบาย |
|---|---|
fn name() {} | ประกาศฟังก์ชัน |
| snake_case | Naming convention |
| ลำดับไม่สำคัญ | ประกาศที่ไหนก็ได้ |
👉 ต่อไป: Parameters
Parameters (พารามิเตอร์)
Parameters คือค่าที่ส่งเข้าไปในฟังก์ชัน เพื่อให้ฟังก์ชันทำงานกับข้อมูลที่แตกต่างกันได้
Syntax
fn function_name(param1: Type1, param2: Type2) {
    // use param1 and param2
}
สำคัญ: ต้องระบุ ชนิดข้อมูล ของทุก parameter!
ตัวอย่างพื้นฐาน
fn main() {
    print_number(5);
    print_number(10);
}

fn print_number(x: i32) {
    println!("The number is: {}", x);
}
ผลลัพธ์:
The number is: 5
The number is: 10
หลาย Parameters
fn main() {
    print_labeled_measurement(5, 'h');
    greet("Alice", 25);
}

fn print_labeled_measurement(value: i32, unit: char) {
    println!("The measurement is: {}{}", value, unit);
}

fn greet(name: &str, age: u32) {
    println!("Hello, {}! You are {} years old.", name, age);
}
ผลลัพธ์:
The measurement is: 5h
Hello, Alice! You are 25 years old.
Arguments vs Parameters
| คำศัพท์ | คำอธิบาย |
|---|---|
| Parameter | ตัวแปรในนิยามฟังก์ชัน |
| Argument | ค่าที่ส่งเข้าไปตอนเรียกใช้ |
fn add(x: i32, y: i32) { // x, y เป็น parameters
    println!("{}", x + y);
}

fn main() {
    add(5, 3); // 5, 3 เป็น arguments
}
ชนิดข้อมูลที่ใช้บ่อย
fn main() {
    integers(10, -5);
    floats(3.14, 2.5);
    with_string("Hello");
    with_boolean(true);
}

fn integers(a: i32, b: i32) {
    println!("Integers: {} + {} = {}", a, b, a + b);
}

fn floats(a: f64, b: f64) {
    println!("Floats: {} * {} = {}", a, b, a * b);
}

fn with_string(s: &str) {
    println!("String: {}", s);
}

fn with_boolean(flag: bool) {
    println!("Boolean: {}", flag);
}
ตัวอย่างจริง: คำนวณพื้นที่
fn main() {
    let width = 10;
    let height = 5;

    calculate_area(width, height);
}

fn calculate_area(width: u32, height: u32) {
    let area = width * height;
    println!("Width: {}", width);
    println!("Height: {}", height);
    println!("Area: {}", area);
}
ลองทำดู! 🎯
- สร้างฟังก์ชัน
introduce(name: &str, age: u32)ที่พิมพ์แนะนำตัว - สร้างฟังก์ชัน
calculate_bmi(weight: f64, height: f64)ที่คำนวณ BMI - สร้างฟังก์ชัน
print_grade(score: u32)ที่พิมพ์เกรด
สรุป
| แนวคิด | ตัวอย่าง |
|---|---|
| Single parameter | fn greet(name: &str) |
| Multiple parameters | fn add(a: i32, b: i32) |
| ต้องระบุชนิด | x: i32 ไม่ใช่แค่ x |
👉 ต่อไป: Return Values
Return Values (ค่าที่ส่งกลับ)
ฟังก์ชันสามารถ ส่งค่ากลับ ให้ผู้เรียกใช้ได้
Syntax
fn function_name() -> ReturnType {
    // return value
}- ใช้
->ระบุชนิดค่าที่ส่งกลับ - ค่าสุดท้ายใน function body จะถูกส่งกลับ (ไม่ต้องใส่
;)
ตัวอย่างพื้นฐาน
fn main() {
    let x = five();
    println!("x = {}", x); // 5
}

fn five() -> i32 {
    5 // ไม่มี ; = ส่งค่านี้กลับ
}
Expressions vs Statements
ใน Rust มีแนวคิดสำคัญ:
| ประเภท | คำอธิบาย | มีค่า? |
|---|---|---|
| Statement | ทำบางอย่าง ไม่ return ค่า | ❌ |
| Expression | ประมวลผลและ return ค่า | ✅ |
fn main() {
    // Statement - ไม่มีค่า
    let x = 5; // let ... เป็น statement

    // Expression - มีค่า
    let y = {
        let a = 3;
        a + 1   // ไม่มี ; = expression ที่ return ค่า
    };

    println!("y = {}", y); // 4
}
สำคัญมาก: ถ้าใส่
;ท้าย จะกลายเป็น statement และไม่ return ค่า!
fn main() {
    let y = {
        let a = 3;
        a + 1; // มี ; = statement = return () (unit)
    };

    // y มีค่าเป็น () ไม่ใช่ 4!
}
ตัวอย่างฟังก์ชันที่ return ค่า
fn main() {
    let sum = add(5, 3);
    println!("5 + 3 = {}", sum); // 8

    let product = multiply(4, 7);
    println!("4 * 7 = {}", product); // 28

    let result = add(multiply(2, 3), 4);
    println!("(2 * 3) + 4 = {}", result); // 10
}

fn add(a: i32, b: i32) -> i32 {
    a + b
}

fn multiply(a: i32, b: i32) -> i32 {
    a * b
}
ใช้ return keyword
สามารถใช้ return เพื่อ return ก่อนจบฟังก์ชันได้:
fn main() {
    println!("{}", absolute(-5)); // 5
    println!("{}", absolute(3));  // 3
}

fn absolute(x: i32) -> i32 {
    if x < 0 {
        return -x; // return ก่อนกำหนด
    }
    x // implicit return
}
แนะนำ: ใช้ implicit return (ไม่ใส่
return) เมื่อเป็นไปได้ ใช้returnเมื่อต้อง return ก่อนจบฟังก์ชัน
ฟังก์ชันที่ไม่ return ค่า
ถ้าไม่ระบุ -> ฟังก์ชันจะ return () (unit):
fn main() {
    let result = print_hello();
    println!("result = {:?}", result); // ()
}

fn print_hello() {
    println!("Hello!");
    // implicitly returns ()
}
เทียบเท่ากับ:
#![allow(unused)]
fn main() {
fn print_hello() -> () {
    println!("Hello!");
}
}
ตัวอย่างจริง
fn main() {
    let radius = 5.0;
    let area = circle_area(radius);
    let circumference = circle_circumference(radius);

    println!("Circle with radius {}:", radius);
    println!("  Area: {:.2}", area);
    println!("  Circumference: {:.2}", circumference);
}

fn circle_area(radius: f64) -> f64 {
    3.14159 * radius * radius
}

fn circle_circumference(radius: f64) -> f64 {
    2.0 * 3.14159 * radius
}
ผลลัพธ์:
Circle with radius 5:
  Area: 78.54
  Circumference: 31.42
ลองทำดู! 🎯
- สร้างฟังก์ชัน
square(x: i32) -> i32ที่ return ค่ายกกำลังสอง - สร้างฟังก์ชัน
max(a: i32, b: i32) -> i32ที่ return ค่าที่มากกว่า - สร้างฟังก์ชัน
is_even(n: i32) -> boolที่ return true ถ้าเป็นเลขคู่
สรุปบทที่ 3
| แนวคิด | ตัวอย่าง |
|---|---|
| Return type | fn add() -> i32 |
| Implicit return | a + b (ไม่มี ;) |
| Explicit return | return value; |
| Expression | มีค่า, ไม่มี ; |
| Statement | ไม่มีค่า, มี ; |
👉 ต่อไป: บทที่ 4: Control Flow
บทที่ 4: Control Flow - การควบคุมโปรแกรม
Control Flow ควบคุมลำดับการทำงานของโปรแกรม ให้ทำสิ่งต่างๆ ตามเงื่อนไข หรือทำซ้ำ
สิ่งที่จะได้เรียนรู้
| หัวข้อ | คำอธิบาย |
|---|---|
| if/else | เงื่อนไข |
| Loops | การวนซ้ำ |
| Match | Pattern matching เบื้องต้น |
ทำไมต้องเรียน?
โปรแกรมที่มีประโยชน์ต้อง:
- 🔀 ตัดสินใจ - ทำสิ่งต่างกันตามสถานการณ์
- 🔁 ทำซ้ำ - ประมวลผลข้อมูลจำนวนมาก
- ⚡ แยกกรณี - จัดการหลายกรณีพร้อมกัน
เริ่มกันเลย!
👉 if/else
if/else - เงื่อนไข
if ใช้ตัดสินใจว่าจะทำโค้ดส่วนไหน ตามเงื่อนไข
🔀 Control Flow Visualization
+-------------------------------------------------------------------+
|                    if/else Control Flow                           |
+-------------------------------------------------------------------+
|                                                                   |
|                      +-----------+                                |
|                      | condition |                                |
|                      +-----+-----+                                |
|                            |                                      |
|             +--------------+--------------+                       |
|             |              |              |                       |
|             v              v              v                       |
|        +--------+    +----------+    +--------+                   |
|        |  true  |    | else if  |    | false  |                   |
|        | block  |    | (option) |    | block  |                   |
|        +---+----+    +----+-----+    +---+----+                   |
|            |              |              |                        |
|            +--------------+--------------+                        |
|                           |                                       |
|                           v                                       |
|                     continue...                                   |
|                                                                   |
+-------------------------------------------------------------------+
|   Tip: In Rust, no () around condition: if x > 5 (not if (x>5))   |
+-------------------------------------------------------------------+
Syntax พื้นฐาน
if condition {
    // ทำเมื่อ condition เป็น true
}
ตัวอย่าง
fn main() {
    let number = 7;

    if number > 5 {
        println!("{} is greater than 5", number);
    }
}
if-else
fn main() {
    let number = 3;

    if number > 5 {
        println!("Greater than 5");
    } else {
        println!("Less than or equal to 5");
    }
}
else if
fn main() {
    let number = 6;

    if number % 4 == 0 {
        println!("Divisible by 4");
    } else if number % 3 == 0 {
        println!("Divisible by 3");
    } else if number % 2 == 0 {
        println!("Divisible by 2");
    } else {
        println!("Not divisible by 4, 3, or 2");
    }
}
ผลลัพธ์:
Divisible by 3
หมายเหตุ: Rust จะหยุดเมื่อเจอเงื่อนไขแรกที่ true ดังนั้น 6 หาร 2 ลงตัวด้วย แต่ไม่ถูกพิมพ์
Condition ต้องเป็น bool
ใน Rust condition ต้องเป็น bool:
fn main() {
    let number = 3;

    // ❌ Error! number ไม่ใช่ bool
    // if number {
    //     println!("number is not zero");
    // }

    // ✅ ถูกต้อง
    if number != 0 {
        println!("number is not zero");
    }
}
if ใน let (Ternary-like)
เพราะ if เป็น expression สามารถใส่ใน let ได้:
fn main() {
    let condition = true;

    let number = if condition { 5 } else { 6 };

    println!("number = {}", number); // 5
}
สำคัญ: ทุก branch ต้อง return ชนิดเดียวกัน
fn main() {
    let condition = true;

    // ❌ Error! ชนิดไม่ตรงกัน
    // let number = if condition { 5 } else { "six" };

    // ✅ ต้องเป็นชนิดเดียวกัน
    let number = if condition { 5 } else { 6 };
}
ตัวอย่างจริง: ตรวจสอบอายุ
fn main() {
    let age = 25;

    let category = if age < 13 {
        "Child"
    } else if age < 20 {
        "Teenager"
    } else if age < 60 {
        "Adult"
    } else {
        "Senior"
    };

    println!("Age {} is {}", age, category);
}
ตัวอย่างจริง: ตรวจสอบเกรด
fn main() {
    let score = 85;

    let grade = if score >= 80 {
        'A'
    } else if score >= 70 {
        'B'
    } else if score >= 60 {
        'C'
    } else if score >= 50 {
        'D'
    } else {
        'F'
    };

    println!("Score {} = Grade {}", score, grade);
}
Nested if
fn main() {
    let number = 15;

    if number > 0 {
        if number % 2 == 0 {
            println!("{} is positive and even", number);
        } else {
            println!("{} is positive and odd", number);
        }
    } else {
        println!("{} is not positive", number);
    }
}
ลองทำดู! 🎯
- เขียนโปรแกรมตรวจสอบว่าตัวเลขเป็นบวก ลบ หรือศูนย์
- เขียนฟังก์ชัน
max(a, b) -> i32ที่ return ค่าที่มากกว่า - เขียนโปรแกรมตรวจสอบปีอธิกสุรทิน
สรุป
| แนวคิด | ตัวอย่าง |
|---|---|
| if | if x > 0 { ... } |
| if-else | if x > 0 { ... } else { ... } |
| else if | else if x < 0 { ... } |
| if ใน let | let y = if x > 0 { 1 } else { -1 }; |
👉 ต่อไป: Loops
Loops - การวนซ้ำ
Rust มี 3 ประเภทของ loop:
| Loop | ใช้เมื่อ |
|---|---|
loop | วนไม่รู้จบ จนกว่าจะ break |
while | วนตราบใดที่เงื่อนไขเป็น true |
for | วนตามจำนวนที่กำหนด |
loop - วนไม่รู้จบ
fn main() {
    let mut count = 0;

    loop {
        count += 1;
        println!("Count: {}", count);

        if count >= 3 {
            break; // ออกจาก loop
        }
    }
}
ผลลัพธ์:
Count: 1
Count: 2
Count: 3
Return ค่าจาก loop
loop สามารถ return ค่าผ่าน break:
fn main() {
    let mut counter = 0;

    let result = loop {
        counter += 1;

        if counter == 10 {
            break counter * 2; // return 20
        }
    };

    println!("Result: {}", result); // 20
}
while - วนตามเงื่อนไข
fn main() {
    let mut number = 3;

    while number != 0 {
        println!("{}!", number);
        number -= 1;
    }

    println!("LIFTOFF!");
}
ผลลัพธ์:
3!
2!
1!
LIFTOFF!
for - วนตาม collection
for เป็น loop ที่ใช้บ่อยที่สุด:
fn main() {
    let a = [10, 20, 30, 40, 50];

    for element in a {
        println!("Value: {}", element);
    }
}
Range
fn main() {
    // 1 ถึง 4 (ไม่รวม 5)
    for number in 1..5 {
        println!("{}", number);
    }
    // 1, 2, 3, 4

    println!("---");

    // 1 ถึง 5 (รวม 5)
    for number in 1..=5 {
        println!("{}", number);
    }
    // 1, 2, 3, 4, 5
}
Reverse
fn main() {
    for number in (1..4).rev() {
        println!("{}!", number);
    }
    println!("LIFTOFF!");
}
ผลลัพธ์:
3!
2!
1!
LIFTOFF!
continue - ข้าม iteration
fn main() {
    for number in 1..=10 {
        if number % 2 == 0 {
            continue; // ข้ามเลขคู่
        }
        println!("{}", number);
    }
}
ผลลัพธ์:
1
3
5
7
9
Loop Labels
ใช้ label เพื่อ break/continue loop นอก:
fn main() {
    let mut count = 0;

    'outer: loop {
        println!("count = {}", count);
        let mut remaining = 10;

        loop {
            println!("  remaining = {}", remaining);
            if remaining == 9 {
                break; // break inner loop
            }
            if count == 2 {
                break 'outer; // break outer loop
            }
            remaining -= 1;
        }

        count += 1;
    }

    println!("End count = {}", count);
}
เปรียบเทียบ Loops
เมื่อไหร่ใช้อะไร?
fn main() {
    // ใช้ for เมื่อรู้จำนวนรอบ หรือวน collection
    for i in 0..5 {
        println!("for: {}", i);
    }

    // ใช้ while เมื่อขึ้นอยู่กับเงื่อนไข
    let mut x = 5;
    while x > 0 {
        println!("while: {}", x);
        x -= 1;
    }

    // ใช้ loop เมื่อต้องการ return ค่า หรือ retry logic
    let result = loop {
        // some logic
        break 42;
    };
    println!("loop result: {}", result);
}
ตัวอย่างจริง: FizzBuzz
fn main() {
    for n in 1..=15 {
        if n % 15 == 0 {
            println!("FizzBuzz");
        } else if n % 3 == 0 {
            println!("Fizz");
        } else if n % 5 == 0 {
            println!("Buzz");
        } else {
            println!("{}", n);
        }
    }
}
ตัวอย่างจริง: หาผลรวม
fn main() {
    let numbers = [1, 2, 3, 4, 5];
    let mut sum = 0;

    for n in numbers {
        sum += n;
    }

    println!("Sum: {}", sum); // 15
}
ลองทำดู! 🎯
- เขียน loop พิมพ์ตาราง 9
- เขียนโปรแกรมหาตัวเลขเฉพาะตั้งแต่ 1-50
- เขียน nested loop พิมพ์รูปสามเหลี่ยม *
สรุป
| Loop | Syntax | ใช้เมื่อ |
|---|---|---|
| loop | loop { ... } | วนไม่รู้จบ |
| while | while cond { ... } | เงื่อนไข |
| for | for x in iter { ... } | collection/range |
👉 ต่อไป: Match เบื้องต้น
Match เบื้องต้น
match เป็น control flow ที่ทรงพลังใน Rust ใช้เปรียบเทียบค่ากับ patterns
Syntax พื้นฐาน
match value {
    pattern1 => expression1,
    pattern2 => expression2,
    _ => default_expression,
}
ตัวอย่างพื้นฐาน
fn main() {
    let number = 3;

    match number {
        1 => println!("One"),
        2 => println!("Two"),
        3 => println!("Three"),
        _ => println!("Something else"),
    }
}
ผลลัพธ์:
Three
_ (Underscore) - Catch-all
_ จับทุกกรณีที่ไม่ตรงกับ pattern อื่น:
fn main() {
    let number = 7;

    match number {
        1 => println!("One"),
        2 => println!("Two"),
        3 => println!("Three"),
        _ => println!("Other: {}", number),
    }
}
สำคัญ:
matchต้องครอบคลุมทุกกรณี (exhaustive) ถ้าไม่ครบ จะ compile error
match กับ Return ค่า
match เป็น expression สามารถ return ค่าได้:
fn main() {
    let number = 2;

    let text = match number {
        1 => "one",
        2 => "two",
        3 => "three",
        _ => "other",
    };

    println!("{}", text); // two
}
Match หลายค่า
ใช้ | เพื่อ match หลายค่าในครั้งเดียว:
fn main() {
    let number = 2;

    match number {
        1 | 2 | 3 => println!("One, two, or three"),
        4 | 5 | 6 => println!("Four, five, or six"),
        _ => println!("Something else"),
    }
}
Match Range
ใช้ ..= เพื่อ match ช่วงค่า:
fn main() {
    let number = 5;

    match number {
        1..=5 => println!("One through five"),
        6..=10 => println!("Six through ten"),
        _ => println!("Something else"),
    }
}
Match กับ char
fn main() {
    let letter = 'c';

    match letter {
        'a'..='j' => println!("Early letter"),
        'k'..='z' => println!("Late letter"),
        _ => println!("Not a lowercase letter"),
    }
}
match vs if-else
| match | if-else |
|---|---|
| ต้องครอบคลุมทุกกรณี | ไม่จำเป็น |
| ใช้ได้กับหลาย pattern | ใช้ได้กับ bool |
| อ่านง่ายกว่าเมื่อหลายกรณี | ดีสำหรับ 2-3 กรณี |
fn main() {
    let number = 3;

    // match - ชัดเจนกว่า
    let result = match number {
        1 => "one",
        2 => "two",
        3 => "three",
        _ => "other",
    };

    // if-else - ยาวกว่า
    let result2 = if number == 1 {
        "one"
    } else if number == 2 {
        "two"
    } else if number == 3 {
        "three"
    } else {
        "other"
    };
}
ตัวอย่างจริง: วันในสัปดาห์
fn main() {
    let day = 3;

    let day_name = match day {
        1 => "Monday",
        2 => "Tuesday",
        3 => "Wednesday",
        4 => "Thursday",
        5 => "Friday",
        6 | 7 => "Weekend!",
        _ => "Invalid day",
    };

    println!("Day {} is {}", day, day_name);
}
ตัวอย่างจริง: คะแนนเป็นเกรด
fn main() {
    let score = 85;

    let grade = match score {
        90..=100 => 'A',
        80..=89 => 'B',
        70..=79 => 'C',
        60..=69 => 'D',
        0..=59 => 'F',
        _ => '?', // คะแนนไม่ถูกต้อง
    };

    println!("Score {} = Grade {}", score, grade);
}
Multiple Lines ใน Arm
ใช้ { } เมื่อต้องการหลายบรรทัด:
fn main() {
    let number = 2;

    match number {
        1 => {
            println!("Number is one");
            println!("It's the first number");
        }
        2 => {
            println!("Number is two");
            println!("It's the second number");
        }
        _ => println!("Something else"),
    }
}
ลองทำดู! 🎯
- เขียน match แปลงเดือน (1-12) เป็นชื่อเดือน
- เขียน match จัดกลุ่มอายุ (เด็ก, วัยรุ่น, ผู้ใหญ่, ผู้สูงอายุ)
- เขียน match สำหรับ rock-paper-scissors
สรุปบทที่ 4
| แนวคิด | ตัวอย่าง |
|---|---|
| if/else | if x > 0 { ... } else { ... } |
| loop | loop { break; } |
| while | while x > 0 { ... } |
| for | for x in 1..10 { ... } |
| match | match x { 1 => "one", _ => "other" } |
👉 ต่อไป: บทที่ 5: Ownership
บทที่ 5: Ownership - ระบบ Ownership ⭐
Ownership เป็นหัวใจสำคัญของ Rust และเป็นสิ่งที่ทำให้ Rust แตกต่างจากภาษาอื่น!
ทำไมบทนี้สำคัญมาก?
นี่คือบทที่สำคัญที่สุดในหนังสือเล่มนี้!
Ownership คือสิ่งที่ทำให้ Rust:
- ปลอดภัยจาก memory bugs
- ไม่ต้องใช้ Garbage Collector
- มีประสิทธิภาพสูง
ถ้าคุณเข้าใจ Ownership คุณจะเข้าใจ Rust 🦀
สิ่งที่จะได้เรียนรู้
| หัวข้อ | คำอธิบาย |
|---|---|
| Ownership คืออะไร | กฎ 3 ข้อ และหลักการ |
| Move & Clone | การย้ายและคัดลอก ownership |
| References | การยืมข้อมูล |
| Slices | การอ้างอิงส่วนหนึ่งของข้อมูล |
ปัญหาที่ Ownership แก้
ในภาษาอื่น อาจเจอปัญหาเหล่านี้:
- Use after free - ใช้ memory ที่ถูก free ไปแล้ว
- Double free - free memory ซ้ำ
- Dangling pointers - pointer ชี้ไปที่ที่ไม่มีอยู่
- Memory leaks - ลืม free memory
Rust ป้องกันปัญหาทั้งหมดนี้ตอน compile time!
เริ่มกันเลย!
Ownership คืออะไร
กฎ 3 ข้อของ Ownership
จำกฎ 3 ข้อนี้ให้ขึ้นใจ:
- ทุกค่ามีเจ้าของ (owner) หนึ่งเดียว
- ในเวลาใดก็ตาม ค่าหนึ่งมีได้แค่เจ้าของเดียว
- เมื่อเจ้าของออกจาก scope ค่าจะถูก drop (ลบ)
⚠️ คำเตือน: ข้อผิดพลาดที่พบบ่อย
- ❌ ใช้ตัวแปรหลัง move
- ❌ ส่ง ownership เข้า function แล้วพยายามใช้ต่อ
- ❌ สร้าง multiple mutable references
- ✅ ใช้
.clone()เมื่อต้องการ copy จริงๆ- ✅ ใช้ references (
&) แทน move เมื่อไม่จำเป็นต้องโอน ownership
🔄 Ownership Flow Diagram
+-------------------------------------------------------------------+
|                  Ownership Flow Visualization                     |
+-------------------------------------------------------------------+
|                                                                   |
|   let s1 = String::from("hello");                                 |
|       |                                                           |
|       v                                                           |
|   +-------+                                                       |
|   |  s1   | <-- owner of "hello"                                  |
|   +---+---+                                                       |
|       |                                                           |
|       |  let s2 = s1;  (MOVE)                                     |
|       |                                                           |
|       v                                                           |
|   +-------+     +-------+                                         |
|   |  s1   | --> |  s2   | <-- new owner                           |
|   | DEAD  |     |  OK   |                                         |
|   +-------+     +-------+                                         |
|   (invalid)     (valid)                                           |
|                                                                   |
+-------------------------------------------------------------------+
|  Alternatives:                                                    |
|  1. CLONE: let s2 = s1.clone();  -> s1 OK, s2 OK (both copies)    |
|  2. BORROW: let s2 = &s1;        -> s1 OK, s2 OK (temporary ref)  |
+-------------------------------------------------------------------+
ตัวอย่างพื้นฐาน
fn main() {
    {
        let s = String::from("hello"); // s เกิดขึ้น เป็น owner ของ "hello"

        println!("{}", s); // ใช้ s ได้

    } // s ออกจาก scope -> memory ถูก free อัตโนมัติ

    // println!("{}", s); // ❌ Error! s ไม่มีแล้ว
}
Stack vs Heap
เพื่อเข้าใจ Ownership ต้องเข้าใจ Stack และ Heap ก่อน:
Stack
- เก็บข้อมูลขนาดคงที่
- เร็วมาก
- LIFO (Last In, First Out)
- เช่น:
i32,f64,bool,char
Heap
- เก็บข้อมูลขนาดไม่คงที่
- ช้ากว่า Stack
- ต้อง allocate และ deallocate
- เช่น:
String,Vec<T>
+-----------------+
|     Stack       |
+-----------------+
| ptr  ----------+       +---------------+
| len = 5        |       |     Heap      |
| capacity = 5   |       +---------------+
+----------------+------>| h e l l o     |
                         |               |
                         +---------------+
Copy Types vs Move Types
Copy Types (อยู่บน Stack)
ข้อมูลขนาดเล็กถูก copy อัตโนมัติ:
fn main() {
    let x = 5;
    let y = x; // copy ค่า

    println!("x = {}, y = {}", x, y); // ✅ ทั้งสองใช้ได้
}| Copy Types |
|---|
| i32, u32, i64, etc. |
| f32, f64 |
| bool |
| char |
| Tuples ที่มี Copy types เท่านั้น |
Move Types (อยู่บน Heap)
ข้อมูลบน Heap ถูก move:
fn main() {
    let s1 = String::from("hello");
    let s2 = s1; // s1 ถูก MOVE ไป s2

    // println!("{}", s1); // ❌ Error! s1 ถูก move ไปแล้ว
    println!("{}", s2); // ✅ OK
}
ทำไมต้อง Move?
ถ้า Rust copy ข้อมูลบน Heap แทนที่จะ move:
        +-------------+
s1 ---->|   hello     |<---- s2 (if copy)
        +-------------+

When s1 and s2 go out of scope
-> Both try to free the same memory
-> DOUBLE FREE!
Rust ป้องกันโดยทำให้ s1 ใช้ไม่ได้หลัง move
Ownership และ Functions
ส่งค่าเข้า function = Move
fn main() {
    let s = String::from("hello");

    takes_ownership(s); // s ถูก move เข้า function

    // println!("{}", s); // ❌ Error! s ถูก move ไปแล้ว
}

fn takes_ownership(some_string: String) {
    println!("{}", some_string);
} // some_string ถูก drop ที่นี่
Return = ย้าย ownership กลับ
fn main() {
    let s1 = gives_ownership(); // s1 ได้รับ ownership

    println!("{}", s1); // ✅ OK
}

fn gives_ownership() -> String {
    let s = String::from("hello");
    s // return และ move ownership
}
ตัวอย่าง: ส่งและรับกลับ
fn main() {
    let s1 = String::from("hello");

    let (s2, len) = calculate_length(s1);

    println!("The length of '{}' is {}.", s2, len);
}

fn calculate_length(s: String) -> (String, usize) {
    let length = s.len();
    (s, length) // return tuple
}
ปัญหา: ต้อง return ค่ากลับมาถ้าต้องการใช้ต่อ ยุ่งยากมาก!
ทางออก: ใช้ References (บทถัดไป)
Scope และ Drop
fn main() {
    let outer = String::from("outer");

    {
        let inner = String::from("inner");
        println!("{}", inner); // ✅ OK
    } // inner ถูก drop ที่นี่

    // println!("{}", inner); // ❌ inner ไม่มีแล้ว

    println!("{}", outer); // ✅ OK
} // outer ถูก drop ที่นี่
ลองทำดู! 🎯
- ลองเขียนโค้ดที่ move String และดู error
- แก้ไขโดยใช้
.clone() - ลองส่ง String เข้า function และดูว่าเกิดอะไร
🧠 Advanced: Ownership Edge Cases
Case 1: Partial Move
struct Person {
    name: String,
    age: u32,
}

fn main() {
    let person = Person {
        name: String::from("Alice"),
        age: 30,
    };

    let name = person.name;  // move name ออกจาก struct
    // println!("{}", person.name);  // ❌ Error! name ถูก move แล้ว
    println!("{}", person.age);      // ✅ OK! age ยังอยู่ (Copy type)
}
Case 2: Reference ใน Struct
// ❌ ไม่ได้! struct เก็บ reference ต้องมี lifetime
struct BadStruct {
    data: &str,  // Error: missing lifetime specifier
}

// ✅ ถูกต้อง
struct GoodStruct<'a> {
    data: &'a str,
}
Case 3: เมื่อใดใช้ Clone vs Reference
| สถานการณ์ | ใช้ | เหตุผล |
|---|---|---|
| ข้อมูลเล็ก ใช้หลายที่ | .clone() | overhead น้อย |
| ข้อมูลใหญ่ อ่านอย่างเดียว | &T | ประหยัด memory |
| ข้อมูลใหญ่ ต้อง modify | &mut T หรือ move | ขึ้นกับ use case |
| ส่งข้าม threads | Arc<T> + clone | shared ownership |
📝 ทดสอบความเข้าใจ
Q1: ทำไม i32 copy ได้แต่ String copy ไม่ได้?
A: i32 เก็บบน stack มีขนาดคงที่ copy ได้เร็ว ส่วน String เก็บ pointer ไปยัง heap ถ้า copy แบบ shallow ทั้งสองตัวแปรจะชี้ไปที่ memory เดียวกัน เกิด double free
Q2: ถ้าต้องการให้หลายตัวแปร "เป็นเจ้าของ" ข้อมูลเดียวกัน ทำยังไง?
A: ใช้ Rc<T> (single thread) หรือ Arc<T> (multi-thread) เพื่อ shared ownership โดยนับ references
Q3: เมื่อไหร่ควรใช้ .clone() vs borrow?
A:
- Clone: เมื่อ data เล็ก หรือต้องการ ownership แยกจริงๆ
- Borrow: เมื่อ data ใหญ่ หรือแค่ต้องการอ่าน/เขียนชั่วคราว
สรุป
| แนวคิด | คำอธิบาย |
|---|---|
| Owner | ตัวแปรที่ “เป็นเจ้าของ” ค่า |
| Move | ย้าย ownership |
| Drop | ลบข้อมูลเมื่อออกจาก scope |
| Stack | ข้อมูลขนาดเล็ก copy ได้ |
| Heap | ข้อมูลขนาดใหญ่ต้อง move |
👉 ต่อไป: Move & Clone
Move & Clone
Move (การย้าย)
เมื่อ assign ตัวแปร heap type ให้ตัวแปรอื่น ค่าจะถูก move:
fn main() {
    let s1 = String::from("hello");
    let s2 = s1; // MOVE!

    // s1 invalidated แล้ว
    // println!("{}", s1); // ❌ Error: borrow of moved value

    println!("{}", s2); // ✅ OK
}
แผนภาพ Move
ก่อน Move:
s1 ──────► "hello" (Heap)

หลัง Move:
s1 ──╳──► (invalidated)
s2 ──────► "hello" (Heap)
Clone (การคัดลอก Deep Copy)
ถ้าต้องการ copy ข้อมูลจริงๆ ใช้ .clone():
fn main() {
    let s1 = String::from("hello");
    let s2 = s1.clone(); // CLONE - deep copy

    println!("s1 = {}", s1); // ✅ OK
    println!("s2 = {}", s2); // ✅ OK
}
แผนภาพ Clone
หลัง Clone:
s1 ──────► "hello" (Heap memory 1)
s2 ──────► "hello" (Heap memory 2)
คำเตือน:
.clone()อาจแพงในแง่ performance เพราะต้อง copy ทุก byte
Copy vs Clone
| Copy | Clone | |
|---|---|---|
| ทำงานอย่างไร | Automatic, bitwise copy | ต้องเรียก .clone() |
| ราคา | ถูก (stack only) | อาจแพง (heap copy) |
| ใช้กับ | Stack types | Heap types |
| ตัวอย่าง | i32, bool | String, Vec |
Copy (อัตโนมัติสำหรับ Stack types)
fn main() {
    let x = 5;
    let y = x; // COPY (อัตโนมัติ)

    println!("x = {}, y = {}", x, y); // ✅ ทั้งสองใช้ได้
}
เมื่อไหร่ใช้ Clone?
1. ต้องการให้ทั้งสองตัวแปรใช้ข้อมูลเดียวกัน
fn main() {
    let original = String::from("hello");
    let backup = original.clone();

    // ใช้ทั้งสองได้
    println!("original: {}", original);
    println!("backup: {}", backup);
}
2. ส่งค่าเข้า function แต่ยังต้องการใช้
fn main() {
    let s = String::from("hello");

    print_string(s.clone()); // ส่ง clone ไป

    println!("Still have: {}", s); // ✅ s ยังใช้ได้
}

fn print_string(s: String) {
    println!("{}", s);
}
ดีกว่า: ใช้ References แทน clone (บทถัดไป)
Clone กับ Collections
fn main() {
    let v1 = vec![1, 2, 3];
    let v2 = v1.clone();

    println!("v1: {:?}", v1);
    println!("v2: {:?}", v2);

    // แก้ไข v2 ไม่กระทบ v1
    // (ถ้าทำได้ ต้องเป็น mut)
}
Copy Trait
Types ที่มี Copy trait จะถูก copy อัตโนมัติ:
fn main() {
    // ทั้งหมดนี้มี Copy
    let a: i32 = 5;
    let b = a; // copy

    let c: f64 = 3.14;
    let d = c; // copy

    let e: bool = true;
    let f = e; // copy

    let g: char = 'A';
    let h = g; // copy

    // Tuple ที่มี Copy types
    let tuple1 = (1, 2, 3);
    let tuple2 = tuple1; // copy

    // ใช้ได้ทั้งหมด
    println!("{} {} {} {} {} {}", a, c, e, g, tuple1.0, tuple2.0);
}
สรุป: Move vs Clone vs Copy
fn main() {
    // Copy - Stack types (อัตโนมัติ)
    let x = 5;
    let y = x;
    println!("x={}, y={}", x, y); // ✅

    // Move - Heap types (default)
    let s1 = String::from("hello");
    let s2 = s1;
    // println!("{}", s1); // ❌ moved
    println!("{}", s2); // ✅

    // Clone - Explicit deep copy
    let s3 = String::from("world");
    let s4 = s3.clone();
    println!("s3={}, s4={}", s3, s4); // ✅
}
ลองทำดู! 🎯
- สร้าง 2 Strings และลอง move ระหว่างกัน
- ใช้
.clone()เพื่อให้ทั้งสองใช้ได้ - ลองกับ Vec และ HashMaps
สรุป
| การทำงาน | เมื่อไหร่ | ผลลัพธ์ |
|---|---|---|
| Copy | Stack types | ทั้งสองใช้ได้ |
| Move | Heap types (default) | ตัวแรกใช้ไม่ได้ |
| Clone | เรียก .clone() | ทั้งสองใช้ได้ (คนละ memory) |
👉 ต่อไป: References & Borrowing
References & Borrowing
References ช่วยให้เรา “ยืม” ค่า โดยไม่ย้าย ownership
ปัญหา: ต้อง Return ค่ากลับ
fn main() {
    let s1 = String::from("hello");

    let (s2, len) = calculate_length(s1);

    println!("Length of '{}' is {}", s2, len);
}

fn calculate_length(s: String) -> (String, usize) {
    let len = s.len();
    (s, len) // ต้อง return s กลับ 😩
}
ทางออก: ใช้ Reference
fn main() {
    let s1 = String::from("hello");

    let len = calculate_length(&s1); // ส่ง reference

    println!("Length of '{}' is {}", s1, len); // s1 ยังใช้ได้!
}

fn calculate_length(s: &String) -> usize { // รับ reference
    s.len()
}
Reference คืออะไร?
Reference คือ pointer ที่ชี้ไปยังค่า โดยไม่เป็นเจ้าของ:
s1 ──────► "hello" (Heap)
           ▲
           │
&s1 ───────┘ (Reference ชี้ไปที่ s1)
&s1สร้าง reference ไปยังs1&Stringคือ type ของ reference
กฎของ References (สำคัญมาก!)
กฎ 1: ในเวลาใดก็ตาม มีหนึ่งในสิ่งนี้ได้:
- หนึ่ง mutable reference (
&mut T)- กี่อันก็ได้ immutable references (
&T)กฎ 2: References ต้อง valid เสมอ (ไม่ dangling)
Immutable References (&T)
สามารถมีหลาย immutable references พร้อมกันได้:
fn main() {
    let s = String::from("hello");

    let r1 = &s; // ✅
    let r2 = &s; // ✅
    let r3 = &s; // ✅

    println!("{}, {}, {}", r1, r2, r3);
}
แต่ไม่สามารถแก้ไขได้
fn main() {
    let s = String::from("hello");

    let r = &s;

    // r.push_str(" world"); // ❌ Error! cannot borrow as mutable
}
Mutable References (&mut T)
ใช้ &mut เมื่อต้องการแก้ไข:
fn main() {
    let mut s = String::from("hello"); // ต้อง mut

    change(&mut s); // ส่ง mutable reference

    println!("{}", s); // "hello world"
}

fn change(s: &mut String) {
    s.push_str(" world");
}
มีได้แค่หนึ่ง mutable reference
fn main() {
    let mut s = String::from("hello");

    let r1 = &mut s;
    // let r2 = &mut s; // ❌ Error! cannot borrow as mutable more than once

    println!("{}", r1);
}
ห้ามผสม Mutable และ Immutable
fn main() {
    let mut s = String::from("hello");

    let r1 = &s;     // immutable borrow
    let r2 = &s;     // immutable borrow
    // let r3 = &mut s; // ❌ Error! cannot borrow as mutable

    println!("{} and {}", r1, r2);
}
แต่ทำได้ถ้า scope ไม่ทับกัน
fn main() {
    let mut s = String::from("hello");

    let r1 = &s;
    let r2 = &s;
    println!("{} and {}", r1, r2);
    // r1 และ r2 ไม่ถูกใช้อีกหลังจากนี้

    let r3 = &mut s; // ✅ OK เพราะ r1, r2 จบแล้ว
    println!("{}", r3);
}
Dangling References
Rust ป้องกัน dangling references:
fn main() {
    let reference_to_nothing = dangle();
}

fn dangle() -> &String { // ❌ Error!
    let s = String::from("hello");

    &s // reference ไปยัง s
} // s ถูก drop ที่นี่ -> reference จะ invalid!
แก้ไขโดย return ค่าแทน
fn main() {
    let s = no_dangle();
    println!("{}", s);
}

fn no_dangle() -> String { // ✅ Return String แทน
    let s = String::from("hello");
    s // move ownership ออกไป
}
สรุป: Reference Types
| Type | ความหมาย | ตัวอย่าง |
|---|---|---|
&T | Immutable reference | &String |
&mut T | Mutable reference | &mut String |
ตัวอย่างจริง
fn main() {
    let mut message = String::from("Hello");

    // อ่านค่า
    print_length(&message);

    // แก้ไขค่า
    add_world(&mut message);

    println!("Final: {}", message);
}

fn print_length(s: &String) {
    println!("Length: {}", s.len());
}

fn add_world(s: &mut String) {
    s.push_str(", World!");
}
ลองทำดู! 🎯
- เขียน function ที่รับ
&Stringและ return ความยาว - เขียน function ที่รับ
&mut Vec<i32>และ push ค่าเข้าไป - ลองสร้าง dangling reference และดู error
สรุป
| แนวคิด | กฎ |
|---|---|
&T | อ่านได้อย่างเดียว, มีหลายอันได้ |
&mut T | แก้ไขได้, มีได้อันเดียว |
| ห้ามผสม | &T และ &mut T พร้อมกันไม่ได้ |
| No dangling | Reference ต้อง valid เสมอ |
👉 ต่อไป: Slices
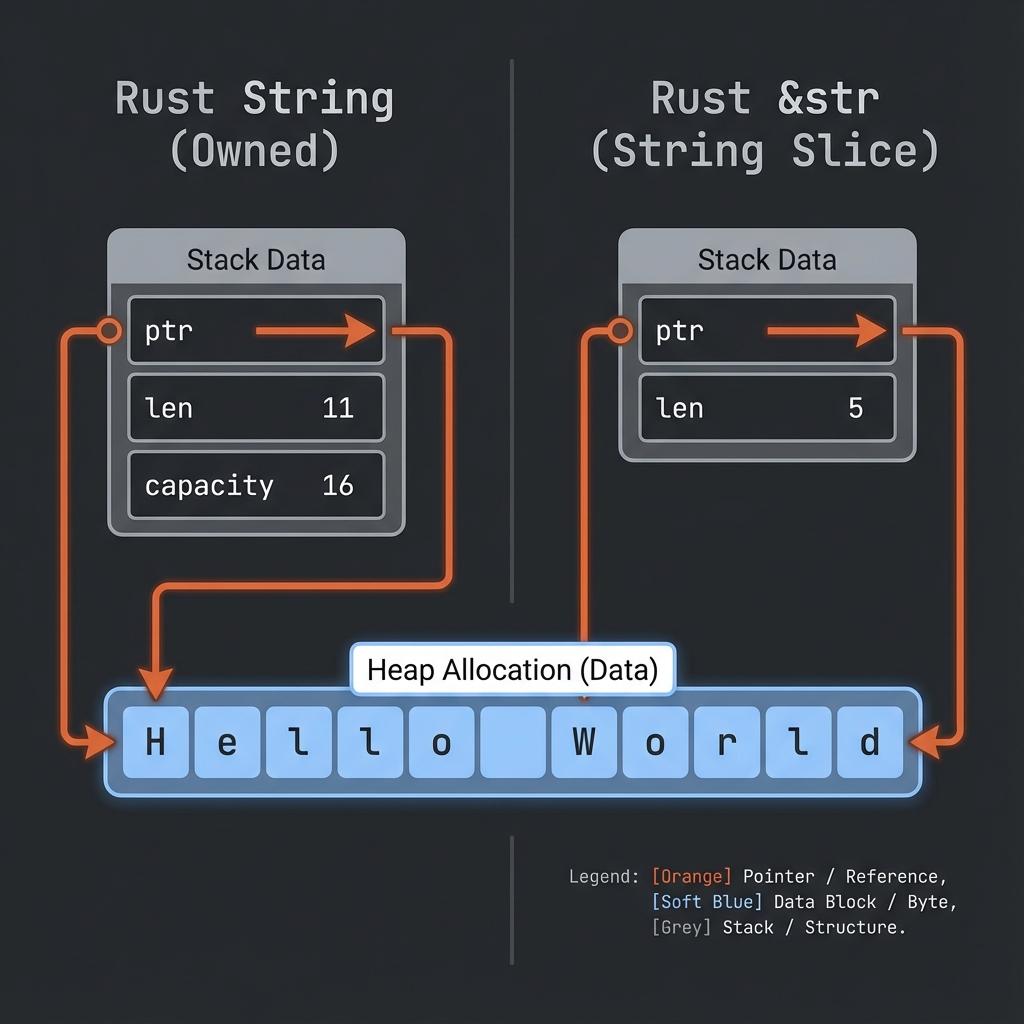
Slices
Slices ให้เราอ้างอิง ส่วนหนึ่ง ของ collection โดยไม่ต้อง copy
String Slices
fn main() {
    let s = String::from("Hello World");

    let hello = &s[0..5];  // "Hello"
    let world = &s[6..11]; // "World"

    println!("{} {}", hello, world);
}
Syntax
&s[start..end]  // start ถึง end-1
&s[start..]     // start ถึงท้าย
&s[..end]       // ต้นถึง end-1
&s[..]          // ทั้งหมด
ตัวอย่าง
fn main() {
    let s = String::from("Hello World");

    let slice1 = &s[0..5];   // "Hello"
    let slice2 = &s[..5];    // "Hello" (เหมือนกัน)

    let slice3 = &s[6..11];  // "World"
    let slice4 = &s[6..];    // "World" (เหมือนกัน)

    let slice5 = &s[0..11];  // "Hello World"
    let slice6 = &s[..];     // "Hello World" (เหมือนกัน)
}
&str Type
&str คือ string slice - reference ไปยังส่วนหนึ่งของ String:
fn main() {
    let s = String::from("Hello World");

    let word: &str = &s[0..5];

    println!("{}", word);
}
String Literals = &str
fn main() {
    let s: &str = "Hello World"; // string literal

    // s เป็น &str ที่ชี้ไปยังข้อมูลใน binary
}
ใช้ Slices กับ Functions
fn main() {
    let sentence = String::from("Hello World");

    let word = first_word(&sentence);

    println!("First word: {}", word);
}

fn first_word(s: &str) -> &str { // รับ &str แทน &String
    let bytes = s.as_bytes();

    for (i, &item) in bytes.iter().enumerate() {
        if item == b' ' {
            return &s[0..i];
        }
    }

    &s[..]
}
เคล็ดลับ: ใช้
&strเป็น parameter ดีกว่า&Stringเพราะรับได้ทั้งStringและ&str
fn main() {
    let my_string = String::from("Hello World");

    // ทำงานกับ slice ของ String
    let word = first_word(&my_string[0..6]);
    let word = first_word(&my_string[..]);
    let word = first_word(&my_string); // deref coercion

    // ทำงานกับ string literal (&str)
    let my_literal = "Hello World";
    let word = first_word(&my_literal[0..6]);
    let word = first_word(my_literal); // ส่งตรงได้เลย
}

fn first_word(s: &str) -> &str {
    // ...
    s
}
Slices ช่วยป้องกัน Bug
โดยไม่มี slices:
fn first_word_index(s: &String) -> usize {
    let bytes = s.as_bytes();
    for (i, &item) in bytes.iter().enumerate() {
        if item == b' ' {
            return i;
        }
    }
    s.len()
}

fn main() {
    let mut s = String::from("Hello World");

    let word_end = first_word_index(&s); // 5

    s.clear(); // s ว่างเปล่าแล้ว

    // word_end ยังเป็น 5 อยู่ แต่ไม่มีความหมายแล้ว!
    // Bug! 🐛
}
ใช้ slices:
fn first_word(s: &str) -> &str {
    let bytes = s.as_bytes();
    for (i, &item) in bytes.iter().enumerate() {
        if item == b' ' {
            return &s[0..i];
        }
    }
    &s[..]
}

fn main() {
    let mut s = String::from("Hello World");

    let word = first_word(&s);

    // s.clear(); // ❌ Error! cannot borrow as mutable

    println!("{}", word);
}
Rust ป้องกันไม่ให้แก้ไข s เพราะมี immutable borrow อยู่!
Array Slices
ใช้ได้กับ arrays ด้วย:
fn main() {
    let a = [1, 2, 3, 4, 5];

    let slice: &[i32] = &a[1..3];

    println!("{:?}", slice); // [2, 3]
}
ตัวอย่างจริง
fn main() {
    let text = "The quick brown fox jumps over the lazy dog";

    let words: Vec<&str> = text.split(' ').collect();

    for word in words {
        println!("{}", word);
    }

    // หรือใช้ slice โดยตรง
    let first_three = &text[0..15]; // "The quick brown"
    println!("First part: {}", first_three);
}
ลองทำดู! 🎯
- เขียน function ที่ return คำสุดท้ายของ string
- เขียน function ที่ return middle element ของ array
- ลองใช้ slice กับ Vec
สรุปบทที่ 5
| แนวคิด | คำอธิบาย |
|---|---|
| Ownership | ทุกค่ามีเจ้าของเดียว |
| Move | ย้าย ownership |
| Clone | Copy ข้อมูล |
&T | Immutable reference |
&mut T | Mutable reference |
| Slices | Reference ไปส่วนหนึ่งของ collection |
🎉 ยินดีด้วย! คุณผ่านบทที่ยากที่สุดแล้ว!
👉 ต่อไป: บทที่ 6: Structs
บทที่ 6: Structs - โครงสร้างข้อมูล
Struct ช่วยให้เราสร้าง custom data type ที่รวมข้อมูลหลายชิ้นไว้ด้วยกัน
สิ่งที่จะได้เรียนรู้
| หัวข้อ | คำอธิบาย |
|---|---|
| การสร้าง Struct | กำหนดโครงสร้างข้อมูล |
| Methods | ฟังก์ชันที่ผูกกับ struct |
| Associated Functions | ฟังก์ชันที่เกี่ยวข้องกับ struct |
ทำไมต้องใช้ Struct?
แทนที่จะเขียนแบบนี้:
#![allow(unused)]
fn main() {
let user_name = "Alice";
let user_email = "alice@example.com";
let user_age = 25;
}
ใช้ Struct รวมข้อมูลที่เกี่ยวข้องกัน:
#![allow(unused)]
fn main() {
struct User {
    name: String,
    email: String,
    age: u32,
}
}
เริ่มกันเลย!
การสร้าง Struct
นิยาม Struct
#![allow(unused)]
fn main() {
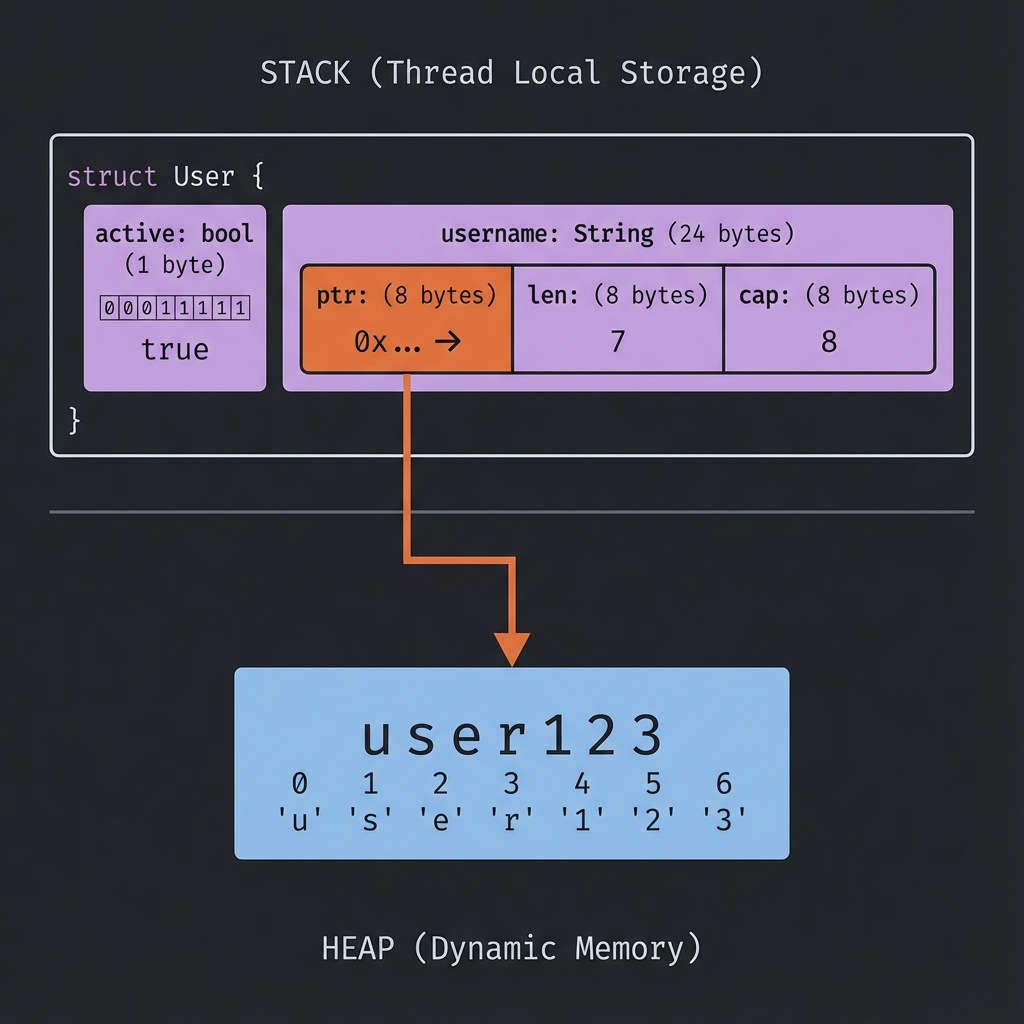
struct User {
username: String,
email: String,
sign_in_count: u64,
active: bool,
}
}- ใช้
structkeyword - ตั้งชื่อแบบ PascalCase (ตัวพิมพ์ใหญ่ขึ้นต้นแต่ละคำ)
- แต่ละ field มี
name: Type
📦 Struct Memory Layout
สร้าง Instance
fn main() {
    let user1 = User {
        email: String::from("alice@example.com"),
        username: String::from("alice"),
        active: true,
        sign_in_count: 1,
    };

    println!("Username: {}", user1.username);
    println!("Email: {}", user1.email);
}

struct User {
    username: String,
    email: String,
    sign_in_count: u64,
    active: bool,
}
เข้าถึงและแก้ไข Fields
struct User {
    username: String,
    email: String,
    sign_in_count: u64,
    active: bool,
}

fn main() {
    let mut user1 = User {
        email: String::from("alice@example.com"),
        username: String::from("alice"),
        active: true,
        sign_in_count: 1,
    };

    // อ่านค่า
    println!("Email: {}", user1.email);

    // แก้ไขค่า (ต้อง mut)
    user1.email = String::from("new@example.com");

    println!("New email: {}", user1.email);
}
หมายเหตุ: ทั้ง instance ต้องเป็น
mutไม่สามารถ mut แค่บาง field ได้
Field Init Shorthand
ถ้าชื่อ parameter ตรงกับ field ไม่ต้องเขียนซ้ำ:
struct User {
    username: String,
    email: String,
    sign_in_count: u64,
    active: bool,
}

fn build_user(email: String, username: String) -> User {
    User {
        email,    // แทน email: email
        username, // แทน username: username
        active: true,
        sign_in_count: 1,
    }
}
Struct Update Syntax
สร้าง instance ใหม่จาก instance เดิม:
struct User {
    username: String,
    email: String,
    sign_in_count: u64,
    active: bool,
}

fn main() {
    let user1 = User {
        email: String::from("alice@example.com"),
        username: String::from("alice"),
        active: true,
        sign_in_count: 1,
    };

    // สร้าง user2 โดยใช้ค่าจาก user1
    let user2 = User {
        email: String::from("bob@example.com"),
        ..user1 // ใช้ค่าที่เหลือจาก user1
    };

    // ⚠️ user1.username ถูก move ไป user2 แล้ว!
    // println!("{}", user1.username); // ❌ Error
    println!("{}", user1.email); // ✅ OK (ไม่ได้ move)
}
Tuple Structs
Struct ที่ไม่มีชื่อ field:
struct Color(i32, i32, i32);
struct Point(i32, i32, i32);

fn main() {
    let black = Color(0, 0, 0);
    let origin = Point(0, 0, 0);

    println!("R: {}", black.0);
    println!("X: {}", origin.0);
}
หมายเหตุ:
ColorและPointเป็นคนละ type แม้จะมีโครงสร้างเหมือนกัน
Unit-like Structs
Struct ที่ไม่มี field:
struct AlwaysEqual;

fn main() {
    let subject = AlwaysEqual;
}
มีประโยชน์เมื่อต้องการ implement trait โดยไม่ต้องเก็บข้อมูล
Debug Printing
เพิ่ม #[derive(Debug)] เพื่อ print struct:
#[derive(Debug)]
struct Rectangle {
    width: u32,
    height: u32,
}

fn main() {
    let rect = Rectangle {
        width: 30,
        height: 50,
    };

    println!("{:?}", rect);   // Debug format
    println!("{:#?}", rect);  // Pretty debug format
}
Output:
Rectangle { width: 30, height: 50 }
Rectangle {
    width: 30,
    height: 50,
}
ลองทำดู! 🎯
- สร้าง struct
Bookที่มี title, author, pages - สร้าง struct
Pointสำหรับพิกัด 2D - ใช้
#[derive(Debug)]และ print struct
สรุป
| แนวคิด | ตัวอย่าง |
|---|---|
| Define | struct Name { field: Type } |
| Create | Name { field: value } |
| Access | instance.field |
| Shorthand | field แทน field: field |
| Update | ..other_instance |
| Debug | #[derive(Debug)] |
👉 ต่อไป: Methods
Methods
Methods คือ functions ที่ผูกกับ struct ใช้ impl block
นิยาม Method
#[derive(Debug)]
struct Rectangle {
    width: u32,
    height: u32,
}

impl Rectangle {
    fn area(&self) -> u32 {
        self.width * self.height
    }
}

fn main() {
    let rect = Rectangle {
        width: 30,
        height: 50,
    };

    println!("Area: {}", rect.area());
}
&self Parameter
&self เป็น shorthand สำหรับ self: &Self:
| Parameter | ความหมาย |
|---|---|
&self | ยืม (อ่านอย่างเดียว) |
&mut self | ยืมแบบแก้ไขได้ |
self | รับ ownership |
#[derive(Debug)]
struct Rectangle {
    width: u32,
    height: u32,
}

impl Rectangle {
    // อ่านค่าอย่างเดียว
    fn area(&self) -> u32 {
        self.width * self.height
    }

    // แก้ไขค่า
    fn double_width(&mut self) {
        self.width *= 2;
    }

    // รับ ownership (หลังเรียก instance จะใช้ไม่ได้)
    fn destroy(self) {
        println!("Destroying {:?}", self);
    }
}
Methods ที่มี Parameters
#[derive(Debug)]
struct Rectangle {
    width: u32,
    height: u32,
}

impl Rectangle {
    fn can_hold(&self, other: &Rectangle) -> bool {
        self.width > other.width && self.height > other.height
    }
}

fn main() {
    let rect1 = Rectangle { width: 30, height: 50 };
    let rect2 = Rectangle { width: 10, height: 40 };
    let rect3 = Rectangle { width: 60, height: 45 };

    println!("rect1 can hold rect2: {}", rect1.can_hold(&rect2)); // true
    println!("rect1 can hold rect3: {}", rect1.can_hold(&rect3)); // false
}
หลาย impl Blocks
สามารถแยก methods เป็นหลาย impl blocks ได้:
struct Rectangle {
    width: u32,
    height: u32,
}

impl Rectangle {
    fn area(&self) -> u32 {
        self.width * self.height
    }
}

impl Rectangle {
    fn perimeter(&self) -> u32 {
        2 * (self.width + self.height)
    }
}
Method Chaining
ออกแบบ methods ที่ return &mut self เพื่อ chain ได้:
#[derive(Debug)]
struct Counter {
    value: i32,
}

impl Counter {
    fn new() -> Counter {
        Counter { value: 0 }
    }

    fn increment(&mut self) -> &mut Self {
        self.value += 1;
        self
    }

    fn add(&mut self, n: i32) -> &mut Self {
        self.value += n;
        self
    }
}

fn main() {
    let mut counter = Counter::new();

    counter
        .increment()
        .increment()
        .add(10);

    println!("{:?}", counter); // Counter { value: 12 }
}
Automatic Referencing
Rust จะเพิ่ม &, &mut, หรือ * อัตโนมัติเมื่อเรียก method:
struct Rectangle {
    width: u32,
    height: u32,
}

impl Rectangle {
    fn area(&self) -> u32 {
        self.width * self.height
    }
}

fn main() {
    let rect = Rectangle { width: 30, height: 50 };

    // เทียบเท่ากัน:
    rect.area();
    (&rect).area();
}
ตัวอย่างจริง: Circle
use std::f64::consts::PI;

#[derive(Debug)]
struct Circle {
    radius: f64,
}

impl Circle {
    fn area(&self) -> f64 {
        PI * self.radius * self.radius
    }

    fn circumference(&self) -> f64 {
        2.0 * PI * self.radius
    }

    fn grow(&mut self, amount: f64) {
        self.radius += amount;
    }
}

fn main() {
    let mut circle = Circle { radius: 5.0 };

    println!("Radius: {}", circle.radius);
    println!("Area: {:.2}", circle.area());
    println!("Circumference: {:.2}", circle.circumference());

    circle.grow(2.5);
    println!("After grow - Area: {:.2}", circle.area());
}
ลองทำดู! 🎯
- เพิ่ม method
is_square(&self)ให้ Rectangle - สร้าง struct
BankAccountพร้อม methods deposit, withdraw - สร้าง method chain สำหรับ builder pattern
สรุป
| แนวคิด | ตัวอย่าง |
|---|---|
| Method | fn method(&self) {} |
| Mutable | fn method(&mut self) {} |
| With args | fn method(&self, arg: Type) {} |
| impl block | impl StructName { ... } |
👉 ต่อไป: Associated Functions
Associated Functions
Associated Functions คือ functions ใน impl block ที่ไม่มี self เรียกด้วย ::
Syntax
#[derive(Debug)]
struct Rectangle {
    width: u32,
    height: u32,
}

impl Rectangle {
    fn new(width: u32, height: u32) -> Rectangle {
        Rectangle { width, height }
    }
}

fn main() {
    let rect = Rectangle::new(30, 50); // ใช้ :: ไม่ใช่ .

    println!("{:?}", rect);
}
Constructor Pattern
Associated functions มักใช้เป็น constructor:
#[derive(Debug)]
struct Rectangle {
    width: u32,
    height: u32,
}

impl Rectangle {
    // Constructor หลัก
    fn new(width: u32, height: u32) -> Self {
        Self { width, height }
    }

    // Constructor สำหรับสี่เหลี่ยมจัตุรัส
    fn square(size: u32) -> Self {
        Self {
            width: size,
            height: size,
        }
    }

    // Constructor default
    fn default() -> Self {
        Self {
            width: 1,
            height: 1,
        }
    }
}

fn main() {
    let rect = Rectangle::new(30, 50);
    let square = Rectangle::square(10);
    let default = Rectangle::default();

    println!("{:?}", rect);
    println!("{:?}", square);
    println!("{:?}", default);
}
หมายเหตุ: ใช้
Selfแทนชื่อ struct ได้ใน impl block
Methods vs Associated Functions
| Methods | Associated Functions |
|---|---|
มี &self, &mut self, self | ไม่มี self |
เรียกด้วย . | เรียกด้วย :: |
| เข้าถึง instance data ได้ | เข้าถึง instance data ไม่ได้ |
struct Rectangle {
    width: u32,
    height: u32,
}

impl Rectangle {
    // Associated Function (ไม่มี self)
    fn new(width: u32, height: u32) -> Self {
        Self { width, height }
    }

    // Method (มี &self)
    fn area(&self) -> u32 {
        self.width * self.height
    }
}

fn main() {
    let rect = Rectangle::new(10, 20); // ::
    let area = rect.area();             // .
}
ตัวอย่าง: String::from
String::from เป็น associated function ที่เราใช้บ่อย:
fn main() {
    let s = String::from("hello"); // associated function

    let len = s.len(); // method
}
ตัวอย่างจริง: User
#[derive(Debug)]
struct User {
    username: String,
    email: String,
    active: bool,
}

impl User {
    // Constructor
    fn new(username: String, email: String) -> Self {
        Self {
            username,
            email,
            active: true,
        }
    }

    // สร้างจาก email (extract username)
    fn from_email(email: String) -> Self {
        let username = email
            .split('@')
            .next()
            .unwrap_or("unknown")
            .to_string();

        Self::new(username, email)
    }

    // Methods
    fn is_active(&self) -> bool {
        self.active
    }

    fn deactivate(&mut self) {
        self.active = false;
    }
}

fn main() {
    let user1 = User::new(
        String::from("alice"),
        String::from("alice@example.com")
    );

    let user2 = User::from_email(String::from("bob@example.com"));

    println!("{:?}", user1);
    println!("{:?}", user2);
}
Builder Pattern
ใช้ associated functions และ methods ร่วมกัน:
#[derive(Debug)]
struct Car {
    brand: String,
    model: String,
    year: u32,
    color: String,
}

impl Car {
    fn builder() -> CarBuilder {
        CarBuilder::default()
    }
}

#[derive(Default)]
struct CarBuilder {
    brand: String,
    model: String,
    year: u32,
    color: String,
}

impl CarBuilder {
    fn brand(mut self, brand: &str) -> Self {
        self.brand = brand.to_string();
        self
    }

    fn model(mut self, model: &str) -> Self {
        self.model = model.to_string();
        self
    }

    fn year(mut self, year: u32) -> Self {
        self.year = year;
        self
    }

    fn color(mut self, color: &str) -> Self {
        self.color = color.to_string();
        self
    }

    fn build(self) -> Car {
        Car {
            brand: self.brand,
            model: self.model,
            year: self.year,
            color: self.color,
        }
    }
}

fn main() {
    let car = Car::builder()
        .brand("Toyota")
        .model("Camry")
        .year(2024)
        .color("Blue")
        .build();

    println!("{:?}", car);
}
ลองทำดู! 🎯
- สร้าง
Point::origin()ที่ return Point(0, 0) - สร้าง
Circle::with_radius(r)constructor - Implement builder pattern สำหรับ struct ที่คุณสร้าง
สรุปบทที่ 6
| แนวคิด | ตัวอย่าง |
|---|---|
| Struct | struct Name { field: Type } |
| Method | fn method(&self) |
| Associated Function | fn func() -> Self |
| Constructor | fn new(...) -> Self |
| Builder | Chain methods ที่ return Self |
👉 ต่อไป: บทที่ 7: Enums & Pattern Matching
บทที่ 7: Enums & Pattern Matching
Enums ช่วยให้เราแสดงค่าที่เป็นไปได้หลายแบบ และ Pattern Matching ช่วยจัดการแต่ละแบบ
สิ่งที่จะได้เรียนรู้
| หัวข้อ | คำอธิบาย |
|---|---|
| การสร้าง Enum | นิยาม variants |
| Option<T> | จัดการค่าที่อาจไม่มี |
| Match | Pattern matching |
| if let | Concise matching |
Enums คืออะไร?
Enum แสดงว่าค่าเป็น หนึ่งใน หลายตัวเลือก:
#![allow(unused)]
fn main() {
enum Direction {
    North,
    South,
    East,
    West,
}
}
ค่าของ Direction ต้องเป็น North, South, East, หรือ West เท่านั้น
เริ่มกันเลย!
การสร้าง Enum
Syntax พื้นฐาน
enum IpAddrKind {
    V4,
    V6,
}

fn main() {
    let four = IpAddrKind::V4;
    let six = IpAddrKind::V6;

    route(four);
    route(six);
}

fn route(ip_kind: IpAddrKind) {
    // ...
}
Enum กับ Data
Variants สามารถมีข้อมูลแนบได้:
enum IpAddr {
    V4(u8, u8, u8, u8),
    V6(String),
}

fn main() {
    let home = IpAddr::V4(127, 0, 0, 1);
    let loopback = IpAddr::V6(String::from("::1"));
}
Variants หลายแบบ
แต่ละ variant มีข้อมูลต่างกันได้:
enum Message {
    Quit,                       // ไม่มีข้อมูล
    Move { x: i32, y: i32 },    // anonymous struct
    Write(String),              // String
    ChangeColor(i32, i32, i32), // 3 integers
}

fn main() {
    let m1 = Message::Quit;
    let m2 = Message::Move { x: 10, y: 20 };
    let m3 = Message::Write(String::from("Hello"));
    let m4 = Message::ChangeColor(255, 0, 0);
}
Methods บน Enum
เหมือนกับ struct:
enum Message {
    Quit,
    Move { x: i32, y: i32 },
    Write(String),
    ChangeColor(i32, i32, i32),
}

impl Message {
    fn call(&self) {
        // method body
        println!("Message received!");
    }
}

fn main() {
    let m = Message::Write(String::from("hello"));
    m.call();
}
เปรียบเทียบ Enum vs Struct
ใช้ Struct + Enum
enum IpAddrKind {
    V4,
    V6,
}

struct IpAddr {
    kind: IpAddrKind,
    address: String,
}

fn main() {
    let home = IpAddr {
        kind: IpAddrKind::V4,
        address: String::from("127.0.0.1"),
    };
}
ใช้ Enum alone (ดีกว่า!)
enum IpAddr {
    V4(String),
    V6(String),
}

fn main() {
    let home = IpAddr::V4(String::from("127.0.0.1"));
}
ตัวอย่างจริง: WebEvent
enum WebEvent {
    PageLoad,
    PageUnload,
    KeyPress(char),
    Paste(String),
    Click { x: i64, y: i64 },
}

fn inspect(event: WebEvent) {
    match event {
        WebEvent::PageLoad => println!("Page loaded"),
        WebEvent::PageUnload => println!("Page unloaded"),
        WebEvent::KeyPress(c) => println!("Key pressed: {}", c),
        WebEvent::Paste(s) => println!("Pasted: {}", s),
        WebEvent::Click { x, y } => println!("Clicked at ({}, {})", x, y),
    }
}

fn main() {
    let press = WebEvent::KeyPress('x');
    let click = WebEvent::Click { x: 20, y: 80 };

    inspect(press);
    inspect(click);
}
ลองทำดู! 🎯
- สร้าง enum
TrafficLight(Red, Yellow, Green) - สร้าง enum
Shapeที่มี Circle(radius), Rectangle(w, h) - เพิ่ม method
area()ให้ Shape
สรุป
| แนวคิด | ตัวอย่าง |
|---|---|
| Basic enum | enum Name { A, B } |
| With data | enum Name { A(i32) } |
| Named fields | enum Name { A { x: i32 } } |
| Use | Name::A |
👉 ต่อไป: Option<T>
Option<T>
Option<T> เป็น enum มาตรฐานที่ใช้แทน null ในภาษาอื่น
ปัญหาของ Null
ในภาษาอื่น null ทำให้เกิด bugs มากมาย:
// JavaScript
let name = null;
console.log(name.length); // 💥 Crash!
Rust ไม่มี null แต่ใช้ Option<T> แทน
นิยามของ Option
#![allow(unused)]
fn main() {
enum Option<T> {
    None,    // ไม่มีค่า
    Some(T), // มีค่า
}
}
หมายเหตุ:
Option,Some,Noneอยู่ใน prelude ใช้ได้เลยโดยไม่ต้อง import
การใช้งาน Option
fn main() {
    let some_number: Option<i32> = Some(5);
    let some_string: Option<&str> = Some("hello");
    let absent_number: Option<i32> = None;

    println!("{:?}", some_number);  // Some(5)
    println!("{:?}", some_string);  // Some("hello")
    println!("{:?}", absent_number); // None
}
ทำไม Option ดีกว่า Null?
Compiler บังคับให้จัดการ
fn main() {
    let x: i32 = 5;
    let y: Option<i32> = Some(5);

    // let sum = x + y; // ❌ Error! cannot add i32 and Option<i32>
}
ต้อง “แกะ” Option ก่อนใช้ → บังคับให้คิดเรื่อง None
การจัดการ Option
1. match
fn main() {
    let x: Option<i32> = Some(5);

    match x {
        Some(value) => println!("Value: {}", value),
        None => println!("No value"),
    }
}
2. if let
fn main() {
    let x: Option<i32> = Some(5);

    if let Some(value) = x {
        println!("Value: {}", value);
    }
}
3. unwrap (ระวัง!)
fn main() {
    let x: Option<i32> = Some(5);
    let value = x.unwrap(); // ✅ ได้ 5

    let y: Option<i32> = None;
    // let value2 = y.unwrap(); // 💥 Panic!
}
4. unwrap_or (ปลอดภัยกว่า)
fn main() {
    let x: Option<i32> = Some(5);
    let y: Option<i32> = None;

    println!("{}", x.unwrap_or(0)); // 5
    println!("{}", y.unwrap_or(0)); // 0 (default)
}
5. map
fn main() {
    let x: Option<i32> = Some(5);

    let doubled = x.map(|v| v * 2);

    println!("{:?}", doubled); // Some(10)
}
Methods ที่ใช้บ่อย
| Method | คำอธิบาย |
|---|---|
is_some() | return true ถ้า Some |
is_none() | return true ถ้า None |
unwrap() | ดึงค่าออก (panic ถ้า None) |
unwrap_or(default) | ดึงค่า หรือใช้ default |
unwrap_or_else(f) | ดึงค่า หรือ call function |
map(f) | แปลงค่าข้างใน |
and_then(f) | chain Options |
fn main() {
    let x: Option<i32> = Some(5);
    let y: Option<i32> = None;

    println!("x is_some: {}", x.is_some()); // true
    println!("y is_none: {}", y.is_none()); // true

    // Chain operations
    let result = x
        .map(|v| v * 2)      // Some(10)
        .map(|v| v + 1)      // Some(11)
        .unwrap_or(0);       // 11

    println!("Result: {}", result);
}
ตัวอย่างจริง: หาค่าใน Array
fn find_item(items: &[i32], target: i32) -> Option<usize> {
    for (index, &item) in items.iter().enumerate() {
        if item == target {
            return Some(index);
        }
    }
    None
}

fn main() {
    let numbers = [1, 2, 3, 4, 5];

    match find_item(&numbers, 3) {
        Some(index) => println!("Found at index {}", index),
        None => println!("Not found"),
    }
}
ตัวอย่างจริง: Division
fn divide(a: f64, b: f64) -> Option<f64> {
    if b == 0.0 {
        None
    } else {
        Some(a / b)
    }
}

fn main() {
    let result1 = divide(10.0, 2.0);
    let result2 = divide(10.0, 0.0);

    println!("{:?}", result1); // Some(5.0)
    println!("{:?}", result2); // None
}
ลองทำดู! 🎯
- เขียน function
first(vec: &Vec<i32>) -> Option<i32> - เขียน function
parse_number(s: &str) -> Option<i32> - Chain หลาย Option methods ด้วยกัน
สรุป
| แนวคิด | ตัวอย่าง |
|---|---|
| Some | Some(5) |
| None | None |
| Match | match opt { Some(x) => ..., None => ... } |
| unwrap_or | opt.unwrap_or(default) |
| map | opt.map(|x| x * 2) |
👉 ต่อไป: Match Expression
Match Expression
match เป็น control flow ที่ทรงพลังใน Rust ใช้เปรียบเทียบค่ากับหลาย patterns
Syntax
match value {
    pattern1 => expression1,
    pattern2 => expression2,
    _ => default,
}
Match กับ Enum
enum Coin {
    Penny,
    Nickel,
    Dime,
    Quarter,
}

fn value_in_cents(coin: Coin) -> u32 {
    match coin {
        Coin::Penny => 1,
        Coin::Nickel => 5,
        Coin::Dime => 10,
        Coin::Quarter => 25,
    }
}

fn main() {
    let coin = Coin::Dime;
    println!("Value: {} cents", value_in_cents(coin));
}
Exhaustive Matching
match ต้องครอบคลุมทุกกรณี:
#![allow(unused)]
fn main() {
enum Color {
    Red,
    Green,
    Blue,
}

fn describe(color: Color) {
    match color {
        Color::Red => println!("Red"),
        Color::Green => println!("Green"),
        // ❌ Error: pattern `Blue` not covered
    }
}
}
แก้ไข
#![allow(unused)]
fn main() {
enum Color {
    Red,
    Green,
    Blue,
}

fn describe(color: Color) {
    match color {
        Color::Red => println!("Red"),
        Color::Green => println!("Green"),
        Color::Blue => println!("Blue"),
    }
}
}
_ (Catch-all)
ใช้ _ จับ patterns ที่เหลือ:
fn main() {
    let number = 13;

    match number {
        1 => println!("One"),
        2 => println!("Two"),
        3 => println!("Three"),
        _ => println!("Something else"),
    }
}
Match กับ Binding
ดึงค่าจาก enum:
enum Message {
    Quit,
    Move { x: i32, y: i32 },
    Write(String),
}

fn process(msg: Message) {
    match msg {
        Message::Quit => println!("Quit"),
        Message::Move { x, y } => {
            println!("Move to ({}, {})", x, y);
        }
        Message::Write(text) => {
            println!("Text: {}", text);
        }
    }
}

fn main() {
    process(Message::Move { x: 10, y: 20 });
    process(Message::Write(String::from("Hello")));
}
Match กับ Option
fn plus_one(x: Option<i32>) -> Option<i32> {
match x {
None => None,
Some(i) => Some(i + 1),
}
}
fn main() {
let five = Some(5);
let six = plus_one(five);
let none = plus_one(None);
println!("{:?}", six); // Some(6)
println!("{:?}", none); // None
}Match Guards
เพิ่มเงื่อนไขให้ pattern:
fn main() {
let num = Some(4);
match num {
Some(x) if x < 5 => println!("Less than 5: {}", x),
Some(x) => println!("5 or more: {}", x),
None => println!("None"),
}
}@ Binding
จับค่าพร้อมทั้งตรวจ pattern:
fn main() {
let msg = Message::Move { x: 5, y: 10 };
match msg {
Message::Move { x: x_val @ 0..=10, y } => {
println!("x ({}) is in range, y = {}", x_val, y);
}
Message::Move { x, y } => {
println!("x ({}) is out of range, y = {}", x, y);
}
_ => {}
}
}
enum Message {
Move { x: i32, y: i32 },
}Multiple Patterns
ใช้ | เพื่อ match หลาย patterns:
fn main() {
let n = 3;
match n {
1 | 2 | 3 => println!("One, two, or three"),
4..=10 => println!("Four to ten"),
_ => println!("Something else"),
}
}Match เป็น Expression
fn main() {
let x = 1;
let message = match x {
1 => "one",
2 => "two",
_ => "other",
};
println!("{}", message);
}ตัวอย่างจริง: Command Processing
enum Command {
Start,
Stop,
Speed(u32),
Position { x: i32, y: i32 },
}
fn execute(cmd: Command) -> String {
match cmd {
Command::Start => String::from("Starting..."),
Command::Stop => String::from("Stopping..."),
Command::Speed(s) if s > 100 => format!("Too fast! {}", s),
Command::Speed(s) => format!("Setting speed to {}", s),
Command::Position { x, y } => format!("Moving to ({}, {})", x, y),
}
}
fn main() {
println!("{}", execute(Command::Start));
println!("{}", execute(Command::Speed(50)));
println!("{}", execute(Command::Speed(150)));
println!("{}", execute(Command::Position { x: 10, y: 20 }));
}ลองทำดู! 🎯
- เขียน match สำหรับ
Option<String>ที่ print ความยาว - เขียน match ที่ใช้ guard เช็คค่าบวก/ลบ
- เขียน function ที่ return String ด้วย match
สรุป
| แนวคิด | ตัวอย่าง |
|---|---|
| Basic | match x { 1 => ..., _ => ... } |
| Binding | Some(value) => ... |
| Multiple | 1 | 2 | 3 => ... |
| Guard | Some(x) if x > 0 => ... |
| @ Binding | x @ 1..=10 => ... |
👉 ต่อไป: if let & while let
if let & while let
if let และ while let เป็นทางเลือกที่กระชับสำหรับ match เมื่อสนใจแค่ pattern เดียว
ปัญหา: Match ยาวไป
fn main() {
let some_value: Option<i32> = Some(3);
// ยาวเกินไปสำหรับแค่ pattern เดียว
match some_value {
Some(value) => println!("Value: {}", value),
_ => (), // ไม่ทำอะไร
}
}if let
fn main() {
let some_value: Option<i32> = Some(3);
// กระชับกว่า!
if let Some(value) = some_value {
println!("Value: {}", value);
}
}Syntax
if let PATTERN = EXPRESSION {
// ทำเมื่อ match
}หรือพร้อม else:
if let PATTERN = EXPRESSION {
// ทำเมื่อ match
} else {
// ทำเมื่อไม่ match
}if let กับ else
fn main() {
let some_value: Option<i32> = None;
if let Some(value) = some_value {
println!("Value: {}", value);
} else {
println!("No value!");
}
}เทียบเท่ากับ:
match some_value {
Some(value) => println!("Value: {}", value),
_ => println!("No value!"),
}if let กับ Enum
enum Message {
Quit,
Move { x: i32, y: i32 },
Write(String),
}
fn main() {
let msg = Message::Move { x: 10, y: 20 };
if let Message::Move { x, y } = msg {
println!("Moving to ({}, {})", x, y);
}
let msg2 = Message::Write(String::from("hello"));
if let Message::Write(text) = msg2 {
println!("Message: {}", text);
}
}while let
ทำซ้ำตราบใดที่ pattern ยัง match:
fn main() {
let mut stack = Vec::new();
stack.push(1);
stack.push(2);
stack.push(3);
// pop() returns Option<T>
while let Some(top) = stack.pop() {
println!("{}", top);
}
}Output:
3
2
1
ตัวอย่าง: Iterator
fn main() {
let numbers = vec![1, 2, 3, 4, 5];
let mut iter = numbers.iter();
while let Some(num) = iter.next() {
println!("{}", num);
}
}let else (Rust 1.65+)
Unwrap หรือ return เร็ว:
fn get_length(s: Option<String>) -> usize {
let Some(text) = s else {
return 0; // ต้อง return, break, continue, panic
};
text.len()
}
fn main() {
println!("{}", get_length(Some(String::from("hello")))); // 5
println!("{}", get_length(None)); // 0
}เปรียบเทียบ
match | if let |
|---|---|
| ครอบคลุมทุก pattern | pattern เดียว |
| Exhaustive | ไม่ exhaustive |
| ยาวกว่า | กระชับกว่า |
ใช้ match เมื่อ:
- มีหลาย patterns
- ต้องการให้ compiler บังคับครบทุกกรณี
ใช้ if let เมื่อ:
- สนใจแค่ pattern เดียว
- ต้องการความกระชับ
ตัวอย่างจริง
fn main() {
let config_max: Option<u8> = Some(100);
// if let - กระชับ
if let Some(max) = config_max {
println!("Maximum is {}", max);
}
// Regular if - ใช้ไม่ได้!
// if config_max.is_some() {
// let max = config_max.unwrap(); // clunky
// println!("Maximum is {}", max);
// }
}Chained if let
fn main() {
let maybe_number: Option<i32> = Some(42);
let maybe_string: Option<&str> = Some("hello");
if let Some(n) = maybe_number {
if let Some(s) = maybe_string {
println!("Number: {}, String: {}", n, s);
}
}
}หรือใช้ && (Rust 1.53+):
fn main() {
let maybe_number: Option<i32> = Some(42);
let maybe_string: Option<&str> = Some("hello");
if let (Some(n), Some(s)) = (maybe_number, maybe_string) {
println!("Number: {}, String: {}", n, s);
}
}ลองทำดู! 🎯
- เขียน if let สำหรับ
Option<String> - ใช้ while let pop จาก Vec
- แปลง match ที่มี 2 arms เป็น if let else
สรุปบทที่ 7
| แนวคิด | ตัวอย่าง |
|---|---|
| Enum | enum Name { A, B(T) } |
| Option | Some(x), None |
| match | match x { A => ..., B => ... } |
| if let | if let Some(x) = opt { ... } |
| while let | while let Some(x) = iter.next() { ... } |
👉 ต่อไป: บทที่ 8: Collections
บทที่ 8: Collections - คอลเลกชัน
Collections เก็บข้อมูลหลายค่า ต่างจาก array/tuple ที่ขนาดคงที่ collections ขยายได้
สิ่งที่จะได้เรียนรู้
| Collection | คำอธิบาย |
|---|---|
| Vec<T> | Dynamic array |
| String | UTF-8 text |
| HashMap<K, V> | Key-value pairs |
เมื่อไหร่ใช้อะไร?
| ต้องการ | ใช้ |
|---|---|
| List ที่ขยายได้ | Vec\<T\> |
| Text | String |
| Key-value lookup | HashMap\<K, V\> |
เริ่มกันเลย!
👉 Vec<T>
Vec<T> - Vector
Vector เป็น dynamic array ที่ขยายขนาดได้
📊 Collections Comparison
| Collection | เมื่อไหร่ใช้ | Key Feature |
|---|---|---|
Vec<T> | ลำดับข้อมูล, dynamic size | Index access O(1) |
String | Text data | UTF-8 encoded |
HashMap<K,V> | Key-value pairs | Lookup O(1) |
HashSet<T> | Unique values | Dedup, membership |
VecDeque<T> | Queue/Deque | Push/pop both ends |
📦 Vector Memory Layout
+-------------------------------------------------------------------+
| Vec<T> Memory Structure |
+-------------------------------------------------------------------+
| |
| Stack Heap |
| ----- ---- |
| +-------------+ |
| | ptr --------+--------------> +---+---+---+---+---+ |
| | len = 3 | | 1 | 2 | 3 | | | |
| | capacity = 5| +---+---+---+---+---+ |
| +-------------+ ^ ^ |
| | | |
| used (len) allocated (capacity) |
| |
+-------------------------------------------------------------------+
สร้าง Vector
fn main() {
// สร้าง vector ว่าง
let v1: Vec<i32> = Vec::new();
// สร้างด้วย vec! macro
let v2 = vec![1, 2, 3];
println!("{:?}", v1); // []
println!("{:?}", v2); // [1, 2, 3]
}เพิ่มข้อมูล
fn main() {
let mut v = Vec::new();
v.push(1);
v.push(2);
v.push(3);
println!("{:?}", v); // [1, 2, 3]
}เข้าถึงข้อมูล
แบบที่ 1: Indexing
fn main() {
let v = vec![1, 2, 3, 4, 5];
let third = &v[2];
println!("Third element: {}", third);
// ⚠️ panic ถ้า index ไม่มี!
// let hundred = &v[100]; // 💥 panic!
}แบบที่ 2: get() (ปลอดภัยกว่า)
fn main() {
let v = vec![1, 2, 3, 4, 5];
match v.get(2) {
Some(value) => println!("Third: {}", value),
None => println!("No element"),
}
// v.get(100) returns None (ไม่ panic)
if let Some(value) = v.get(100) {
println!("Found: {}", value);
} else {
println!("Not found");
}
}วนลูป
Immutable iteration
fn main() {
let v = vec![1, 2, 3];
for i in &v {
println!("{}", i);
}
println!("v still accessible: {:?}", v);
}Mutable iteration
fn main() {
let mut v = vec![1, 2, 3];
for i in &mut v {
*i *= 2; // dereference with *
}
println!("{:?}", v); // [2, 4, 6]
}Methods ที่ใช้บ่อย
fn main() {
let mut v = vec![1, 2, 3, 4, 5];
println!("len: {}", v.len()); // 5
println!("is_empty: {}", v.is_empty()); // false
println!("first: {:?}", v.first()); // Some(1)
println!("last: {:?}", v.last()); // Some(5)
// pop - ลบและ return ตัวสุดท้าย
let last = v.pop();
println!("popped: {:?}", last); // Some(5)
println!("v: {:?}", v); // [1, 2, 3, 4]
// insert - แทรกที่ตำแหน่ง
v.insert(1, 10);
println!("after insert: {:?}", v); // [1, 10, 2, 3, 4]
// remove - ลบที่ตำแหน่ง
let removed = v.remove(1);
println!("removed: {}", removed); // 10
println!("after remove: {:?}", v); // [1, 2, 3, 4]
// contains
println!("contains 3: {}", v.contains(&3)); // true
}Vector กับ Enum
เก็บหลาย types ด้วย enum:
enum SpreadsheetCell {
Int(i32),
Float(f64),
Text(String),
}
fn main() {
let row = vec![
SpreadsheetCell::Int(3),
SpreadsheetCell::Float(10.12),
SpreadsheetCell::Text(String::from("hello")),
];
for cell in &row {
match cell {
SpreadsheetCell::Int(i) => println!("Int: {}", i),
SpreadsheetCell::Float(f) => println!("Float: {}", f),
SpreadsheetCell::Text(s) => println!("Text: {}", s),
}
}
}Ownership และ Vector
fn main() {
let v = vec![1, 2, 3, 4, 5];
let first = &v[0]; // borrow
// v.push(6); // ❌ Error! cannot borrow v as mutable
println!("First: {}", first);
}ทำไม? เพราะ push อาจทำให้ vector ย้ายที่ในเมมโมรี่ ทำให้ reference เดิมไม่ valid
ลองทำดู! 🎯
- สร้าง vector ของเลข 1-10 แล้วคำนวณผลรวม
- สร้าง function ที่รับ
&mut Vec<i32>และกรองเอาเฉพาะเลขคู่ - ใช้ enum เก็บหลาย types ใน vector
สรุป
| Method | คำอธิบาย |
|---|---|
Vec::new() | สร้าง vector ว่าง |
vec![...] | สร้าง vector พร้อมค่า |
push(x) | เพิ่มท้าย |
pop() | ลบท้าย |
v[i] | เข้าถึง (panic ได้) |
v.get(i) | เข้าถึง (ปลอดภัย) |
for x in &v | iterate |
👉 ต่อไป: String
String
String ใน Rust มี 2 แบบหลัก:
| Type | คำอธิบาย |
|---|---|
String | Owned, mutable, heap-allocated |
&str | Borrowed, immutable, slice |
สร้าง String
fn main() {
// จาก string literal
let s1 = String::from("Hello");
let s2 = "Hello".to_string();
// String ว่าง
let s3 = String::new();
// จาก format!
let s4 = format!("Hello, {}!", "World");
println!("{}, {}, {}, {}", s1, s2, s3, s4);
}String vs &str
fn main() {
let s1: String = String::from("Hello"); // owned
let s2: &str = "Hello"; // borrowed (string literal)
let s3: &str = &s1; // borrowed from String
// String -> &str (automatic coercion)
greet(&s1);
greet(s2);
// &str -> String
let s4: String = s2.to_string();
}
fn greet(name: &str) {
println!("Hello, {}!", name);
}แนะนำ: ใช้
&strเป็น parameter, ใช้Stringเมื่อต้อง own ข้อมูล
ต่อ String
push_str และ push
fn main() {
let mut s = String::from("Hello");
s.push_str(", World"); // ต่อ string
s.push('!'); // ต่อ char
println!("{}", s); // Hello, World!
}+ Operator
fn main() {
let s1 = String::from("Hello, ");
let s2 = String::from("World!");
let s3 = s1 + &s2; // s1 ถูก move!
// println!("{}", s1); // ❌ Error: s1 was moved
println!("{}", s2); // ✅ OK
println!("{}", s3); // Hello, World!
}หมายเหตุ:
+รับStringซ้าย และ&strขวา
format! (แนะนำ)
fn main() {
let s1 = String::from("Hello");
let s2 = String::from("World");
// format! ไม่ move อะไรเลย
let s3 = format!("{}, {}!", s1, s2);
println!("{}", s1); // ✅ OK
println!("{}", s2); // ✅ OK
println!("{}", s3); // Hello, World!
}UTF-8 และการ Index
String ใน Rust เป็น UTF-8 → ไม่สามารถ index ด้วย s[0] ได้!
fn main() {
let hello = String::from("สวัสดี");
// let first = hello[0]; // ❌ Error!
// ใช้ slicing ได้ (แต่ระวัง!)
// let first_byte = &hello[0..1]; // 💥 panic! กลาง character
let first_char = &hello[0..3]; // ✅ "ส" (3 bytes)
println!("First char: {}", first_char);
}การวนลูป
fn main() {
let hello = String::from("สวัสดี");
// วนตาม characters
for c in hello.chars() {
println!("{}", c);
}
// วนตาม bytes
for b in hello.bytes() {
println!("{}", b);
}
}Methods ที่ใช้บ่อย
fn main() {
let s = String::from(" Hello, World! ");
// Length
println!("len: {}", s.len()); // 18 (bytes)
println!("chars: {}", s.chars().count()); // 18 (characters)
// trim
println!("trimmed: '{}'", s.trim());
// contains, starts_with, ends_with
println!("contains 'World': {}", s.contains("World"));
// replace
println!("replaced: {}", s.replace("World", "Rust"));
// split
for word in s.trim().split(',') {
println!("word: '{}'", word.trim());
}
// to_uppercase, to_lowercase
println!("upper: {}", s.to_uppercase());
println!("lower: {}", s.to_lowercase());
}ตัวอย่างจริง: Parse และ Format
fn main() {
// Parse string to number
let num_str = "42";
let num: i32 = num_str.parse().expect("Not a number");
println!("Parsed: {}", num);
// Format number to string
let formatted = format!("The answer is {}", num);
println!("{}", formatted);
// Format with padding
let padded = format!("{:0>5}", num); // "00042"
println!("Padded: {}", padded);
}ลองทำดู! 🎯
- สร้าง function ที่นับคำใน string
- สร้าง function ที่ reverse string
- สร้าง function ที่ตรวจสอบว่าเป็น palindrome หรือไม่
สรุป
| แนวคิด | ตัวอย่าง |
|---|---|
| Create | String::from("hello") |
| Append | s.push_str("world") |
| Concat | format!("{}{}", a, b) |
| Iterate | for c in s.chars() |
| Slice | &s[0..5] (ระวัง UTF-8) |
👉 ต่อไป: HashMap
HashMap<K, V>
HashMap เก็บข้อมูลแบบ key-value pairs
สร้าง HashMap
use std::collections::HashMap;
fn main() {
// สร้าง HashMap ว่าง
let mut scores: HashMap<String, i32> = HashMap::new();
// เพิ่มข้อมูล
scores.insert(String::from("Blue"), 10);
scores.insert(String::from("Yellow"), 50);
println!("{:?}", scores);
}หมายเหตุ: ต้อง
use std::collections::HashMap;
สร้างจาก Iterator
use std::collections::HashMap;
fn main() {
let teams = vec![String::from("Blue"), String::from("Yellow")];
let initial_scores = vec![10, 50];
let scores: HashMap<_, _> = teams
.into_iter()
.zip(initial_scores.into_iter())
.collect();
println!("{:?}", scores);
}เข้าถึงข้อมูล
use std::collections::HashMap;
fn main() {
let mut scores = HashMap::new();
scores.insert(String::from("Blue"), 10);
scores.insert(String::from("Yellow"), 50);
// get returns Option<&V>
let team_name = String::from("Blue");
if let Some(score) = scores.get(&team_name) {
println!("Blue score: {}", score);
}
// get_key_value returns Option<(&K, &V)>
if let Some((key, value)) = scores.get_key_value(&team_name) {
println!("{}: {}", key, value);
}
}วนลูป
use std::collections::HashMap;
fn main() {
let mut scores = HashMap::new();
scores.insert(String::from("Blue"), 10);
scores.insert(String::from("Yellow"), 50);
for (key, value) in &scores {
println!("{}: {}", key, value);
}
}Ownership
use std::collections::HashMap;
fn main() {
let field_name = String::from("Color");
let field_value = String::from("Blue");
let mut map = HashMap::new();
map.insert(field_name, field_value);
// field_name และ field_value ถูก move แล้ว!
// println!("{}", field_name); // ❌ Error
}ใช้ references หรือ clone ถ้าต้องการเก็บ:
use std::collections::HashMap;
fn main() {
let field_name = String::from("Color");
let field_value = String::from("Blue");
let mut map = HashMap::new();
map.insert(field_name.clone(), field_value.clone());
println!("{}: {}", field_name, field_value); // ✅ OK
}อัปเดตค่า
Overwrite
use std::collections::HashMap;
fn main() {
let mut scores = HashMap::new();
scores.insert(String::from("Blue"), 10);
scores.insert(String::from("Blue"), 25); // overwrite!
println!("{:?}", scores); // {"Blue": 25}
}Insert ถ้าไม่มี (entry)
use std::collections::HashMap;
fn main() {
let mut scores = HashMap::new();
scores.insert(String::from("Blue"), 10);
// ใส่ค่าเฉพาะเมื่อ key ไม่มี
scores.entry(String::from("Yellow")).or_insert(50);
scores.entry(String::from("Blue")).or_insert(50); // ไม่ทำอะไร
println!("{:?}", scores); // {"Blue": 10, "Yellow": 50}
}อัปเดตตามค่าเดิม
use std::collections::HashMap;
fn main() {
let text = "hello world wonderful world";
let mut map = HashMap::new();
for word in text.split_whitespace() {
let count = map.entry(word).or_insert(0);
*count += 1;
}
println!("{:?}", map);
// {"hello": 1, "world": 2, "wonderful": 1}
}Methods ที่ใช้บ่อย
use std::collections::HashMap;
fn main() {
let mut map = HashMap::new();
map.insert("a", 1);
map.insert("b", 2);
map.insert("c", 3);
println!("len: {}", map.len()); // 3
println!("is_empty: {}", map.is_empty()); // false
println!("contains a: {}", map.contains_key("a")); // true
// remove
let removed = map.remove("a");
println!("removed: {:?}", removed); // Some(1)
// keys, values
for key in map.keys() {
println!("key: {}", key);
}
for value in map.values() {
println!("value: {}", value);
}
// clear
map.clear();
println!("after clear: {:?}", map); // {}
}ตัวอย่างจริง: นับความถี่
use std::collections::HashMap;
fn main() {
let numbers = vec![1, 2, 3, 2, 1, 3, 3, 3, 4, 5];
let mut frequency = HashMap::new();
for num in numbers {
*frequency.entry(num).or_insert(0) += 1;
}
// หาค่าที่มากที่สุด
let (most_common, count) = frequency
.iter()
.max_by_key(|&(_, count)| count)
.unwrap();
println!("Most common: {} ({}x)", most_common, count);
println!("All: {:?}", frequency);
}ลองทำดู! 🎯
- สร้าง phonebook ด้วย
HashMap<String, String> - นับความถี่ของ characters ใน string
- สร้าง group function ที่จัดกลุ่ม items
สรุปบทที่ 8
| Collection | ใช้เมื่อ |
|---|---|
| Vec<T> | รายการลำดับ |
| String | ข้อความ |
| HashMap<K,V> | key-value lookup |
👉 ต่อไป: บทที่ 9: Error Handling
บทที่ 9: Error Handling - การจัดการ Error
Rust มีระบบจัดการ error ที่แข็งแกร่ง แบ่งเป็น 2 ประเภท:
| ประเภท | ใช้เมื่อ |
|---|---|
panic! | Error ร้ายแรง, ไม่สามารถ recover ได้ |
Result<T, E> | Error ที่สามารถจัดการได้ |
สิ่งที่จะได้เรียนรู้
| หัวข้อ | คำอธิบาย |
|---|---|
| panic! | เมื่อไหร่ควรใช้ |
| Result | วิธีจัดการ recoverable errors |
| ? operator | การส่งต่อ error แบบกระชับ |
| Custom Errors | สร้าง error type เอง |
เริ่มกันเลย!
👉 panic!
panic! - Unrecoverable Errors
panic! หยุดโปรแกรมทันทีเมื่อเกิด error ที่จัดการไม่ได้
🚨 Error Handling Decision Tree
+-------------------------------------------------------------------+
| Error Handling in Rust |
+-------------------------------------------------------------------+
| |
| +--------------+ |
| | Error occurs | |
| +------+-------+ |
| | |
| +-----------------+-----------------+ |
| | | |
| v v |
| +---------------+ +---------------+ |
| | Recoverable? | | Unrecoverable | |
| | Can recover | | Cannot recover| |
| +-------+-------+ +-------+-------+ |
| | | |
| v v |
| +---------------+ +---------------+ |
| | Result<T, E> | | panic!() | |
| | | | | |
| | * File not | | * Bug in code | |
| | found | | * Impossible | |
| | * Parse error | | state | |
| | * Network | | * Contract | |
| | timeout | | violation | |
| +---------------+ +---------------+ |
| |
+-------------------------------------------------------------------+
เมื่อไหร่เกิด Panic?
1. เรียก panic! เอง
fn main() {
panic!("crash and burn");
}Output:
thread 'main' panicked at 'crash and burn', src/main.rs:2:5
2. Bug ในโค้ด
fn main() {
let v = vec![1, 2, 3];
v[99]; // 💥 panic! index out of bounds
}Backtrace
ดู backtrace เพื่อหาที่มาของ panic:
RUST_BACKTRACE=1 cargo run
```text
```text
thread 'main' panicked at 'index out of bounds: the len is 3 but the index is 99'
stack backtrace:
0: std::panicking::begin_panic_handler
1: core::panicking::panic_bounds_check
2: <usize as core::slice::SliceIndex<[T]>>::index
3: playground::main
at src/main.rs:3:5
เมื่อไหร่ควรใช้ panic!
✅ ควรใช้
- Prototyping - ตัวอย่างโค้ด, ทดลอง
fn main() {
// ยังไม่ได้ implement
todo!("implement this later");
}- Tests - เมื่อ test fail
#[test]
fn test_something() {
assert_eq!(1, 2); // panic! ถ้าไม่เท่า
}- Unrecoverable situation - สถานการณ์ที่โปรแกรมต้องหยุด
#![allow(unused)]
fn main() {
fn divide(a: i32, b: i32) -> i32 {
if b == 0 {
panic!("Cannot divide by zero!");
}
a / b
}
}- Invalid state - ข้อมูลอยู่ในสถานะที่ไม่ถูกต้อง
#![allow(unused)]
fn main() {
fn process_age(age: i32) {
if age < 0 || age > 150 {
panic!("Invalid age: {}", age);
}
// ...
}
}❌ ไม่ควรใช้
- Expected failures - เช่น file not found, network error
- User input errors - ผู้ใช้พิมพ์ผิด
- Recoverable errors - ลอง retry ได้
Rule of thumb: ถ้าผู้เรียกสามารถ handle error ได้ → ใช้
Result
💡 Best Practices: panic! vs Result
+---------------------------------------------------------+ | Error Handling Choice | +---------------------------------------------------------+ | panic! | Result<T, E> | +-------------------+-------------------------------------+ | * Bug in code | * File not found | | * Invalid state | * Network error | | * Tests | * User input error | | * Prototyping | * Parse error | | * Unrecoverable | * Recoverable errors | +-------------------+-------------------------------------+
unwrap และ expect
unwrap
fn main() {
let x: Option<i32> = Some(5);
let value = x.unwrap(); // ✅ 5
let y: Option<i32> = None;
// let value = y.unwrap(); // 💥 panic!
}expect (ดีกว่า unwrap)
fn main() {
let x: Option<i32> = None;
// ให้ error message ที่ชัดเจน
let value = x.expect("x should have a value");
}Output:
thread 'main' panicked at 'x should have a value', src/main.rs:4:18
unreachable! และ todo!
fn main() {
let level = 5;
let description = match level {
1..=5 => "beginner",
6..=10 => "intermediate",
11..=20 => "advanced",
_ => unreachable!("level should be 1-20"),
};
// ยังไม่ได้ implement
todo!("add more logic here");
}ตัวอย่างจริง: Assertion
fn set_age(age: u32) {
assert!(age <= 150, "Age {} is unrealistic", age);
println!("Age set to {}", age);
}
fn main() {
set_age(25); // ✅ OK
set_age(200); // 💥 panic!
}ลองทำดู! 🎯
- สร้าง function ที่ panic เมื่อได้รับค่าลบ
- ใช้ expect แทน unwrap และให้ error message ที่ดี
- ลองเปิด RUST_BACKTRACE=1 ดู backtrace
สรุป
| Macro | ใช้เมื่อ |
|---|---|
panic!("msg") | Error ร้ายแรง |
unreachable!() | โค้ดที่ไม่ควรถูกเรียก |
todo!() | ยังไม่ได้ implement |
assert!(cond) | ตรวจสอบเงื่อนไข |
👉 ต่อไป: Result<T, E>
Result<T, E>
Result ใช้จัดการ recoverable errors - error ที่สามารถ handle ได้
นิยาม
#![allow(unused)]
fn main() {
enum Result<T, E> {
Ok(T), // สำเร็จ มีค่า T
Err(E), // ล้มเหลว มี error E
}
}ตัวอย่างพื้นฐาน
use std::fs::File;
fn main() {
let result = File::open("hello.txt");
let file = match result {
Ok(file) => file,
Err(error) => {
panic!("Failed to open file: {:?}", error);
}
};
println!("File opened: {:?}", file);
}จัดการหลายประเภท Error
use std::fs::File;
use std::io::ErrorKind;
fn main() {
let result = File::open("hello.txt");
let file = match result {
Ok(file) => file,
Err(error) => match error.kind() {
ErrorKind::NotFound => {
// สร้างไฟล์ใหม่ถ้าไม่มี
match File::create("hello.txt") {
Ok(fc) => fc,
Err(e) => panic!("Cannot create file: {:?}", e),
}
}
other_error => {
panic!("Cannot open file: {:?}", other_error);
}
},
};
println!("File: {:?}", file);
}Shortcuts: unwrap และ expect
unwrap
use std::fs::File;
fn main() {
// panic ถ้า error
let file = File::open("hello.txt").unwrap();
}expect (แนะนำ)
use std::fs::File;
fn main() {
// panic พร้อม message
let file = File::open("hello.txt")
.expect("Failed to open hello.txt");
}Methods ที่ใช้บ่อย
fn main() {
let ok_result: Result<i32, &str> = Ok(42);
let err_result: Result<i32, &str> = Err("error");
// is_ok, is_err
println!("ok is_ok: {}", ok_result.is_ok()); // true
println!("err is_err: {}", err_result.is_err()); // true
// unwrap_or
println!("ok: {}", ok_result.unwrap_or(0)); // 42
println!("err: {}", err_result.unwrap_or(0)); // 0
// unwrap_or_else
let value = err_result.unwrap_or_else(|e| {
println!("Error was: {}", e);
-1
});
println!("value: {}", value); // -1
// map - transform Ok value
let doubled = ok_result.map(|x| x * 2);
println!("doubled: {:?}", doubled); // Ok(84)
// map_err - transform Err value
let new_err = err_result.map_err(|e| format!("Error: {}", e));
println!("new_err: {:?}", new_err); // Err("Error: error")
}ok() และ err()
แปลง Result เป็น Option:
fn main() {
let ok_result: Result<i32, &str> = Ok(42);
let err_result: Result<i32, &str> = Err("error");
// ok() -> Option<T>
println!("{:?}", ok_result.ok()); // Some(42)
println!("{:?}", err_result.ok()); // None
// err() -> Option<E>
println!("{:?}", ok_result.err()); // None
println!("{:?}", err_result.err()); // Some("error")
}and_then (Chaining)
fn square(x: i32) -> Result<i32, &'static str> {
if x > 100 {
Err("Too large to square")
} else {
Ok(x * x)
}
}
fn main() {
let result = Ok(5)
.and_then(square) // Ok(25)
.and_then(square); // Ok(625)
println!("{:?}", result); // Ok(625)
let result2 = Ok(50)
.and_then(square) // Ok(2500)
.and_then(square); // Err("Too large to square")
println!("{:?}", result2);
}ตัวอย่างจริง: Parse Number
fn parse_and_double(s: &str) -> Result<i32, std::num::ParseIntError> {
let n: i32 = s.parse()?;
Ok(n * 2)
}
fn main() {
match parse_and_double("42") {
Ok(n) => println!("Result: {}", n),
Err(e) => println!("Error: {}", e),
}
match parse_and_double("abc") {
Ok(n) => println!("Result: {}", n),
Err(e) => println!("Error: {}", e),
}
}ลองทำดู! 🎯
- เขียน function
divide(a, b) -> Result<f64, String>ที่ return Err เมื่อ b = 0 - ใช้
and_thenเพื่อ chain หลาย operations - แปลง string เป็น number แล้วบวกเลขสองตัว
สรุป
| Method | คำอธิบาย |
|---|---|
unwrap() | ดึงค่า หรือ panic |
expect(msg) | ดึงค่า หรือ panic พร้อม message |
unwrap_or(default) | ดึงค่า หรือใช้ default |
map(f) | แปลง Ok value |
and_then(f) | Chain operations |
ok() | แปลงเป็น Option |
👉 ต่อไป: การส่งต่อ Error
การส่งต่อ Error (Propagating Errors)
เมื่อ function เจอ error อาจต้องการส่งต่อให้ caller จัดการ
วิธีดั้งเดิม: match
use std::fs::File;
use std::io::{self, Read};
fn read_username_from_file() -> Result<String, io::Error> {
let file_result = File::open("username.txt");
let mut file = match file_result {
Ok(file) => file,
Err(e) => return Err(e), // ส่งต่อ error
};
let mut username = String::new();
match file.read_to_string(&mut username) {
Ok(_) => Ok(username),
Err(e) => Err(e), // ส่งต่อ error
}
}ยาวไป! 😩
? Operator
? ทำให้โค้ดสั้นลง:
use std::fs::File;
use std::io::{self, Read};
fn read_username_from_file() -> Result<String, io::Error> {
let mut file = File::open("username.txt")?; // ส่งต่อถ้า Err
let mut username = String::new();
file.read_to_string(&mut username)?; // ส่งต่อถ้า Err
Ok(username)
}? ทำงานอย่างไร
let file = File::open("file.txt")?;เทียบเท่ากับ:
let file = match File::open("file.txt") {
Ok(f) => f,
Err(e) => return Err(e.into()), // แปลง error type ด้วย
};Chain ?
use std::fs::File;
use std::io::{self, Read};
fn read_username_from_file() -> Result<String, io::Error> {
let mut username = String::new();
File::open("username.txt")?.read_to_string(&mut username)?;
Ok(username)
}หรือสั้นกว่านี้:
use std::fs;
fn read_username_from_file() -> Result<String, String> {
fs::read_to_string("username.txt")
.map_err(|e| e.to_string())
}? กับ Option
ใช้ ? กับ Option ได้ด้วย:
fn last_char_of_first_line(text: &str) -> Option<char> {
text.lines().next()?.chars().last()
}
fn main() {
println!("{:?}", last_char_of_first_line("Hello\nWorld")); // Some('o')
println!("{:?}", last_char_of_first_line("")); // None
}? ใน main()
use std::fs::File;
use std::io;
fn main() -> Result<(), io::Error> {
let _file = File::open("hello.txt")?;
Ok(())
}Error Conversion
? เรียก From::from() อัตโนมัติเพื่อแปลง error types:
use std::fs::File;
use std::io::{self, Read};
fn read_number_from_file() -> Result<i32, Box<dyn std::error::Error>> {
let mut file = File::open("number.txt")?; // io::Error -> Box<dyn Error>
let mut content = String::new();
file.read_to_string(&mut content)?; // io::Error -> Box<dyn Error>
let number: i32 = content.trim().parse()?; // ParseIntError -> Box<dyn Error>
Ok(number)
}ตัวอย่างจริง: API Call
use std::fs;
fn get_config_value(key: &str) -> Result<String, String> {
let content = fs::read_to_string("config.txt")
.map_err(|e| format!("Cannot read config: {}", e))?;
for line in content.lines() {
let parts: Vec<&str> = line.split('=').collect();
if parts.len() == 2 && parts[0].trim() == key {
return Ok(parts[1].trim().to_string());
}
}
Err(format!("Key '{}' not found", key))
}
fn main() {
match get_config_value("database_url") {
Ok(value) => println!("Found: {}", value),
Err(e) => println!("Error: {}", e),
}
}Early Return Pattern
fn process_data(data: &str) -> Result<String, &'static str> {
if data.is_empty() {
return Err("Data is empty");
}
let trimmed = data.trim();
if trimmed.len() < 3 {
return Err("Data too short");
}
Ok(trimmed.to_uppercase())
}
fn main() {
println!("{:?}", process_data(" hello ")); // Ok("HELLO")
println!("{:?}", process_data("")); // Err("Data is empty")
println!("{:?}", process_data("ab")); // Err("Data too short")
}ลองทำดู! 🎯
- เขียน function ที่อ่านไฟล์และ parse เป็น JSON (ใช้ ?)
- Chain หลาย
?ในบรรทัดเดียว - สร้าง function ที่ return
Result<T, Box<dyn Error>>
สรุป
| แนวคิด | ตัวอย่าง |
|---|---|
| ? operator | file.read()? |
| Chain ? | File::open(path)?.read()? |
| ? กับ Option | iter.next()? |
| main Result | fn main() -> Result<(), E> |
👉 ต่อไป: Custom Error Types
Custom Error Types
สร้าง error types เองเพื่อให้มีข้อมูลมากขึ้นและจัดการได้ดีขึ้น
Simple String Error
fn divide(a: f64, b: f64) -> Result<f64, String> {
if b == 0.0 {
Err(String::from("Cannot divide by zero"))
} else {
Ok(a / b)
}
}
fn main() {
match divide(10.0, 0.0) {
Ok(result) => println!("Result: {}", result),
Err(e) => println!("Error: {}", e),
}
}Enum Error Type
#[derive(Debug)]
enum MathError {
DivisionByZero,
NegativeSquareRoot,
Overflow,
}
fn divide(a: f64, b: f64) -> Result<f64, MathError> {
if b == 0.0 {
Err(MathError::DivisionByZero)
} else {
Ok(a / b)
}
}
fn sqrt(x: f64) -> Result<f64, MathError> {
if x < 0.0 {
Err(MathError::NegativeSquareRoot)
} else {
Ok(x.sqrt())
}
}
fn main() {
match divide(10.0, 0.0) {
Ok(result) => println!("Result: {}", result),
Err(MathError::DivisionByZero) => println!("Cannot divide by zero!"),
Err(e) => println!("Other error: {:?}", e),
}
}Implement Display และ Error
use std::fmt;
use std::error::Error;
#[derive(Debug)]
enum AppError {
NotFound(String),
InvalidInput(String),
DatabaseError(String),
}
impl fmt::Display for AppError {
fn fmt(&self, f: &mut fmt::Formatter) -> fmt::Result {
match self {
AppError::NotFound(item) => write!(f, "{} not found", item),
AppError::InvalidInput(msg) => write!(f, "Invalid input: {}", msg),
AppError::DatabaseError(msg) => write!(f, "Database error: {}", msg),
}
}
}
impl Error for AppError {}
fn find_user(id: u32) -> Result<String, AppError> {
if id == 0 {
Err(AppError::InvalidInput("ID cannot be 0".to_string()))
} else if id > 100 {
Err(AppError::NotFound(format!("User {}", id)))
} else {
Ok(format!("User_{}", id))
}
}
fn main() {
match find_user(0) {
Ok(user) => println!("Found: {}", user),
Err(e) => println!("Error: {}", e),
}
match find_user(150) {
Ok(user) => println!("Found: {}", user),
Err(e) => println!("Error: {}", e),
}
}From Trait สำหรับ Error Conversion
use std::io;
use std::num::ParseIntError;
use std::fmt;
use std::error::Error;
#[derive(Debug)]
enum MyError {
Io(io::Error),
Parse(ParseIntError),
Custom(String),
}
impl fmt::Display for MyError {
fn fmt(&self, f: &mut fmt::Formatter) -> fmt::Result {
match self {
MyError::Io(e) => write!(f, "IO error: {}", e),
MyError::Parse(e) => write!(f, "Parse error: {}", e),
MyError::Custom(msg) => write!(f, "{}", msg),
}
}
}
impl Error for MyError {}
// ทำให้ใช้ ? ได้
impl From<io::Error> for MyError {
fn from(err: io::Error) -> MyError {
MyError::Io(err)
}
}
impl From<ParseIntError> for MyError {
fn from(err: ParseIntError) -> MyError {
MyError::Parse(err)
}
}
fn read_number_from_file(path: &str) -> Result<i32, MyError> {
let content = std::fs::read_to_string(path)?; // io::Error -> MyError
let number: i32 = content.trim().parse()?; // ParseIntError -> MyError
Ok(number)
}ใช้ thiserror Crate (แนะนำ)
# Cargo.toml
[dependencies]
thiserror = "1.0"
use thiserror::Error;
#[derive(Error, Debug)]
enum AppError {
#[error("User {0} not found")]
NotFound(String),
#[error("Invalid input: {0}")]
InvalidInput(String),
#[error("IO error")]
Io(#[from] std::io::Error),
#[error("Parse error")]
Parse(#[from] std::num::ParseIntError),
}
fn process() -> Result<i32, AppError> {
let content = std::fs::read_to_string("number.txt")?;
let num: i32 = content.trim().parse()?;
Ok(num)
}ใช้ anyhow สำหรับ Applications
# Cargo.toml
[dependencies]
anyhow = "1.0"
use anyhow::{Context, Result};
fn read_config() -> Result<String> {
let content = std::fs::read_to_string("config.txt")
.context("Failed to read config file")?;
Ok(content)
}
fn main() -> Result<()> {
let config = read_config()?;
println!("Config: {}", config);
Ok(())
}Best Practices
| Library | ใช้เมื่อ |
|---|---|
| Custom enum | ต้องการ match error types |
| thiserror | เขียน library |
| anyhow | เขียน application |
ลองทำดู! 🎯
- สร้าง custom error enum สำหรับ HTTP status codes
- Implement From สำหรับ convert ระหว่าง error types
- ลองใช้ thiserror หรือ anyhow
สรุปบทที่ 9
| แนวคิด | ใช้เมื่อ |
|---|---|
| panic! | Unrecoverable errors |
| Result | Recoverable errors |
| ? operator | Propagate errors |
| Custom errors | ต้องการ specific error types |
👉 ต่อไป: บทที่ 10: Generics, Traits & Lifetimes
บทที่ 10: Generics, Traits & Lifetimes
บทนี้ครอบคลุม 3 หัวข้อสำคัญที่ทำให้ Rust ทรงพลัง
สิ่งที่จะได้เรียนรู้
| หัวข้อ | คำอธิบาย |
|---|---|
| Generics | เขียนโค้ดที่ใช้ได้กับหลาย types |
| Traits | กำหนด behavior ที่ types ต้องมี |
| Lifetimes | ระบุอายุของ references |
เริ่มกันเลย!
👉 Generics
Generics
Generics ช่วยให้เขียนโค้ดที่ใช้ได้กับหลาย types โดยไม่ต้องเขียนซ้ำ
ปัญหา: Code Duplication
fn largest_i32(list: &[i32]) -> i32 {
let mut largest = list[0];
for &item in list {
if item > largest {
largest = item;
}
}
largest
}
fn largest_char(list: &[char]) -> char {
let mut largest = list[0];
for &item in list {
if item > largest {
largest = item;
}
}
largest
}โค้ดเหมือนกัน แต่ต่างแค่ type!
Generic Functions
fn largest<T: PartialOrd + Copy>(list: &[T]) -> T {
let mut largest = list[0];
for &item in list {
if item > largest {
largest = item;
}
}
largest
}
fn main() {
let numbers = vec![34, 50, 25, 100, 65];
println!("Largest number: {}", largest(&numbers));
let chars = vec!['y', 'm', 'a', 'q'];
println!("Largest char: {}", largest(&chars));
}Syntax
fn function_name<T>(param: T) -> T {
// ...
}
// Multiple type parameters
fn pair<T, U>(first: T, second: U) -> (T, U) {
(first, second)
}Generic Structs
struct Point<T> {
x: T,
y: T,
}
fn main() {
let integer_point = Point { x: 5, y: 10 };
let float_point = Point { x: 1.0, y: 4.0 };
// ❌ Error: x และ y ต้องเป็น type เดียวกัน
// let mixed = Point { x: 5, y: 4.0 };
}หลาย Type Parameters
struct Point<T, U> {
x: T,
y: U,
}
fn main() {
let integer = Point { x: 5, y: 10 };
let float = Point { x: 1.0, y: 4.0 };
let mixed = Point { x: 5, y: 4.0 }; // ✅ OK
}Generic Methods
struct Point<T> {
x: T,
y: T,
}
impl<T> Point<T> {
fn x(&self) -> &T {
&self.x
}
fn y(&self) -> &T {
&self.y
}
}
fn main() {
let p = Point { x: 5, y: 10 };
println!("x = {}", p.x());
}Methods สำหรับ Specific Type
impl Point<f32> {
fn distance_from_origin(&self) -> f32 {
(self.x.powi(2) + self.y.powi(2)).sqrt()
}
}
fn main() {
let p = Point { x: 3.0_f32, y: 4.0_f32 };
println!("Distance: {}", p.distance_from_origin()); // 5.0
let p2 = Point { x: 3, y: 4 };
// p2.distance_from_origin(); // ❌ Error: not available for Point<i32>
}Mix Type Parameters
struct Point<X1, Y1> {
x: X1,
y: Y1,
}
impl<X1, Y1> Point<X1, Y1> {
fn mixup<X2, Y2>(self, other: Point<X2, Y2>) -> Point<X1, Y2> {
Point {
x: self.x,
y: other.y,
}
}
}
fn main() {
let p1 = Point { x: 5, y: 10.4 };
let p2 = Point { x: "Hello", y: 'c' };
let p3 = p1.mixup(p2);
println!("p3.x = {}, p3.y = {}", p3.x, p3.y);
// Output: p3.x = 5, p3.y = c
}Generic Enums
Standard library ใช้ generics มากมาย:
#![allow(unused)]
fn main() {
enum Option<T> {
Some(T),
None,
}
enum Result<T, E> {
Ok(T),
Err(E),
}
}สร้าง Generic Enum เอง
enum Either<L, R> {
Left(L),
Right(R),
}
fn main() {
let a: Either<i32, String> = Either::Left(42);
let b: Either<i32, String> = Either::Right(String::from("hello"));
}Monomorphization
Rust compiles generics เป็น specific types ตอน compile time:
// เราเขียน:
fn id<T>(x: T) -> T { x }
fn main() {
id(5);
id("hello");
}
// Compiler สร้าง:
fn id_i32(x: i32) -> i32 { x }
fn id_str(x: &str) -> &str { x }ผลลัพธ์: zero runtime cost! เหมือนเขียนแยกเอง
ตัวอย่างจริง: Container
struct Stack<T> {
items: Vec<T>,
}
impl<T> Stack<T> {
fn new() -> Self {
Stack { items: Vec::new() }
}
fn push(&mut self, item: T) {
self.items.push(item);
}
fn pop(&mut self) -> Option<T> {
self.items.pop()
}
fn is_empty(&self) -> bool {
self.items.is_empty()
}
fn len(&self) -> usize {
self.items.len()
}
}
fn main() {
let mut stack = Stack::new();
stack.push(1);
stack.push(2);
stack.push(3);
while let Some(item) = stack.pop() {
println!("{}", item);
}
// Output: 3, 2, 1
}Default Type Parameters
#![allow(unused)]
fn main() {
use std::ops::Add;
// Add trait มี default type parameter
// trait Add<Rhs = Self> { ... }
struct Point {
x: i32,
y: i32,
}
impl Add for Point {
type Output = Point;
fn add(self, other: Point) -> Point {
Point {
x: self.x + other.x,
y: self.y + other.y,
}
}
}
}ลองทำดู! 🎯
- สร้าง generic struct
Pair<T>ที่มี first และ second - เพิ่ม method
swap()ที่สลับ first และ second - สร้าง generic function ที่หาค่า min จาก slice
สรุป
| แนวคิด | Syntax |
|---|---|
| Function | fn name<T>(arg: T) |
| Struct | struct Name<T> { field: T } |
| Enum | enum Name<T> { Variant(T) } |
| impl | impl<T> Name<T> { ... } |
| Specific impl | impl Name<f32> { ... } |
| Multiple | <T, U, V> |
ข้อดี
- ✅ ไม่ต้องเขียนโค้ดซ้ำ
- ✅ Type-safe
- ✅ Zero runtime cost (monomorphization)
👉 ต่อไป: Traits
Traits
Traits กำหนด behavior ที่ types ต้องมี คล้าย interfaces ในภาษาอื่น
นิยาม Trait
trait Summary {
fn summarize(&self) -> String;
}Implement Trait
trait Summary {
fn summarize(&self) -> String;
}
struct Article {
title: String,
author: String,
content: String,
}
impl Summary for Article {
fn summarize(&self) -> String {
format!("{} by {}", self.title, self.author)
}
}
struct Tweet {
username: String,
content: String,
}
impl Summary for Tweet {
fn summarize(&self) -> String {
format!("@{}: {}", self.username, self.content)
}
}
fn main() {
let article = Article {
title: String::from("Rust is great"),
author: String::from("Alice"),
content: String::from("..."),
};
println!("{}", article.summarize());
}Default Implementation
trait Summary {
fn summarize(&self) -> String {
String::from("(Read more...)")
}
}
struct Article {
title: String,
}
impl Summary for Article {} // ใช้ default
fn main() {
let article = Article { title: String::from("News") };
println!("{}", article.summarize()); // (Read more...)
}Traits as Parameters
fn notify(item: &impl Summary) {
println!("Breaking news! {}", item.summarize());
}
// หรือใช้ trait bound syntax
fn notify2<T: Summary>(item: &T) {
println!("Breaking news! {}", item.summarize());
}Derive Attribute
#[derive(Debug, Clone, PartialEq)]
struct Point {
x: i32,
y: i32,
}
fn main() {
let p1 = Point { x: 1, y: 2 };
let p2 = p1.clone();
println!("{:?}", p1);
println!("Equal: {}", p1 == p2);
}Common derives: Debug, Clone, Copy, PartialEq, Eq, Hash, Default
สรุป
| แนวคิด | Syntax |
|---|---|
| Define | trait Name { fn method(&self); } |
| Implement | impl Trait for Type { ... } |
| Parameter | fn func(item: &impl Trait) |
| Derive | #[derive(Debug, Clone)] |
👉 ต่อไป: Trait Bounds
Trait Bounds
Trait Bounds จำกัดว่า generic type ต้องมี traits อะไรบ้าง
Basic Syntax
fn print_summary<T: Summary>(item: &T) {
println!("{}", item.summarize());
}
// หรือ impl syntax
fn print_summary2(item: &impl Summary) {
println!("{}", item.summarize());
}Multiple Trait Bounds
fn notify<T: Summary + Display>(item: &T) {
println!("Summary: {}", item.summarize());
println!("Display: {}", item);
}
// impl syntax
fn notify2(item: &(impl Summary + Display)) {
// ...
}Where Clause
อ่านง่ายกว่าเมื่อมีหลาย bounds:
fn some_function<T, U>(t: &T, u: &U) -> i32
where
T: Display + Clone,
U: Clone + Debug,
{
// ...
0
}Return Trait
fn get_summarizable() -> impl Summary {
Tweet {
username: String::from("user"),
content: String::from("hello"),
}
}หมายเหตุ: สามารถ return ได้แค่ type เดียว
Conditionally Implement Methods
#![allow(unused)]
fn main() {
use std::fmt::Display;
struct Pair<T> {
x: T,
y: T,
}
impl<T> Pair<T> {
fn new(x: T, y: T) -> Self {
Self { x, y }
}
}
// Methods only for types with Display + PartialOrd
impl<T: Display + PartialOrd> Pair<T> {
fn cmp_display(&self) {
if self.x >= self.y {
println!("Larger: {}", self.x);
} else {
println!("Larger: {}", self.y);
}
}
}
}สรุป
| Syntax | ตัวอย่าง |
|---|---|
| Single bound | T: Display |
| Multiple | T: Display + Clone |
| Where | where T: Display |
| Return | -> impl Trait |
👉 ต่อไป: Lifetimes
Lifetimes
Lifetimes บอก compiler ว่า references มีอายุนานเท่าไหร่ ป้องกัน dangling references
⚠️ คำเตือน: Lifetime เป็นหัวข้อที่ยากที่สุดใน Rust
- ❌ อย่าใช้
'staticเพื่อแก้ทุก error- ❌ อย่าเดา lifetime แบบสุ่ม
- ✅ เข้าใจปัญหาก่อนแก้
- ✅ ใช้ owned types (String แทน &str) เมื่อสงสัย
📋 Lifetime Cheatsheet
| สถานการณ์ | ต้องใส่ Lifetime? | ตัวอย่าง |
|---|---|---|
| Return reference จาก function | ✅ ใช่ | fn foo<'a>(x: &'a str) -> &'a str |
| 1 input reference | ❌ ไม่ต้อง (elision) | fn foo(x: &str) -> &str |
Method with &self | ❌ ไม่ต้อง (elision) | fn bar(&self) -> &str |
| Struct เก็บ reference | ✅ ใช่ | struct Foo<'a> { x: &'a str } |
| Static string | ❌ ไม่ต้อง | let s: &'static str = "hello" |
🧠 Mental Model
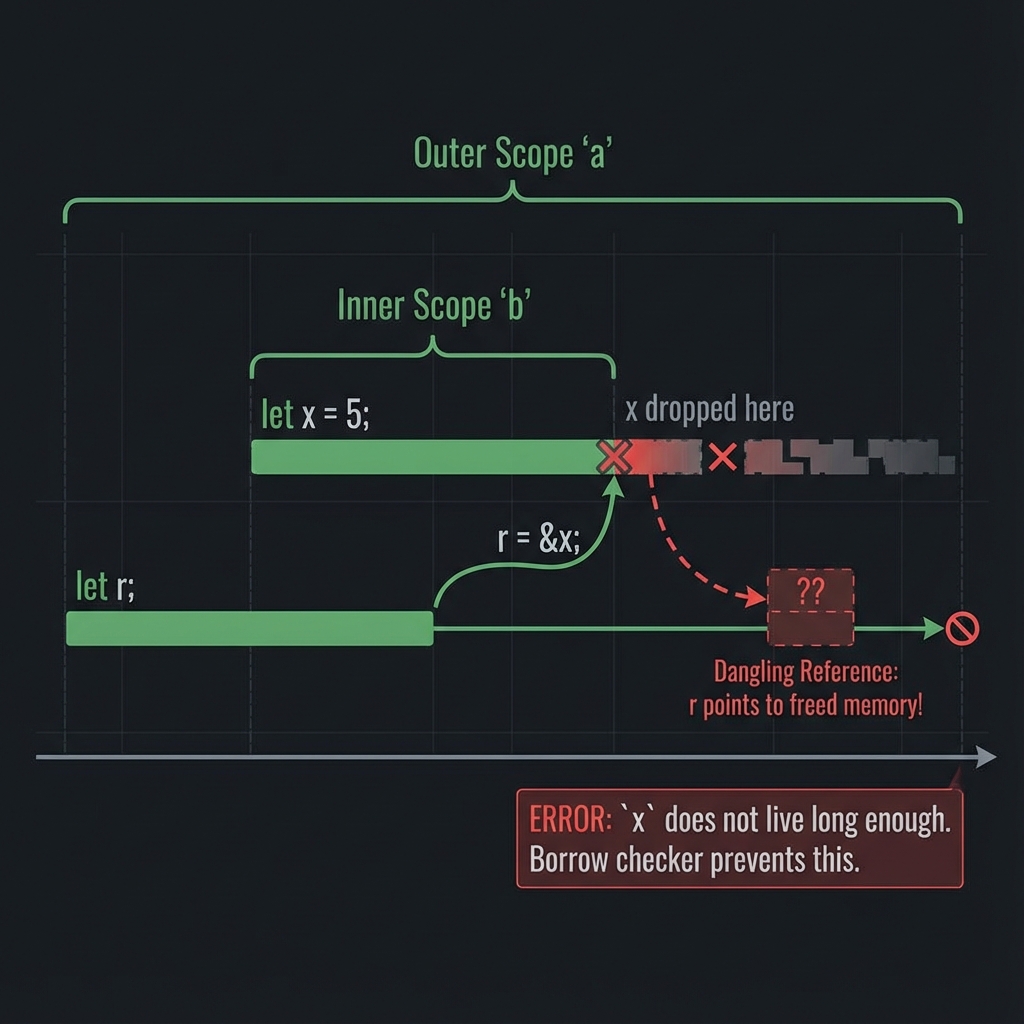
🔧 Common Patterns
1. Input → Output (ใช้ lifetime เดียวกัน)
fn get_first<'a>(list: &'a [i32]) -> &'a i32
2. Struct เก็บ reference
struct Parser<'a> { input: &'a str }
3. Multiple lifetimes (แยกคนละช่วง)
fn foo<'a, 'b>(x: &'a str, y: &'b str) -> &'a str
4. 'static (อยู่ตลอดโปรแกรม)
const MSG: &'static str = "Hello";
ปัญหา: Dangling Reference
fn main() {
let r; // declare r
{
let x = 5;
r = &x; // ❌ x จะหายเมื่อออกจาก scope
}
// println!("{}", r); // Error! r points to invalid memory
}+---------------------------------------------------------+
| Dangling Reference |
+---------------------------------------------------------+
| |
| let r; ---------+ |
| { | |
| let x = 5; <--+ r points to x |
| r = &x; |
| } <-- x dropped here! |
| |
| r -> invalid memory |
| |
+---------------------------------------------------------+
Rust compiler จะ reject โค้ดนี้เพราะ x ไม่อยู่แล้วเมื่อใช้ r
Lifetime Syntax
&i32 // reference
&'a i32 // reference with explicit lifetime 'a
&'a mut i32 // mutable reference with lifetime 'a
'a (อ่านว่า “tick a”) คือ lifetime parameter บอกว่า reference มีอายุเท่าไหร่
Lifetime ใน Functions
ปัญหา: Compiler ไม่รู้ว่า return อะไร
#![allow(unused)]
fn main() {
// ❌ Error: missing lifetime specifier
fn longest(x: &str, y: &str) -> &str {
if x.len() > y.len() {
x
} else {
y
}
}
}Compiler ไม่รู้ว่า return value จะอยู่นานเท่า x หรือ y
ทางแก้: Lifetime Annotations
fn longest<'a>(x: &'a str, y: &'a str) -> &'a str {
if x.len() > y.len() {
x
} else {
y
}
}
fn main() {
let string1 = String::from("long string is long");
let string2 = String::from("xyz");
let result = longest(&string1, &string2);
println!("Longest: {}", result);
}ความหมาย: Return value จะมีอายุเท่ากับ lifetime ที่สั้นกว่าระหว่าง x และ y
Lifetime กับ Scope
fn main() {
let string1 = String::from("long string is long");
{
let string2 = String::from("xyz");
let result = longest(&string1, &string2);
println!("Longest: {}", result); // ✅ OK
}
// println!("{}", result); // ❌ result ไม่มีแล้ว
}
fn longest<'a>(x: &'a str, y: &'a str) -> &'a str {
if x.len() > y.len() { x } else { y }
}Lifetime Elision Rules
Compiler มีกฎ 3 ข้อที่เดา lifetime ให้อัตโนมัติ:
Rule 1: Input Lifetimes
แต่ละ reference parameter ได้ lifetime ของตัวเอง:
fn foo(x: &i32) // -> fn foo<'a>(x: &'a i32)
fn foo(x: &i32, y: &i32) // -> fn foo<'a, 'b>(x: &'a i32, y: &'b i32)Rule 2: Single Input → Output
ถ้ามี input lifetime เดียว ใช้กับ output ทั้งหมด:
fn foo(x: &i32) -> &i32 // -> fn foo<'a>(x: &'a i32) -> &'a i32Rule 3: Methods with &self
ถ้ามี &self หรือ &mut self ใช้ lifetime ของ self กับ output:
impl Foo {
fn bar(&self, x: &str) -> &str // -> fn bar<'a, 'b>(&'a self, x: &'b str) -> &'a str
}ถ้ากฎทั้งหมดไม่เพียงพอ → Compiler error → ต้องใส่ lifetime เอง
ตัวอย่าง: เมื่อต้องใส่ Lifetime
#![allow(unused)]
fn main() {
// ✅ Elision works - Rule 2
fn first_word(s: &str) -> &str {
let bytes = s.as_bytes();
for (i, &item) in bytes.iter().enumerate() {
if item == b' ' {
return &s[0..i];
}
}
&s[..]
}
// ❌ Elision fails - must annotate
fn longest<'a>(x: &'a str, y: &'a str) -> &'a str {
if x.len() > y.len() { x } else { y }
}
}Lifetime ใน Structs
Struct ที่มี references ต้องมี lifetime annotation:
struct ImportantExcerpt<'a> {
part: &'a str,
}
fn main() {
let novel = String::from("Call me Ishmael. Some years ago...");
let first_sentence = novel.split('.').next().unwrap();
let excerpt = ImportantExcerpt {
part: first_sentence,
};
println!("{}", excerpt.part);
}
// excerpt ต้องไม่อยู่นานกว่า novelMethods on Structs with Lifetimes
impl<'a> ImportantExcerpt<'a> {
fn level(&self) -> i32 {
3
}
// Rule 3 applies: return lifetime = self lifetime
fn announce_and_return_part(&self, announcement: &str) -> &str {
println!("Attention: {}", announcement);
self.part
}
}’static Lifetime
'static หมายถึง reference อยู่ได้ตลอดโปรแกรม:
#![allow(unused)]
fn main() {
let s: &'static str = "I have a static lifetime.";
}String literals ทั้งหมดมี 'static lifetime เพราะเก็บใน binary
ระวัง!
อย่าใช้ 'static เพื่อ “แก้” lifetime errors โดยไม่เข้าใจ:
#![allow(unused)]
fn main() {
// ❌ Bad: ใช้ 'static แบบผิดๆ
fn get_str() -> &'static str {
let s = String::from("hello");
&s // ❌ s จะถูก drop!
}
// ✅ Good: return owned String
fn get_str_good() -> String {
String::from("hello")
}
}Multiple Lifetimes
บางครั้งต้องใช้หลาย lifetimes:
#![allow(unused)]
fn main() {
fn longest_with_announcement<'a, 'b>(
x: &'a str,
y: &'a str,
ann: &'b str,
) -> &'a str {
println!("Announcement: {}", ann);
if x.len() > y.len() { x } else { y }
}
}Lifetime Bounds
ใช้กับ generics:
#![allow(unused)]
fn main() {
fn longest_with_trait<'a, T>(x: &'a str, y: &'a str, ann: T) -> &'a str
where
T: std::fmt::Display,
{
println!("Announcement: {}", ann);
if x.len() > y.len() { x } else { y }
}
}ลองทำดู! 🎯
- เขียน struct ที่มี lifetime annotation
- เขียน function ที่ต้องใส่ lifetime
- ลองตัด lifetime ออกและดู compiler error
สรุป
| แนวคิด | ตัวอย่าง |
|---|---|
| Annotation | &'a str |
| Function | fn foo<'a>(x: &'a str) -> &'a str |
| Struct | struct Foo<'a> { x: &'a str } |
| ’static | อายุตลอดโปรแกรม |
| Elision | Compiler เดาให้ |
กฎ Elision
- แต่ละ input ได้ lifetime ตัวเอง
- input เดียว → ใช้กับ output
&self→ output ใช้ lifetime ของ self
👉 ต่อไป: บทที่ 11: Modules & Packages
บทที่ 11: Modules & Packages
จัดระเบียบโค้ดเป็น modules และ packages
สิ่งที่จะได้เรียนรู้
| หัวข้อ | คำอธิบาย |
|---|---|
| Packages & Crates | หน่วยใหญ่ของโค้ด |
| Modules | จัดกลุ่มโค้ด |
| Paths | เข้าถึง items |
| แยกไฟล์ | โครงสร้างโปรเจกต์ใหญ่ |
Packages & Crates
Crate
Crate คือหน่วยการ compile ที่เล็กที่สุด มี 2 แบบ:
- Binary crate - โปรแกรมที่รันได้ (มี
main) - Library crate - โค้ดที่ใช้ร่วมกัน (ไม่มี
main)
📦 Package Structure Visualization
+-------------------------------------------------------------------+
| Rust Package Hierarchy |
+-------------------------------------------------------------------+
| |
| Package (Cargo.toml) |
| +-- Binary Crate (src/main.rs) <--- executable |
| | +-- mod auth |
| | +-- mod database |
| | +-- mod routes |
| | |
| +-- Library Crate (src/lib.rs) <--- shared code |
| +-- pub mod models |
| +-- pub mod utils |
| +-- pub mod errors |
| |
+-------------------------------------------------------------------+
| Dependencies (Cargo.toml) |
| +-- serde = "1.0" <--- External crates |
| +-- tokio = { version = "1", features = ["full"] } |
| +-- rand = "0.8" |
| |
+-------------------------------------------------------------------+
Package
Package = collection ของ crates พร้อม Cargo.toml
my-package/
├── Cargo.toml
├── src/
│ ├── main.rs # binary crate root
│ └── lib.rs # library crate root (optional)
└── src/bin/ # additional binaries
└── another.rs
สร้าง Package
# Binary package
cargo new my-app
# Library package
cargo new my-lib --lib
Cargo.toml
[package]
name = "my-app"
version = "0.1.0"
edition = "2024"
[dependencies]
rand = "0.8"
serde = { version = "1.0", features = ["derive"] }
👉 ต่อไป: Modules
Modules
Modules จัดกลุ่มโค้ดและควบคุม privacy เป็นพื้นฐานของการจัดโครงสร้างโปรเจกต์ใน Rust
Module Tree
โปรเจกต์ Rust มีโครงสร้างเป็น tree:
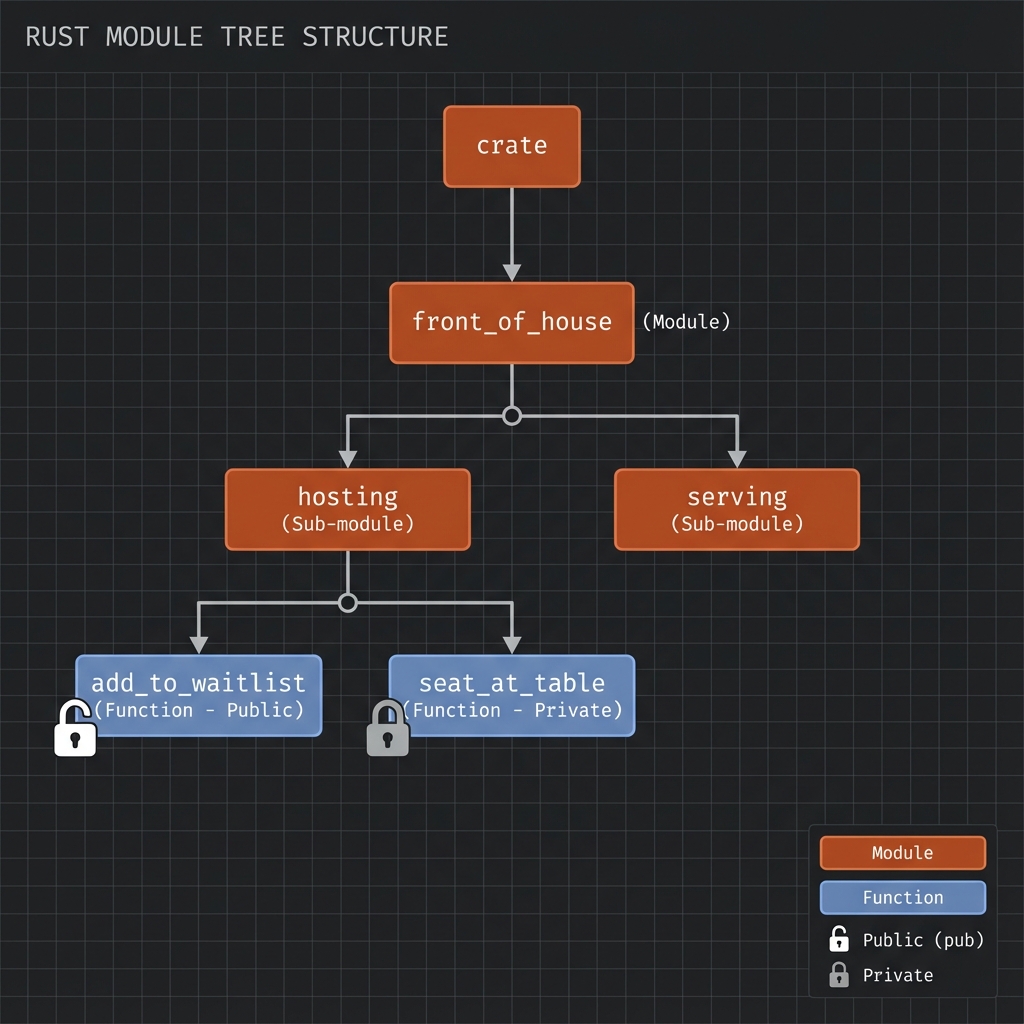
นิยาม Module
mod front_of_house {
pub mod hosting {
pub fn add_to_waitlist() {}
fn seat_at_table() {} // private
}
mod serving {
fn take_order() {}
fn serve_order() {}
}
}
fn main() {
// เรียกใช้ public function
front_of_house::hosting::add_to_waitlist();
}pub Keyword
Default: ทุกอย่างเป็น private
mod my_module {
pub fn public_function() {} // ✅ เข้าถึงได้จากนอก
fn private_function() {} // ❌ private
pub struct PublicStruct {
pub name: String, // ✅ field public
age: u32, // ❌ field private
}
pub enum PublicEnum {
Variant1, // ✅ variants ของ pub enum เป็น public
Variant2,
}
}Visibility Modifiers
| Modifier | Visibility |
|---|---|
| (default) | Private ใน module เดียว |
pub | Public ทุกที่ |
pub(crate) | Public ใน crate เดียว |
pub(super) | Public ใน parent module |
pub(in path) | Public ใน path ที่ระบุ |
mod outer {
pub(crate) fn crate_only() {}
pub mod inner {
pub(super) fn parent_only() {}
pub(in crate::outer) fn outer_only() {}
}
}
fn main() {
outer::crate_only(); // ✅ OK - same crate
// outer::inner::parent_only(); // ❌ Error - only visible to outer
}ใช้ use
Basic use
mod front_of_house {
pub mod hosting {
pub fn add_to_waitlist() {}
}
}
use front_of_house::hosting;
fn main() {
hosting::add_to_waitlist();
}Idiomatic use
// ✅ Good: use parent module สำหรับ functions
use std::collections::HashMap;
fn main() {
let mut map = HashMap::new();
map.insert("key", "value");
}
// ✅ Good: use full path สำหรับ structs/enums
use std::collections::HashMap;
use std::io::Result;use กับ as (alias)
use std::fmt::Result;
use std::io::Result as IoResult;
fn function1() -> Result {
Ok(())
}
fn function2() -> IoResult<()> {
Ok(())
}Re-exporting with pub use
mod front_of_house {
pub mod hosting {
pub fn add_to_waitlist() {}
}
}
// Re-export ให้ผู้ใช้ library เข้าถึงได้ง่าย
pub use crate::front_of_house::hosting;
// ผู้ใช้ library เรียกได้แค่:
// use my_crate::hosting;
// hosting::add_to_waitlist();Nested Paths
// แทนที่จะเขียน:
use std::cmp::Ordering;
use std::io;
// เขียนแบบนี้:
use std::{cmp::Ordering, io};
// หรือ:
use std::io::{self, Write};
// = use std::io และ use std::io::WriteGlob Operator
// นำเข้าทุกอย่างที่เป็น public
use std::collections::*;
fn main() {
let mut map = HashMap::new();
let mut set = HashSet::new();
}คำเตือน: ใช้
*ระวัง เพราะไม่ชัดเจนว่า names มาจากไหน
ตัวอย่างจริง: Library Structure
// lib.rs
mod authentication;
mod database;
mod handlers;
pub use authentication::User;
pub use database::Connection;
pub mod api {
pub use crate::handlers::*;
}ผู้ใช้ library:
use my_lib::User;
use my_lib::Connection;
use my_lib::api::get_users;Privacy Rules
- Parent can’t see private children
- Children can see private ancestors
- Siblings can see each other
mod parent {
fn parent_private() {}
pub fn parent_public() {}
mod child {
fn child_func() {
super::parent_private(); // ✅ Child can access parent's private
super::parent_public(); // ✅
}
}
mod sibling {
fn call_child() {
// super::child::child_func(); // ❌ Can't access sibling's private
}
}
}ลองทำดู! 🎯
- สร้าง module tree 3 ระดับ
- ใช้
pub(crate)และpub(super) - Re-export ด้วย
pub use
สรุป
| แนวคิด | Syntax |
|---|---|
| Define module | mod name { } |
| Public | pub fn, pub struct |
| Crate-only | pub(crate) fn |
| Parent-only | pub(super) fn |
| Use | use path::to::item; |
| Alias | use path as name; |
| Re-export | pub use path; |
| Nested | use std::{io, fmt}; |
| Glob | use module::*; |
👉 ต่อไป: Paths
Paths
เข้าถึง items ใน module tree ด้วย paths
2 รูปแบบของ Path
| Type | เริ่มจาก | Syntax |
|---|---|---|
| Absolute | crate root | crate::module::item |
| Relative | current module | module::item |
Absolute Path
เริ่มจาก crate root ด้วย crate:
mod front_of_house {
pub mod hosting {
pub fn add_to_waitlist() {
println!("Adding to waitlist");
}
}
}
fn main() {
// Absolute path - ชัดเจน ไม่กำกวม
crate::front_of_house::hosting::add_to_waitlist();
}Relative Path
เริ่มจาก module ปัจจุบัน:
mod front_of_house {
pub mod hosting {
pub fn add_to_waitlist() {}
}
}
fn main() {
// Relative path
front_of_house::hosting::add_to_waitlist();
}super Keyword
super = parent module (เหมือน .. ใน filesystem)
mod parent {
fn parent_function() {
println!("In parent");
}
pub mod child {
pub fn call_parent() {
// super ชี้ไปที่ parent module
super::parent_function();
}
pub fn call_sibling() {
// เรียก sibling module
super::sibling::sibling_function();
}
}
pub mod sibling {
pub fn sibling_function() {
println!("In sibling");
}
}
}
fn main() {
parent::child::call_parent();
parent::child::call_sibling();
}self Keyword
self = current module
mod my_module {
pub fn function_a() {
println!("Function A");
}
pub fn function_b() {
// ใช้ self เรียก function ใน module เดียวกัน
self::function_a();
// หรือเรียกตรงๆ ก็ได้
function_a();
}
}ใช้ self กับ use
mod outer {
pub mod inner {
pub fn func() {}
}
pub fn use_inner() {
// use self เพื่อนำเข้าจาก current module
use self::inner::func;
func();
}
}Path ใน use Statement
mod front_of_house {
pub mod hosting {
pub fn add_to_waitlist() {}
pub fn seat_at_table() {}
}
}
// นำเข้า module
use crate::front_of_house::hosting;
// หรือนำเข้า function โดยตรง
use crate::front_of_house::hosting::add_to_waitlist;
fn main() {
// เรียกผ่าน module
hosting::add_to_waitlist();
// หรือเรียกตรง
add_to_waitlist();
}เลือกใช้ Absolute vs Relative?
| Situation | ใช้ |
|---|---|
| Code อาจย้าย | Absolute |
| อยู่ใกล้กัน | Relative |
| Re-export | Absolute |
| Library | แบบไหนก็ได้ |
// ✅ Good: ถ้าย้าย main ไปที่อื่น ไม่ต้องแก้
crate::utils::helper();
// ⚠️ Might break: ถ้าย้าย function นี้ไปที่อื่น
utils::helper();ตัวอย่างจริง
mod database {
pub mod connection {
pub fn connect() {
println!("Connecting...");
}
}
pub mod queries {
use super::connection; // parent's sibling
pub fn execute() {
connection::connect();
println!("Executing query...");
}
}
}
mod handlers {
use crate::database; // absolute path
pub fn handle_request() {
database::queries::execute();
}
}
fn main() {
handlers::handle_request();
}ลองทำดู! 🎯
- สร้าง nested modules และใช้
super - ใช้
selfใน use statement - เปรียบเทียบ absolute และ relative paths
สรุป
| Keyword | ความหมาย |
|---|---|
crate | Root ของ crate ปัจจุบัน |
super | Parent module |
self | Current module |
:: | Path separator |
Path Examples
crate::module::item // absolute
module::item // relative
self::item // current module
super::item // parent module
super::super::item // grandparent👉 ต่อไป: แยกไฟล์
แยกไฟล์
จัดโครงสร้างโปรเจกต์ใหญ่ด้วยการแยก modules เป็นไฟล์
2 รูปแบบโครงสร้าง
รูปแบบ 1: ไฟล์เดียว
src/
├── main.rs
└── my_module.rs ← mod my_module; จะหาที่นี่
รูปแบบ 2: โฟลเดอร์ + mod.rs
src/
├── main.rs
└── my_module/
├── mod.rs ← mod my_module; จะหาที่นี่
└── submodule.rs
ตัวอย่าง: โปรเจกต์จริง
โครงสร้าง
my_project/
├── Cargo.toml
└── src/
├── main.rs
├── lib.rs
├── config.rs
├── database/
│ ├── mod.rs
│ ├── connection.rs
│ └── queries.rs
└── handlers/
├── mod.rs
├── users.rs
└── posts.rs
src/lib.rs
// ประกาศ modules
pub mod config;
pub mod database;
pub mod handlers;src/config.rs
pub struct Config {
pub database_url: String,
pub port: u16,
}
impl Config {
pub fn new() -> Self {
Config {
database_url: String::from("postgres://localhost/mydb"),
port: 3000,
}
}
}src/database/mod.rs
// ประกาศ submodules
pub mod connection;
pub mod queries;
// Re-export items ที่ใช้บ่อย
pub use connection::DatabaseConnection;
pub use queries::Query;src/database/connection.rs
pub struct DatabaseConnection {
url: String,
connected: bool,
}
impl DatabaseConnection {
pub fn new(url: &str) -> Self {
DatabaseConnection {
url: url.to_string(),
connected: false,
}
}
pub fn connect(&mut self) {
self.connected = true;
println!("Connected to {}", self.url);
}
}src/database/queries.rs
use super::DatabaseConnection;
pub struct Query {
sql: String,
}
impl Query {
pub fn new(sql: &str) -> Self {
Query { sql: sql.to_string() }
}
pub fn execute(&self, _conn: &DatabaseConnection) {
println!("Executing: {}", self.sql);
}
}src/handlers/mod.rs
pub mod users;
pub mod posts;src/main.rs
use my_project::{config::Config, database::DatabaseConnection};
fn main() {
let config = Config::new();
let mut db = DatabaseConnection::new(&config.database_url);
db.connect();
println!("Server starting on port {}", config.port);
}Module Discovery Rules
Rust หา module ตามลำดับนี้:
- Inline:
mod name { ... }ใน file เดียวกัน - File:
src/name.rs - Directory:
src/name/mod.rs
// src/lib.rs
mod foo; // หา src/foo.rs หรือ src/foo/mod.rs
mod bar; // หา src/bar.rs หรือ src/bar/mod.rs
mod inline { // inline module
pub fn stuff() {}
}2018+ Edition Style (แนะนำ)
แทนที่จะใช้ mod.rs ใช้ชื่อ folder:
src/
├── lib.rs
├── database.rs ← แทน database/mod.rs
└── database/
├── connection.rs
└── queries.rs
```text
```rust,ignore
// src/database.rs
pub mod connection;
pub mod queries;
Private vs Public Files
// src/lib.rs
mod private_module; // private - ใช้ได้ใน crate นี้เท่านั้น
pub mod public_module; // public - user ของ crate ใช้ได้Workspace
สำหรับโปรเจกต์ใหญ่มาก:
my_workspace/
├── Cargo.toml ← [workspace]
├── crates/
│ ├── core/
│ │ ├── Cargo.toml
│ │ └── src/lib.rs
│ ├── api/
│ │ ├── Cargo.toml
│ │ └── src/lib.rs
│ └── cli/
│ ├── Cargo.toml
│ └── src/main.rs
```text
```toml,ignore
# Cargo.toml (workspace root)
[workspace]
members = ["crates/*"]
ลองทำดู! 🎯
- สร้างโปรเจกต์ที่มี 2-3 modules
- แยก modules เป็นไฟล์
- ใช้
pub usere-export
สรุปบทที่ 11
| Pattern | Location |
|---|---|
mod foo | src/foo.rs หรือ src/foo/mod.rs |
mod foo::bar | src/foo/bar.rs |
| Inline | mod foo { ... } |
Best Practices
- ใช้ 2018 style (ไม่ใช้
mod.rs) pub usere-export items ที่สำคัญ- ใช้ workspace สำหรับโปรเจกต์ใหญ่
👉 ต่อไป: บทที่ 12: Testing
บทที่ 12: Testing
Rust มี testing framework ในตัว
สิ่งที่จะได้เรียนรู้
| หัวข้อ | คำอธิบาย |
|---|---|
| Unit Tests | ทดสอบแต่ละ function |
| Integration Tests | ทดสอบ modules ร่วมกัน |
| Test Organization | จัดระเบียบ tests |
Unit Tests
Rust มี testing framework ในตัว ไม่ต้องติดตั้งเพิ่ม
🧪 Testing Pyramid in Rust
+-------------------------------------------------------------------+
| Testing Pyramid |
+-------------------------------------------------------------------+
| |
| /\ |
| / \ |
| / E2E\ <--- Slow, Expensive |
| /------\ |
| / \ |
| /Integration\ <--- tests/ directory |
| /--------------\ |
| / \ |
| / Unit Tests \ <--- Fast, Many |
| /--------------------\ #[cfg(test)] |
| |
+-------------------------------------------------------------------+
| Rust Test Commands: |
| * cargo test --> Run all tests |
| * cargo test --lib --> Unit tests only |
| * cargo test --test '*' --> Integration tests |
| * cargo test --doc --> Doc tests |
+-------------------------------------------------------------------+
โครงสร้างพื้นฐาน
fn add(a: i32, b: i32) -> i32 {
a + b
}
#[cfg(test)]
mod tests {
use super::*; // นำเข้า items จาก parent module
#[test]
fn test_add() {
assert_eq!(add(2, 3), 5);
}
#[test]
fn test_add_negative() {
assert_eq!(add(-1, 1), 0);
}
}รัน Tests
# รัน tests ทั้งหมด
cargo test
# รัน test เฉพาะชื่อ
cargo test test_add
# รัน tests ที่มีคำนี้
cargo test add
# รัน tests ใน module
cargo test tests::
Assertions
assert!
#[test]
fn test_assert() {
assert!(true);
assert!(1 + 1 == 2);
// Custom error message
assert!(4 > 2, "4 should be greater than 2");
// กับ format arguments
let x = 5;
assert!(x > 0, "x should be positive, got {}", x);
}assert_eq! และ assert_ne!
#[test]
fn test_equality() {
assert_eq!(4, 2 + 2);
assert_ne!(4, 5);
// Custom message
let result = 10;
assert_eq!(result, 10, "Expected 10, got {}", result);
}debug_assert!
เฉพาะ debug builds:
fn expensive_check(x: i32) -> bool {
// expensive computation
x > 0
}
fn process(x: i32) {
debug_assert!(expensive_check(x), "x must be positive");
// ใน release build, debug_assert! ถูกลบออก
}ทดสอบ Panic
#[should_panic]
pub fn divide(a: i32, b: i32) -> i32 {
if b == 0 {
panic!("Cannot divide by zero!");
}
a / b
}
#[test]
#[should_panic]
fn test_divide_by_zero() {
divide(10, 0);
}
// ระบุ expected message
#[test]
#[should_panic(expected = "Cannot divide by zero")]
fn test_divide_by_zero_message() {
divide(10, 0);
}ใช้ Result ใน Tests
#[test]
fn test_with_result() -> Result<(), String> {
if 2 + 2 == 4 {
Ok(())
} else {
Err(String::from("Math is broken"))
}
}
// ใช้กับ ? operator
#[test]
fn test_file_operations() -> Result<(), std::io::Error> {
let content = std::fs::read_to_string("test.txt")?;
assert!(content.contains("expected"));
Ok(())
}Test Output Control
แสดง println! output
# ปกติ output จะถูกซ่อน
cargo test
# แสดง output
cargo test -- --show-output
# หรือ
cargo test -- --nocapture
ตัวอย่าง
#[test]
fn test_with_output() {
println!("Setting up test...");
let result = 2 + 2;
println!("Result: {}", result);
assert_eq!(result, 4);
println!("Test passed!");
}Control Test Execution
รันแบบ Single Thread
# ปกติ tests รันแบบ parallel
cargo test
# รันแบบ sequential
cargo test -- --test-threads=1
Ignore Tests
#[test]
#[ignore]
fn expensive_test() {
// takes a long time
std::thread::sleep(std::time::Duration::from_secs(60));
}
// รัน ignored tests
// cargo test -- --ignored
// รันทุก tests รวม ignored
// cargo test -- --include-ignoredTest Private Functions
ใน Rust ทดสอบ private functions ได้:
fn internal_adder(a: i32, b: i32) -> i32 {
a + b
}
#[cfg(test)]
mod tests {
use super::*;
#[test]
fn test_internal() {
// ✅ เข้าถึง private function ได้
assert_eq!(internal_adder(2, 2), 4);
}
}Doc Tests
ทดสอบ code ใน documentation:
#![allow(unused)]
fn main() {
/// Adds two numbers together.
///
/// # Examples
///
/// ```
/// let result = my_crate::add(2, 3);
/// assert_eq!(result, 5);
/// ```text
pub fn add(a: i32, b: i32) -> i32 {
a + b
}
}# Doc tests รันกับ cargo test
cargo test
# รันเฉพาะ doc tests
cargo test --doc
Test Filtering
# รัน tests ที่ชื่อขึ้นต้นด้วย 'test_'
cargo test test_
# รัน tests ใน specific module
cargo test tests::unit::
# รันเฉพาะ test เดียว
cargo test tests::test_add -- --exact
Test Organization Best Practices
// src/lib.rs
pub fn public_function() -> i32 {
private_helper() + 1
}
fn private_helper() -> i32 {
41
}
// Unit tests อยู่ในไฟล์เดียวกัน
#[cfg(test)]
mod tests {
use super::*;
mod public_api_tests {
use super::*;
#[test]
fn test_public_function() {
assert_eq!(public_function(), 42);
}
}
mod internal_tests {
use super::*;
#[test]
fn test_private_helper() {
assert_eq!(private_helper(), 41);
}
}
}ลองทำดู! 🎯
- เขียน tests สำหรับ function ที่ควร panic
- ใช้
#[ignore]และลองรันcargo test -- --ignored - เขียน doc test ใน function documentation
สรุป
| Attribute/Macro | คำอธิบาย |
|---|---|
#[test] | Mark as test |
#[cfg(test)] | Compile only for test |
#[should_panic] | Expect panic |
#[ignore] | Skip test |
assert! | Check condition |
assert_eq! | Check equality |
assert_ne! | Check inequality |
Cargo Test Flags
| Flag | คำอธิบาย |
|---|---|
--show-output | แสดง println! |
--test-threads=1 | รันแบบ sequential |
--ignored | รัน ignored tests |
--exact | Match exact name |
👉 ต่อไป: Integration Tests
Integration Tests
Integration tests ทดสอบ library จากมุมมองของ user ภายนอก
Unit Tests vs Integration Tests
| Aspect | Unit Tests | Integration Tests |
|---|---|---|
| Location | src/ (ใน module) | tests/ (แยกต่างหาก) |
| Access | Private items ได้ | Public API เท่านั้น |
| Purpose | Test ทีละ unit | Test การทำงานรวม |
| Speed | เร็วกว่า | ช้ากว่า |
โครงสร้างโปรเจกต์
my_library/
├── Cargo.toml
├── src/
│ └── lib.rs
└── tests/
├── common/
│ └── mod.rs ← shared test utilities
├── integration_test.rs
└── another_test.rs
สร้าง Integration Test
src/lib.rs
#![allow(unused)]
fn main() {
pub fn add(a: i32, b: i32) -> i32 {
a + b
}
pub fn multiply(a: i32, b: i32) -> i32 {
a * b
}
pub struct Calculator {
value: i32,
}
impl Calculator {
pub fn new() -> Self {
Calculator { value: 0 }
}
pub fn add(&mut self, n: i32) {
self.value += n;
}
pub fn result(&self) -> i32 {
self.value
}
}
}tests/integration_test.rs
use my_library::{add, multiply, Calculator};
#[test]
fn test_add() {
assert_eq!(add(2, 3), 5);
assert_eq!(add(-1, 1), 0);
assert_eq!(add(0, 0), 0);
}
#[test]
fn test_multiply() {
assert_eq!(multiply(2, 3), 6);
assert_eq!(multiply(-2, 3), -6);
assert_eq!(multiply(0, 100), 0);
}
#[test]
fn test_calculator_workflow() {
let mut calc = Calculator::new();
calc.add(5);
calc.add(10);
calc.add(-3);
assert_eq!(calc.result(), 12);
}Shared Test Code
tests/common/mod.rs
use my_library::Calculator;
pub fn setup_calculator_with_value(value: i32) -> Calculator {
let mut calc = Calculator::new();
calc.add(value);
calc
}
pub fn assert_close(a: f64, b: f64, epsilon: f64) {
assert!((a - b).abs() < epsilon,
"Expected {} to be close to {}", a, b);
}
pub struct TestContext {
pub name: String,
pub created_at: std::time::Instant,
}
impl TestContext {
pub fn new(name: &str) -> Self {
println!("Setting up test: {}", name);
TestContext {
name: name.to_string(),
created_at: std::time::Instant::now(),
}
}
}
impl Drop for TestContext {
fn drop(&mut self) {
println!("Tearing down test: {} (took {:?})",
self.name,
self.created_at.elapsed());
}
}ใช้ Shared Code
// tests/integration_test.rs
mod common;
use my_library::Calculator;
#[test]
fn test_with_setup() {
let _ctx = common::TestContext::new("calculator_test");
let calc = common::setup_calculator_with_value(100);
assert_eq!(calc.result(), 100);
}รัน Integration Tests
# รันทุก tests (unit + integration)
cargo test
# รันเฉพาะ integration tests
cargo test --test integration_test
# รันเฉพาะ test เดียว
cargo test --test integration_test test_add
# รันทุก integration test files
cargo test --test '*'
Binary Crates
สำคัญ: Integration tests ใช้ได้กับ library crates เท่านั้น
ถ้ามีแค่ main.rs (binary crate):
// src/main.rs
fn main() {
let result = add(2, 3);
println!("{}", result);
}
fn add(a: i32, b: i32) -> i32 {
a + b
}ทางแก้: แยก logic ไปไว้ใน lib.rs:
// src/lib.rs
pub fn add(a: i32, b: i32) -> i32 {
a + b
}
// src/main.rs
use my_crate::add;
fn main() {
println!("{}", add(2, 3));
}หลาย Test Files
// tests/math_tests.rs
use my_library::{add, multiply};
#[test]
fn test_math_operations() {
assert_eq!(add(multiply(2, 3), 4), 10);
}
// tests/calculator_tests.rs
use my_library::Calculator;
#[test]
fn test_calculator_chain() {
let mut calc = Calculator::new();
calc.add(1);
calc.add(2);
calc.add(3);
assert_eq!(calc.result(), 6);
}Async Integration Tests
// tests/async_test.rs
#[tokio::test]
async fn test_async_function() {
let result = my_library::async_fetch().await;
assert!(result.is_ok());
}ลองทำดู! 🎯
- สร้าง
tests/folder และ integration test - สร้าง shared utilities ใน
tests/common/mod.rs - รันเฉพาะ integration tests ด้วย
--test
สรุป
| Command | Description |
|---|---|
cargo test | Run all tests |
cargo test --test NAME | Run specific test file |
cargo test --lib | Run only unit tests |
cargo test --doc | Run only doc tests |
File Structure
tests/
├── common/mod.rs ← shared code (NOT a test)
├── test_a.rs ← first test file
└── test_b.rs ← second test file
👉 ต่อไป: จัดระเบียบ Tests
จัดระเบียบ Tests
วิธีจัดระเบียบ tests ให้ maintain ง่าย
#[cfg(test)]
Compile test code เฉพาะ เมื่อรัน cargo test:
#![allow(unused)]
fn main() {
// Production code
pub fn add(a: i32, b: i32) -> i32 {
a + b
}
// Test code - ไม่รวมใน production build
#[cfg(test)]
mod tests {
use super::*;
#[test]
fn test_add() {
assert_eq!(add(2, 3), 5);
}
}
}ทำไมต้องใช้?
- ลดขนาด binary
- ไม่ compile test dependencies
- code ที่ใช้แค่ test ไม่เข้าไปใน production
#[ignore] - ข้าม Tests
#[test]
fn fast_test() {
assert!(true);
}
#[test]
#[ignore = "takes too long"]
fn slow_test() {
std::thread::sleep(std::time::Duration::from_secs(10));
assert!(true);
}
#[test]
#[ignore = "requires database"]
fn db_test() {
// needs database connection
}รัน Ignored Tests
# รันเฉพาะ tests ปกติ (ข้าม ignored)
cargo test
# รันเฉพาะ ignored tests
cargo test -- --ignored
# รันทั้งหมด (รวม ignored)
cargo test -- --include-ignored
Test Attributes รวม
#[test]
fn normal_test() {}
#[test]
#[ignore]
fn ignored_test() {}
#[test]
#[should_panic]
fn expected_panic() {
panic!("This should happen");
}
#[test]
#[should_panic(expected = "specific message")]
fn expected_specific_panic() {
panic!("specific message here");
}Controlling Test Output
# แสดง println! output (ปกติซ่อน)
cargo test -- --show-output
# รัน tests แบบ sequential (ไม่ parallel)
cargo test -- --test-threads=1
# รัน test ที่ชื่อตรง
cargo test --exact test_name
# รัน tests ที่มีคำนี้ในชื่อ
cargo test add
Test Module Organization
Pattern 1: Tests ใต้ function
#![allow(unused)]
fn main() {
pub fn calculate(x: i32) -> i32 {
x * 2
}
#[cfg(test)]
mod tests {
use super::*;
#[test]
fn test_calculate() {
assert_eq!(calculate(5), 10);
}
}
}Pattern 2: Test submodules
#![allow(unused)]
fn main() {
pub fn add(a: i32, b: i32) -> i32 { a + b }
pub fn sub(a: i32, b: i32) -> i32 { a - b }
#[cfg(test)]
mod tests {
use super::*;
mod add_tests {
use super::*;
#[test]
fn test_positive() {
assert_eq!(add(2, 3), 5);
}
#[test]
fn test_negative() {
assert_eq!(add(-2, -3), -5);
}
}
mod sub_tests {
use super::*;
#[test]
fn test_basic() {
assert_eq!(sub(5, 3), 2);
}
}
}
}Test Helper Functions
#![allow(unused)]
fn main() {
#[cfg(test)]
mod tests {
use super::*;
// Helper - ไม่ใช่ test
fn create_test_data() -> Vec<i32> {
vec![1, 2, 3, 4, 5]
}
fn assert_even(n: i32) {
assert!(n % 2 == 0, "{} is not even", n);
}
#[test]
fn test_with_helpers() {
let data = create_test_data();
let sum: i32 = data.iter().sum();
assert_even(sum); // ไม่ผ่าน เพราะ 15 ไม่ใช่เลขคู่
}
}
}Doc Tests
Comments ที่มี code examples จะถูก test:
#![allow(unused)]
fn main() {
/// Adds two numbers together.
///
/// # Examples
///
/// ```
/// let result = my_lib::add(2, 3);
/// assert_eq!(result, 5);
/// ```text
pub fn add(a: i32, b: i32) -> i32 {
a + b
}
/// # Panics
///
/// Panics if divisor is zero.
///
/// ```should_panic
/// my_lib::divide(10, 0);
/// ```text
pub fn divide(a: i32, b: i32) -> i32 {
if b == 0 {
panic!("Division by zero");
}
a / b
}
/// Code that shouldn't compile:
///
/// ```compile_fail
/// let x: i32 = "not a number";
/// ```text
pub fn example() {}
}Run Doc Tests
# รันเฉพาะ doc tests
cargo test --doc
Test Fixtures และ Setup
use std::fs;
use std::io::Write;
struct TestFile {
path: String,
}
impl TestFile {
fn new(name: &str, content: &str) -> Self {
let path = format!("/tmp/test_{}", name);
let mut file = fs::File::create(&path).unwrap();
file.write_all(content.as_bytes()).unwrap();
TestFile { path }
}
}
impl Drop for TestFile {
fn drop(&mut self) {
fs::remove_file(&self.path).ok();
}
}
#[test]
fn test_with_fixture() {
let file = TestFile::new("example.txt", "Hello, World!");
let content = fs::read_to_string(&file.path).unwrap();
assert_eq!(content, "Hello, World!");
} // file ถูก cleanup อัตโนมัติลองทำดู! 🎯
- ใช้
#[ignore]กับ slow tests - สร้าง test helper functions
- เขียน doc tests
สรุปบทที่ 12
| Attribute | Purpose |
|---|---|
#[test] | Mark as test |
#[cfg(test)] | Compile only for test |
#[ignore] | Skip test |
#[should_panic] | Expect panic |
Cargo Commands
| Command | Description |
|---|---|
cargo test | Run all tests |
cargo test NAME | Run matching tests |
cargo test --doc | Run doc tests only |
cargo test -- --ignored | Run ignored tests |
cargo test -- --show-output | Show println! |
cargo test -- --test-threads=1 | Sequential |
Test Organization Tips
- ใช้
#[cfg(test)]สำหรับ unit tests - แยก integration tests ไปไว้ใน
tests/ - ใช้
#[ignore]สำหรับ slow/flaky tests - เขียน doc tests สำหรับ public API
👉 ต่อไป: บทที่ 13: Iterators & Closures
บทที่ 13: Iterators & Closures
สิ่งที่จะได้เรียนรู้
| หัวข้อ | คำอธิบาย |
|---|---|
| Closures | Anonymous functions |
| Iterators | การประมวลผลแบบ lazy |
| Iterator Methods | map, filter, fold |
| Custom Iterators | สร้าง iterator เอง |
👉 Closures
Closures
Closures คือ anonymous functions ที่สามารถ capture ค่าจาก environment รอบข้าง
Syntax พื้นฐาน
fn main() {
// Closure พื้นฐาน
let add_one = |x| x + 1;
println!("{}", add_one(5)); // 6
// กับ type annotations
let add_two = |x: i32| -> i32 { x + 2 };
println!("{}", add_two(5)); // 7
// หลาย parameters
let add = |a, b| a + b;
println!("{}", add(2, 3)); // 5
// ไม่มี parameters
let say_hi = || println!("Hi!");
say_hi();
// Multi-line closure
let calculate = |x: i32, y: i32| {
let sum = x + y;
let product = x * y;
sum + product
};
println!("{}", calculate(3, 4)); // 7 + 12 = 19
}Closure vs Function
#![allow(unused)]
fn main() {
fn add_one_fn(x: i32) -> i32 { x + 1 }
let add_one_closure = |x: i32| x + 1;
// ทั้งสองใช้เหมือนกัน
println!("{}", add_one_fn(5)); // 6
println!("{}", add_one_closure(5)); // 6
}| Aspect | Function | Closure |
|---|---|---|
| Capture | ❌ ไม่ได้ | ✅ ได้ |
| Syntax | fn name() | |x| x + 1 |
| Inline | ❌ | ✅ |
| Generic | ❌ (ต้องแยก) | ✅ (type inference) |
Capture Environment
Closures สามารถ “จับ” ค่าจากภายนอกได้:
fn main() {
let x = 4;
let multiplier = 3;
// capture x และ multiplier
let calculate = |y| x + y * multiplier;
println!("{}", calculate(2)); // 4 + 2*3 = 10
// x และ multiplier ยังใช้ได้ (ถูก borrow)
println!("x = {}, multiplier = {}", x, multiplier);
}3 Capture Modes
Rust มี 3 วิธีที่ closure capture ค่า:
1. Fn - Borrow (&T)
fn main() {
let list = vec![1, 2, 3];
// Fn: borrow list
let print_list = || println!("{:?}", list);
print_list();
print_list(); // เรียกได้หลายครั้ง
println!("Still valid: {:?}", list); // ยังใช้ได้
}2. FnMut - Mutable Borrow (&mut T)
fn main() {
let mut count = 0;
// FnMut: mutable borrow count
let mut increment = || {
count += 1;
println!("Count: {}", count);
};
increment(); // Count: 1
increment(); // Count: 2
increment(); // Count: 3
println!("Final: {}", count); // 3
}3. FnOnce - Move Ownership (T)
fn main() {
let message = String::from("Hello");
// FnOnce: move ownership
let consume = move || {
println!("{}", message);
// message ถูก drop เมื่อ closure จบ
};
consume();
// consume(); // ❌ Error: ใช้ได้แค่ครั้งเดียว
// println!("{}", message); // ❌ message ถูก move ไปแล้ว
}move Keyword
บังคับให้ closure เป็นเจ้าของค่า:
fn main() {
let name = String::from("Alice");
// Without move: borrow
let greet1 = || println!("Hello, {}!", name);
greet1();
println!("Name still valid: {}", name);
// With move: take ownership
let greet2 = move || println!("Hello, {}!", name);
greet2();
// println!("{}", name); // ❌ name moved
}ใช้ move กับ Threads
use std::thread;
fn main() {
let data = vec![1, 2, 3];
// ต้อง move เพราะ thread อาจอยู่นานกว่า main
let handle = thread::spawn(move || {
println!("Data in thread: {:?}", data);
});
handle.join().unwrap();
}Closures as Parameters
ใช้ Trait Bounds
fn apply<F>(f: F)
where
F: FnOnce(),
{
f();
}
fn apply_twice<F>(mut f: F)
where
F: FnMut(),
{
f();
f();
}
fn apply_many<F>(f: F, times: u32)
where
F: Fn(),
{
for _ in 0..times {
f();
}
}
fn main() {
apply(|| println!("Called once!"));
apply_twice(|| println!("Called!"));
apply_many(|| println!("Hello!"), 3);
}Trait Hierarchy
FnOnce (ทุก closure เป็น FnOnce)
↓
FnMut (ถ้าไม่ move ownership)
↓
Fn (ถ้าไม่ mutate)
Closures as Return Values
fn make_adder(x: i32) -> impl Fn(i32) -> i32 {
move |y| x + y
}
fn main() {
let add_5 = make_adder(5);
let add_10 = make_adder(10);
println!("{}", add_5(3)); // 8
println!("{}", add_10(3)); // 13
}ตัวอย่างจริง: Map และ Filter
fn main() {
let numbers = vec![1, 2, 3, 4, 5];
// map กับ closure
let doubled: Vec<i32> = numbers
.iter()
.map(|x| x * 2)
.collect();
println!("Doubled: {:?}", doubled); // [2, 4, 6, 8, 10]
// filter กับ closure
let evens: Vec<&i32> = numbers
.iter()
.filter(|x| *x % 2 == 0)
.collect();
println!("Evens: {:?}", evens); // [2, 4]
// Combined
let sum_of_squares: i32 = numbers
.iter()
.map(|x| x * x)
.filter(|x| x % 2 == 0)
.sum();
println!("Sum of even squares: {}", sum_of_squares); // 4 + 16 = 20
}ลองทำดู! 🎯
- สร้าง closure ที่ capture mutable variable และเพิ่มค่า
- สร้าง function ที่รับ closure เป็น parameter
- ใช้
moveกับthread::spawn
สรุป
| Trait | Capture | เรียกได้ | ใช้เมื่อ |
|---|---|---|---|
Fn | &T | หลายครั้ง | ไม่ mutate |
FnMut | &mut T | หลายครั้ง | mutate ได้ |
FnOnce | T | 1 ครั้ง | move ownership |
| Keyword | Effect |
|---|---|
move | บังคับ take ownership |
|x| | closure parameters |
impl Fn() | return closure |
👉 ต่อไป: Iterators
Iterators
Iterator ประมวลผล collection ทีละ item แบบ lazy (ไม่ทำจนกว่าจะต้องใช้)
🔗 Iterator Chain Visualization

Iterator Trait
pub trait Iterator {
type Item;
fn next(&mut self) -> Option<Self::Item>;
// ... มี methods อื่นๆ อีกมากที่ได้มาฟรี
}ทุกครั้งที่เรียก next():
Some(item)- ได้ item ถัดไปNone- หมดแล้ว
Basic Usage
fn main() {
let v = vec![1, 2, 3];
// สร้าง iterator
let mut iter = v.iter();
// เรียก next() ทีละครั้ง
assert_eq!(iter.next(), Some(&1));
assert_eq!(iter.next(), Some(&2));
assert_eq!(iter.next(), Some(&3));
assert_eq!(iter.next(), None); // หมดแล้ว
assert_eq!(iter.next(), None); // ยังคง None
}3 วิธีสร้าง Iterator
1. iter() - Borrow (&T)
fn main() {
let v = vec![1, 2, 3];
for x in v.iter() {
println!("{}", x); // x is &i32
}
// v ยังใช้ได้
println!("Still valid: {:?}", v);
}2. iter_mut() - Mutable Borrow (&mut T)
fn main() {
let mut v = vec![1, 2, 3];
for x in v.iter_mut() {
*x *= 2; // แก้ไขค่าได้
}
println!("{:?}", v); // [2, 4, 6]
}3. into_iter() - Take Ownership (T)
fn main() {
let v = vec![String::from("a"), String::from("b")];
for s in v.into_iter() {
println!("{}", s); // s is String (owned)
}
// println!("{:?}", v); // ❌ v ถูก move ไปแล้ว
}เปรียบเทียบ
| Method | Returns | Ownership |
|---|---|---|
iter() | &T | Borrow |
iter_mut() | &mut T | Mutable borrow |
into_iter() | T | Take ownership |
for Loop กับ Iterator
fn main() {
let v = vec![1, 2, 3];
// ทั้งสองเหมือนกัน:
// 1. for loop (syntactic sugar)
for x in &v {
println!("{}", x);
}
// 2. Explicit iterator
let mut iter = v.iter();
while let Some(x) = iter.next() {
println!("{}", x);
}
}Lazy Evaluation
Iterator ไม่ทำอะไรจนกว่าจะ “consume”:
fn main() {
let v = vec![1, 2, 3];
// ยังไม่ทำอะไร! (lazy)
let iter = v.iter().map(|x| {
println!("Processing {}", x);
x * 2
});
println!("Iterator created, nothing printed yet...");
// consume iterator
let result: Vec<_> = iter.collect();
// NOW it prints "Processing 1, 2, 3"
println!("Result: {:?}", result);
}Range as Iterator
fn main() {
// Range เป็น iterator
for i in 0..5 {
println!("{}", i); // 0, 1, 2, 3, 4
}
// Inclusive range
for i in 0..=5 {
println!("{}", i); // 0, 1, 2, 3, 4, 5
}
// Use with methods
let sum: i32 = (1..=100).sum();
println!("Sum 1-100: {}", sum); // 5050
}Common Iterators
fn main() {
// chars() - iterate characters
for c in "hello".chars() {
println!("{}", c);
}
// bytes() - iterate bytes
for b in "hello".bytes() {
println!("{}", b);
}
// lines() - iterate lines
let text = "line1\nline2\nline3";
for line in text.lines() {
println!("{}", line);
}
// enumerate() - with index
let v = vec!["a", "b", "c"];
for (i, x) in v.iter().enumerate() {
println!("{}: {}", i, x);
}
}Infinite Iterators
fn main() {
// repeat - ซ้ำค่าเดิมตลอด
let threes: Vec<i32> = std::iter::repeat(3).take(5).collect();
println!("{:?}", threes); // [3, 3, 3, 3, 3]
// cycle - วนซ้ำ
let cycle: Vec<i32> = vec![1, 2].into_iter().cycle().take(6).collect();
println!("{:?}", cycle); // [1, 2, 1, 2, 1, 2]
}ลองทำดู! 🎯
- ใช้
iter(),iter_mut(),into_iter()ดูความแตกต่าง - สร้าง range iterator และ sum
- ใช้
enumerate()กับ vector
สรุป
| Concept | Description |
|---|---|
Iterator trait | next() -> Option<Item> |
iter() | Borrow elements |
iter_mut() | Mutable borrow |
into_iter() | Take ownership |
| Lazy | ไม่ทำจนกว่า consume |
| Infinite | repeat, cycle |
👉 ต่อไป: Iterator Methods
Iterator Methods
Methods ของ Iterator แบ่งเป็น 2 ประเภท: Adapters และ Consumers
Adapters (แปลง Iterator)
Adapters รับ iterator แล้ว return iterator ใหม่:
map - แปลงค่า
fn main() {
let v = vec![1, 2, 3, 4, 5];
let doubled: Vec<i32> = v.iter()
.map(|x| x * 2)
.collect();
println!("{:?}", doubled); // [2, 4, 6, 8, 10]
}filter - เลือกเฉพาะที่ต้องการ
fn main() {
let v = vec![1, 2, 3, 4, 5, 6];
let evens: Vec<&i32> = v.iter()
.filter(|x| *x % 2 == 0)
.collect();
println!("{:?}", evens); // [2, 4, 6]
}filter_map - filter + map รวมกัน
fn main() {
let strings = vec!["1", "two", "3", "four", "5"];
let numbers: Vec<i32> = strings.iter()
.filter_map(|s| s.parse().ok()) // parse เฉพาะที่ได้
.collect();
println!("{:?}", numbers); // [1, 3, 5]
}enumerate - เพิ่ม index
fn main() {
let v = vec!["a", "b", "c"];
for (index, value) in v.iter().enumerate() {
println!("{}: {}", index, value);
}
// 0: a
// 1: b
// 2: c
}zip - จับคู่ 2 iterators
fn main() {
let names = vec!["Alice", "Bob", "Charlie"];
let scores = vec![95, 87, 92];
for (name, score) in names.iter().zip(scores.iter()) {
println!("{}: {}", name, score);
}
// Alice: 95
// Bob: 87
// Charlie: 92
}take / skip
fn main() {
let v = vec![1, 2, 3, 4, 5, 6, 7, 8, 9, 10];
// take: เอา n ตัวแรก
let first_3: Vec<_> = v.iter().take(3).collect();
println!("First 3: {:?}", first_3); // [1, 2, 3]
// skip: ข้าม n ตัวแรก
let after_5: Vec<_> = v.iter().skip(5).collect();
println!("After 5: {:?}", after_5); // [6, 7, 8, 9, 10]
// take_while / skip_while
let small: Vec<_> = v.iter().take_while(|x| **x < 5).collect();
println!("While < 5: {:?}", small); // [1, 2, 3, 4]
}flatten - แบน nested
fn main() {
let nested = vec![vec![1, 2], vec![3, 4], vec![5]];
let flat: Vec<i32> = nested.into_iter().flatten().collect();
println!("{:?}", flat); // [1, 2, 3, 4, 5]
// flat_map = map + flatten
let words = vec!["hello", "world"];
let chars: Vec<char> = words.iter()
.flat_map(|s| s.chars())
.collect();
println!("{:?}", chars); // ['h', 'e', 'l', 'l', 'o', 'w', 'o', 'r', 'l', 'd']
}chain - ต่อ 2 iterators
fn main() {
let a = vec![1, 2, 3];
let b = vec![4, 5, 6];
let combined: Vec<_> = a.iter().chain(b.iter()).collect();
println!("{:?}", combined); // [1, 2, 3, 4, 5, 6]
}rev - กลับลำดับ
fn main() {
let v = vec![1, 2, 3, 4, 5];
let reversed: Vec<_> = v.iter().rev().collect();
println!("{:?}", reversed); // [5, 4, 3, 2, 1]
}Consumers (ใช้ Iterator)
Consumers รับ iterator และ return ค่า (ไม่ใช่ iterator):
collect - รวบรวมเป็น collection
fn main() {
let v: Vec<i32> = (1..=5).collect();
let set: std::collections::HashSet<_> = (1..=5).collect();
println!("Vec: {:?}", v); // [1, 2, 3, 4, 5]
println!("Set: {:?}", set); // {1, 2, 3, 4, 5}
}sum / product
fn main() {
let numbers = vec![1, 2, 3, 4, 5];
let total: i32 = numbers.iter().sum();
println!("Sum: {}", total); // 15
let product: i32 = numbers.iter().product();
println!("Product: {}", product); // 120
}fold - รวมค่าแบบ custom
fn main() {
let numbers = vec![1, 2, 3, 4, 5];
// fold(initial, |accumulator, item| new_accumulator)
let sum = numbers.iter().fold(0, |acc, x| acc + x);
println!("Sum: {}", sum); // 15
// ใช้ fold สร้าง string
let s = numbers.iter().fold(String::new(), |acc, x| {
if acc.is_empty() {
x.to_string()
} else {
format!("{}, {}", acc, x)
}
});
println!("String: {}", s); // "1, 2, 3, 4, 5"
}reduce - เหมือน fold แต่ไม่มี initial
fn main() {
let numbers = vec![1, 2, 3, 4, 5];
let max = numbers.iter().reduce(|a, b| if a > b { a } else { b });
println!("Max: {:?}", max); // Some(5)
}count / min / max
fn main() {
let v = vec![3, 1, 4, 1, 5, 9, 2, 6];
println!("Count: {}", v.iter().count()); // 8
println!("Min: {:?}", v.iter().min()); // Some(1)
println!("Max: {:?}", v.iter().max()); // Some(9)
}find / position
fn main() {
let v = vec![1, 2, 3, 4, 5];
// find - หาค่าแรกที่ตรง
let first_even = v.iter().find(|x| *x % 2 == 0);
println!("First even: {:?}", first_even); // Some(2)
// position - หา index
let pos = v.iter().position(|x| *x == 3);
println!("Position of 3: {:?}", pos); // Some(2)
}any / all
fn main() {
let v = vec![1, 2, 3, 4, 5];
let has_even = v.iter().any(|x| x % 2 == 0);
println!("Has even: {}", has_even); // true
let all_positive = v.iter().all(|x| *x > 0);
println!("All positive: {}", all_positive); // true
}for_each - side effects
fn main() {
let v = vec![1, 2, 3];
v.iter().for_each(|x| println!("Value: {}", x));
}Chaining (ต่อเชื่อม)
fn main() {
let data = vec!["1", "two", "3", "four", "5", "six"];
let result: i32 = data.iter()
.filter_map(|s| s.parse::<i32>().ok()) // parse เฉพาะตัวเลข
.filter(|n| n % 2 == 1) // เอาเฉพาะเลขคี่
.map(|n| n * n) // ยกกำลังสอง
.sum(); // รวม
println!("Sum of odd squares: {}", result); // 1 + 9 + 25 = 35
}ลองทำดู! 🎯
- ใช้
mapและfilterchain กัน - ใช้
enumerateและzip - ใช้
foldหาค่า max เอง
สรุป
Adapters (return Iterator)
| Method | Purpose |
|---|---|
map | แปลงค่า |
filter | เลือกค่า |
enumerate | เพิ่ม index |
zip | จับคู่ |
take / skip | เอา/ข้าม n ตัว |
flatten | แบน nested |
chain | ต่อ iterators |
rev | กลับลำดับ |
Consumers (return Value)
| Method | Purpose |
|---|---|
collect | รวมเป็น collection |
sum / product | รวม/คูณ |
fold | custom aggregation |
count / min / max | นับ/หาเล็ก/ใหญ่ |
find / position | หาค่า/ตำแหน่ง |
any / all | ตรวจเงื่อนไข |
👉 ต่อไป: Custom Iterators
Custom Iterators
สร้าง iterator ของตัวเอง โดย implement Iterator trait
Implementation พื้นฐาน
struct Counter {
count: u32,
max: u32,
}
impl Counter {
fn new(max: u32) -> Counter {
Counter { count: 0, max }
}
}
impl Iterator for Counter {
type Item = u32; // ระบุ type ที่จะ return
fn next(&mut self) -> Option<Self::Item> {
if self.count < self.max {
self.count += 1;
Some(self.count)
} else {
None // หมดแล้ว
}
}
}
fn main() {
let counter = Counter::new(5);
for n in counter {
println!("{}", n);
}
// Output: 1, 2, 3, 4, 5
}ใช้ Iterator Methods ได้ฟรี
เมื่อ implement next() ได้ Iterator methods ทั้งหมดมาฟรี:
fn main() {
// sum
let sum: u32 = Counter::new(5).sum();
println!("Sum: {}", sum); // 15
// filter
let evens: Vec<u32> = Counter::new(10)
.filter(|x| x % 2 == 0)
.collect();
println!("Evens: {:?}", evens); // [2, 4, 6, 8, 10]
// map
let squared: Vec<u32> = Counter::new(5)
.map(|x| x * x)
.collect();
println!("Squared: {:?}", squared); // [1, 4, 9, 16, 25]
// chain กัน
let result: u32 = Counter::new(10)
.filter(|x| x % 2 == 0)
.map(|x| x * x)
.sum();
println!("Sum of even squares: {}", result); // 220
}ตัวอย่าง: Fibonacci Iterator
struct Fibonacci {
curr: u64,
next: u64,
}
impl Fibonacci {
fn new() -> Fibonacci {
Fibonacci { curr: 0, next: 1 }
}
}
impl Iterator for Fibonacci {
type Item = u64;
fn next(&mut self) -> Option<Self::Item> {
let result = self.curr;
self.curr = self.next;
self.next = result + self.next;
Some(result) // Infinite iterator!
}
}
fn main() {
// Take first 10 Fibonacci numbers
let fibs: Vec<u64> = Fibonacci::new().take(10).collect();
println!("{:?}", fibs);
// [0, 1, 1, 2, 3, 5, 8, 13, 21, 34]
// Find first Fibonacci > 100
let first_over_100 = Fibonacci::new()
.find(|&x| x > 100);
println!("First > 100: {:?}", first_over_100); // Some(144)
}IntoIterator Trait
ทำให้ใช้กับ for loop ได้:
struct MyCollection {
items: Vec<i32>,
}
impl IntoIterator for MyCollection {
type Item = i32;
type IntoIter = std::vec::IntoIter<i32>;
fn into_iter(self) -> Self::IntoIter {
self.items.into_iter()
}
}
// สำหรับ reference
impl<'a> IntoIterator for &'a MyCollection {
type Item = &'a i32;
type IntoIter = std::slice::Iter<'a, i32>;
fn into_iter(self) -> Self::IntoIter {
self.items.iter()
}
}
fn main() {
let collection = MyCollection { items: vec![1, 2, 3] };
// ใช้กับ for loop ได้
for item in &collection {
println!("{}", item);
}
// ยัง borrow ได้
println!("Length: {}", collection.items.len());
}DoubleEndedIterator
ทำให้ rev() ใช้ได้:
struct Range {
start: i32,
end: i32,
}
impl Range {
fn new(start: i32, end: i32) -> Range {
Range { start, end }
}
}
impl Iterator for Range {
type Item = i32;
fn next(&mut self) -> Option<Self::Item> {
if self.start < self.end {
let result = self.start;
self.start += 1;
Some(result)
} else {
None
}
}
}
impl DoubleEndedIterator for Range {
fn next_back(&mut self) -> Option<Self::Item> {
if self.start < self.end {
self.end -= 1;
Some(self.end)
} else {
None
}
}
}
fn main() {
// Forward
let forward: Vec<i32> = Range::new(1, 5).collect();
println!("Forward: {:?}", forward); // [1, 2, 3, 4]
// Reverse
let backward: Vec<i32> = Range::new(1, 5).rev().collect();
println!("Backward: {:?}", backward); // [4, 3, 2, 1]
}ExactSizeIterator
ถ้ารู้ขนาด:
impl ExactSizeIterator for Counter {
fn len(&self) -> usize {
(self.max - self.count) as usize
}
}
fn main() {
let counter = Counter::new(10);
println!("Size: {}", counter.len()); // 10
}ตัวอย่างจริง: Lines Iterator
struct Lines<'a> {
remaining: &'a str,
}
impl<'a> Lines<'a> {
fn new(s: &'a str) -> Lines<'a> {
Lines { remaining: s }
}
}
impl<'a> Iterator for Lines<'a> {
type Item = &'a str;
fn next(&mut self) -> Option<Self::Item> {
if self.remaining.is_empty() {
return None;
}
match self.remaining.find('\n') {
Some(pos) => {
let line = &self.remaining[..pos];
self.remaining = &self.remaining[pos + 1..];
Some(line)
}
None => {
let line = self.remaining;
self.remaining = "";
Some(line)
}
}
}
}
fn main() {
let text = "line1\nline2\nline3";
for line in Lines::new(text) {
println!("Line: {}", line);
}
}ลองทำดู! 🎯
- สร้าง iterator ที่นับถอยหลัง
- สร้าง Fibonacci iterator และ take(20)
- Implement IntoIterator สำหรับ custom struct
สรุปบทที่ 13
| Trait | Purpose | Method |
|---|---|---|
Iterator | Basic iteration | next() |
IntoIterator | Convert to iterator | into_iter() |
DoubleEndedIterator | Reverse | next_back() |
ExactSizeIterator | Known size | len() |
Key Points
- implement
next()→ ได้ methods ฟรี type Itemระบุ type ที่ returnIntoIteratorทำให้ใช้กับforได้
👉 ต่อไป: บทที่ 14: Smart Pointers
บทที่ 14: Smart Pointers
Smart pointers คือ structs ที่ทำตัวเหมือน pointers แต่มีความสามารถเพิ่มเติม
สิ่งที่จะได้เรียนรู้
| Type | คำอธิบาย |
|---|---|
| Box<T> | Heap allocation |
| Rc<T> | Reference counting |
| RefCell<T> | Interior mutability |
| Weak<T> | ป้องกัน cycles |
👉 Box<T>
Box<T>
Box<T> เก็บข้อมูลบน heap แทน stack เป็น smart pointer ที่ง่ายที่สุด
เมื่อไหร่ใช้ Box?
- Recursive types - type ที่มีตัวเองข้างใน
- Large data - ย้ายข้อมูลใหญ่ไป heap
- Trait objects - dynamic dispatch
- Transfer ownership โดยไม่ copy
📦 Smart Pointer Comparison
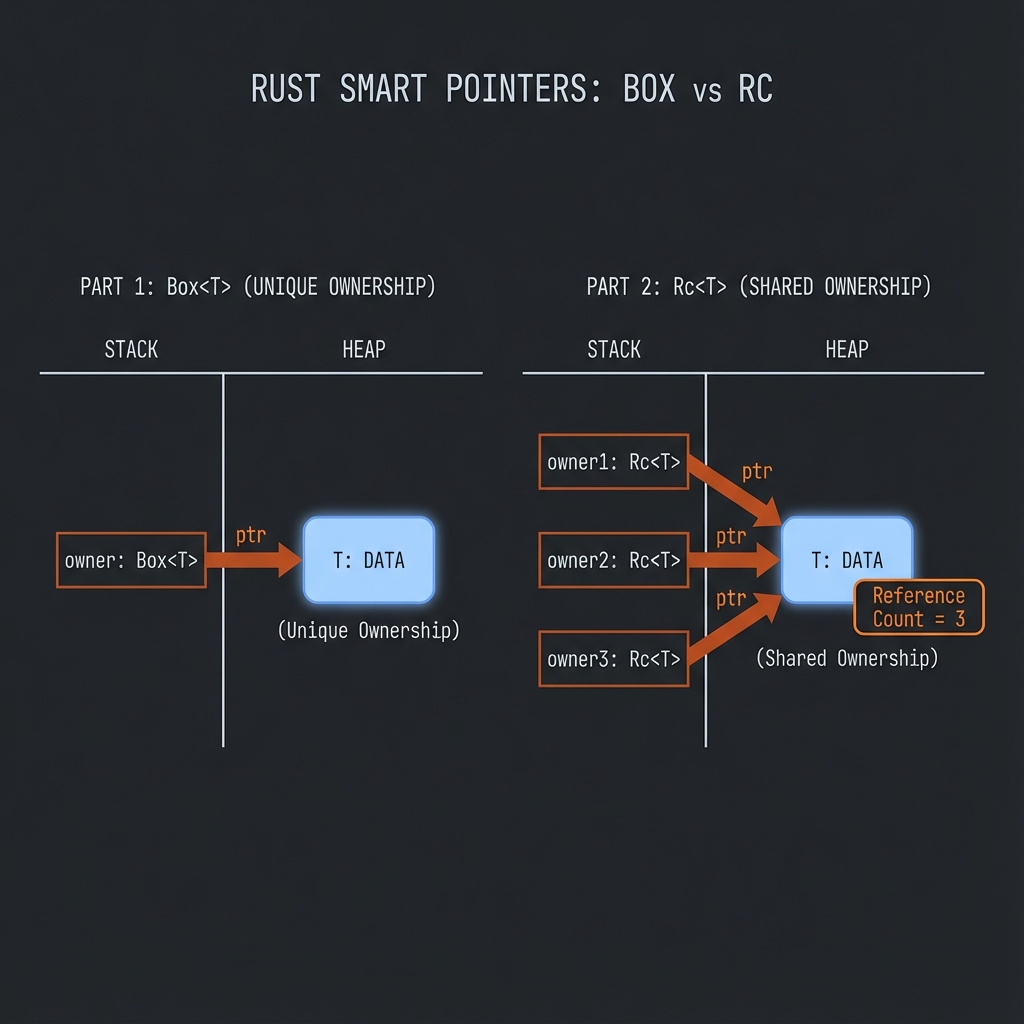
การใช้งานพื้นฐาน
fn main() {
let b = Box::new(5);
println!("b = {}", b);
// Box implements Deref ใช้เหมือน reference
let x = *b + 1;
println!("x = {}", x);
}Use Case 1: Recursive Types
ปัญหา: ขนาดไม่แน่นอน
#![allow(unused)]
fn main() {
// ❌ Error: recursive type has infinite size
enum List {
Cons(i32, List),
Nil,
}
}Compiler ไม่รู้ว่า List ใหญ่เท่าไหร่
ทางแก้: ใช้ Box
enum List {
Cons(i32, Box<List>),
Nil,
}
use List::{Cons, Nil};
fn main() {
let list = Cons(1,
Box::new(Cons(2,
Box::new(Cons(3,
Box::new(Nil))))));
// Print list
print_list(&list);
}
fn print_list(list: &List) {
match list {
Cons(value, next) => {
println!("{}", value);
print_list(next);
}
Nil => println!("End"),
}
}ทำไมใช้ได้? Box มีขนาดคงที่ (pointer size) ไม่ว่าจะชี้ไปที่อะไร
Stack Heap
+-------------+ +-------------+
| Cons(1, ----+-------->| Cons(2, ----+--->...
+-------------+ +-------------+
Use Case 2: Trait Objects
trait Draw {
fn draw(&self);
}
struct Circle { radius: f64 }
struct Square { side: f64 }
impl Draw for Circle {
fn draw(&self) {
println!("Drawing circle with radius {}", self.radius);
}
}
impl Draw for Square {
fn draw(&self) {
println!("Drawing square with side {}", self.side);
}
}
fn main() {
// Vec ของหลาย types ที่ implement Draw
let shapes: Vec<Box<dyn Draw>> = vec![
Box::new(Circle { radius: 5.0 }),
Box::new(Square { side: 3.0 }),
];
for shape in &shapes {
shape.draw();
}
}Use Case 3: Large Data Transfer
fn main() {
// Large array on stack
let big_array = [0u8; 1_000_000]; // 1MB on stack!
// Move to heap with Box
let boxed_array = Box::new([0u8; 1_000_000]); // 1MB on heap
// Now ownership transfer is cheap (just move pointer)
let another_owner = boxed_array; // Fast move!
}Deref Trait
Box implements Deref ทำให้ใช้งานเหมือน reference:
use std::ops::Deref;
fn main() {
let x = 5;
let y = Box::new(x);
assert_eq!(5, x);
assert_eq!(5, *y); // Deref แปลง Box<T> -> T
// Deref coercion
let s = Box::new(String::from("hello"));
hello(&s); // Box<String> -> &String -> &str
}
fn hello(name: &str) {
println!("Hello, {}!", name);
}Deref Coercion
Rust แปลง types อัตโนมัติผ่าน Deref chain:
// Box<String> -> String -> str
// &Box<String> -> &String -> &str
fn main() {
let b = Box::new(String::from("Rust"));
// ทั้งหมดนี้ใช้ได้เหมือนกัน
greet(&b); // &Box<String>
greet(&*b); // &String
greet(&(*b)[..]); // &str
}
fn greet(s: &str) {
println!("Hello, {}!", s);
}Drop Trait
Box จะ drop ทั้ง pointer และ data บน heap เมื่อออกจาก scope:
fn main() {
{
let b = Box::new(String::from("hello"));
println!("{}", b);
} // b dropped here → String on heap is freed
println!("Box is dropped!");
}Custom Drop
struct CustomSmartPointer {
data: String,
}
impl Drop for CustomSmartPointer {
fn drop(&mut self) {
println!("Dropping CustomSmartPointer with data `{}`!", self.data);
}
}
fn main() {
let c = CustomSmartPointer {
data: String::from("my stuff"),
};
let d = CustomSmartPointer {
data: String::from("other stuff"),
};
println!("CustomSmartPointers created.");
}
// Output:
// CustomSmartPointers created.
// Dropping CustomSmartPointer with data `other stuff`!
// Dropping CustomSmartPointer with data `my stuff`!Drop Early with std::mem::drop
fn main() {
let c = Box::new(String::from("hello"));
println!("Before drop");
drop(c); // Drop early
println!("After drop");
// println!("{}", c); // ❌ Error: c was moved
}เปรียบเทียบ Box กับ Stack
| Aspect | Stack | Box (Heap) |
|---|---|---|
| Size | ต้องรู้ตอน compile | ได้ตอน runtime |
| Speed | เร็วกว่า | ช้ากว่าเล็กน้อย |
| Ownership | Copy หรือ Move | Move pointer เท่านั้น |
| Use case | Small, fixed-size | Large, recursive, dynamic |
ลองทำดู! 🎯
- สร้าง Binary Tree ด้วย Box
- Implement trait object vector
- ลอง drop Box ก่อนออกจาก scope
สรุป
| แนวคิด | คำอธิบาย |
|---|---|
Box::new(x) | สร้าง Box ใส่ x บน heap |
*box | Deref ดึงค่าออก |
| Recursive types | ใช้ Box ให้ขนาดคงที่ |
| Trait objects | Box\<dyn Trait\> |
| Drop | อัตโนมัติเมื่อออกจาก scope |
👉 ต่อไป: Rc<T>
Rc<T>
Rc<T> (Reference Counted) ให้หลาย owners ได้ ใช้เมื่อต้องการ share ownership
เมื่อไหร่ใช้ Rc?
ปกติ Rust มี owner เดียว แต่บางครั้งต้องการหลาย owners:
+-----+
| a |
+--+--+
|
+--v--+
| 5 |<-- want b and c to share this too
+-----+
^
+----+----+
+--+--+ +--+--+
| b | | c |
+-----+ +-----+
การใช้งาน
use std::rc::Rc;
fn main() {
let a = Rc::new(String::from("hello"));
println!("Count after a: {}", Rc::strong_count(&a)); // 1
let b = Rc::clone(&a); // เพิ่ม reference count
println!("Count after b: {}", Rc::strong_count(&a)); // 2
{
let c = Rc::clone(&a);
println!("Count in block: {}", Rc::strong_count(&a)); // 3
} // c dropped, count -= 1
println!("Count after block: {}", Rc::strong_count(&a)); // 2
}หมายเหตุ:
Rc::cloneไม่ copy data แค่เพิ่ม reference count
Rc::clone vs .clone()
use std::rc::Rc;
fn main() {
let a = Rc::new(vec![1, 2, 3]);
// ✅ Preferred: ชัดเจนว่าเพิ่ม reference count
let b = Rc::clone(&a);
// ✅ ก็ใช้ได้ แต่อาจสับสนกับ deep clone
let c = a.clone();
// Both b and c point to the same data
}Shared List Example
use std::rc::Rc;
enum List {
Cons(i32, Rc<List>),
Nil,
}
use List::{Cons, Nil};
fn main() {
// a = [5, 10, Nil]
let a = Rc::new(Cons(5, Rc::new(Cons(10, Rc::new(Nil)))));
println!("Count after a: {}", Rc::strong_count(&a)); // 1
// b = [3, -> a]
let b = Cons(3, Rc::clone(&a));
println!("Count after b: {}", Rc::strong_count(&a)); // 2
// c = [4, -> a]
let c = Cons(4, Rc::clone(&a));
println!("Count after c: {}", Rc::strong_count(&a)); // 3
// a ถูก share โดย b และ c
}b: Cons(3, --+
| +-------------------------+
+---->| a: Cons(5, Cons(10, Nil))|
+---->| |
| +-------------------------+
c: Cons(4, --+
Rc<T> Properties
| Property | Description |
|---|---|
| Single-threaded | ไม่ thread-safe |
| Immutable | ได้แค่ &T ไม่ได้ &mut T |
| No Copy | ใช้ Rc::clone() |
| Automatic drop | เมื่อ count เป็น 0 |
Rc กับ Methods
use std::rc::Rc;
fn main() {
let a = Rc::new(String::from("hello"));
// Deref ใช้ methods ของ inner type ได้
println!("Length: {}", a.len());
println!("Uppercase: {}", a.to_uppercase());
// Rc methods
println!("Strong count: {}", Rc::strong_count(&a));
// Get reference
let s: &String = &a;
println!("Ref: {}", s);
}Rc::downgrade และ Weak
use std::rc::{Rc, Weak};
fn main() {
let strong = Rc::new(5);
let weak: Weak<i32> = Rc::downgrade(&strong);
println!("Strong count: {}", Rc::strong_count(&strong)); // 1
println!("Weak count: {}", Rc::weak_count(&strong)); // 1
// Weak ต้อง upgrade เป็น Rc ก่อนใช้
if let Some(value) = weak.upgrade() {
println!("Value: {}", value);
}
drop(strong); // strong dropped
// Weak ยัง upgrade ไม่ได้
assert!(weak.upgrade().is_none());
}Weak ใช้ป้องกัน reference cycles (ดูบท 04-weak.md)
ข้อจำกัดของ Rc
use std::rc::Rc;
fn main() {
let a = Rc::new(5);
// ❌ Error: cannot borrow as mutable
// *a += 1;
// Rc ให้แค่ shared reference (&T)
// ถ้าต้องการ mutate ใช้ร่วมกับ RefCell
}Rc + RefCell Pattern
use std::rc::Rc;
use std::cell::RefCell;
fn main() {
// Multiple owners + Interior mutability
let value = Rc::new(RefCell::new(5));
let a = Rc::clone(&value);
let b = Rc::clone(&value);
// ทั้ง a และ b สามารถ mutate ได้
*a.borrow_mut() += 10;
*b.borrow_mut() += 10;
println!("Value: {}", value.borrow()); // 25
}ลองทำดู! 🎯
- สร้าง shared data ด้วย Rc
- Print strong_count ขณะ clone และ drop
- ลอง combine Rc กับ RefCell
สรุป
| Function | คำอธิบาย |
|---|---|
Rc::new(v) | สร้าง Rc ใหม่ |
Rc::clone(&rc) | เพิ่ม reference count |
Rc::strong_count(&rc) | จำนวน strong references |
Rc::weak_count(&rc) | จำนวน weak references |
Rc::downgrade(&rc) | สร้าง Weak reference |
เมื่อไหร่ใช้
| Situation | Use |
|---|---|
| Single owner | ปกติ (ไม่ต้อง Rc) |
| Multiple owners, single-thread | Rc |
| Multiple owners, multi-thread | Arc (บทที่ 15) |
| Mutability needed | Rc + RefCell |
👉 ต่อไป: RefCell<T>
RefCell<T>
RefCell<T> ให้ interior mutability - mutate ข้อมูลแม้มี immutable references
ปัญหา: Borrowing Rules ตอน Compile
fn main() {
let x = 5;
// ❌ Error at compile time
// let y = &mut x; // cannot borrow as mutable
}บางครั้งต้องการ mutate แม้ interface เป็น immutable
RefCell Basics
use std::cell::RefCell;
fn main() {
let data = RefCell::new(5);
// borrow() returns Ref<T> (like &T)
println!("Value: {}", data.borrow());
// borrow_mut() returns RefMut<T> (like &mut T)
*data.borrow_mut() += 1;
println!("Value: {}", data.borrow()); // 6
}Compile-time vs Runtime
| Aspect | &T / &mut T | RefCell |
|---|---|---|
| Check | Compile-time | Runtime |
| Error | Compile error | Panic |
| Flexibility | Strict | Flexible |
| Performance | No overhead | Small overhead |
use std::cell::RefCell;
fn main() {
let data = RefCell::new(5);
let borrow1 = data.borrow();
let borrow2 = data.borrow(); // ✅ OK - multiple immutable borrows
println!("{} {}", borrow1, borrow2);
drop(borrow1);
drop(borrow2);
let mut_borrow = data.borrow_mut();
// let another = data.borrow_mut(); // 💥 Panic at runtime!
}Borrowing Rules (Runtime)
เหมือนกับ compile-time rules:
- หลาย immutable borrows ได้
- หนึ่ง mutable borrow เท่านั้น
- ไม่มี mutable + immutable พร้อมกัน
use std::cell::RefCell;
fn main() {
let data = RefCell::new(vec![1, 2, 3]);
// ✅ Multiple borrows (must be dropped before mut borrow)
{
let a = data.borrow();
let b = data.borrow();
println!("{:?} {:?}", a, b);
}
// ✅ Single mut borrow
{
let mut c = data.borrow_mut();
c.push(4);
}
println!("{:?}", data.borrow());
}try_borrow และ try_borrow_mut
ไม่ panic แต่ return Result:
use std::cell::RefCell;
fn main() {
let data = RefCell::new(5);
let borrow = data.borrow();
match data.try_borrow_mut() {
Ok(mut value) => *value += 1,
Err(_) => println!("Already borrowed!"),
}
}Use Case: Mock Objects
use std::cell::RefCell;
trait Messenger {
fn send(&self, msg: &str);
}
struct MockMessenger {
messages: RefCell<Vec<String>>,
}
impl MockMessenger {
fn new() -> MockMessenger {
MockMessenger {
messages: RefCell::new(vec![]),
}
}
}
impl Messenger for MockMessenger {
fn send(&self, msg: &str) {
// &self is immutable, but we can still mutate!
self.messages.borrow_mut().push(String::from(msg));
}
}
fn main() {
let messenger = MockMessenger::new();
messenger.send("Hello");
messenger.send("World");
assert_eq!(messenger.messages.borrow().len(), 2);
}Rc + RefCell = Multiple Owners + Mutability
use std::cell::RefCell;
use std::rc::Rc;
#[derive(Debug)]
struct Node {
value: i32,
children: RefCell<Vec<Rc<Node>>>,
}
fn main() {
let leaf = Rc::new(Node {
value: 3,
children: RefCell::new(vec![]),
});
let branch = Rc::new(Node {
value: 5,
children: RefCell::new(vec![Rc::clone(&leaf)]),
});
// Add another child to branch
branch.children.borrow_mut().push(Rc::new(Node {
value: 7,
children: RefCell::new(vec![]),
}));
println!("leaf: {:#?}", leaf);
println!("branch: {:#?}", branch);
}Common Pattern: Shared Mutable State
use std::cell::RefCell;
use std::rc::Rc;
fn main() {
let counter = Rc::new(RefCell::new(0));
let counter1 = Rc::clone(&counter);
let counter2 = Rc::clone(&counter);
*counter1.borrow_mut() += 1;
*counter2.borrow_mut() += 1;
*counter.borrow_mut() += 1;
println!("Final count: {}", counter.borrow()); // 3
}Cell<T> (simpler alternative)
สำหรับ Copy types:
use std::cell::Cell;
fn main() {
let x = Cell::new(5);
x.set(10); // ไม่ต้อง borrow
let value = x.get(); // Copy ออกมา
println!("{}", value); // 10
}| Type | Best for |
|---|---|
| Cell<T> | Copy types (i32, bool, etc.) |
| RefCell<T> | Non-Copy types (String, Vec, etc.) |
ลองทำดู! 🎯
- สร้าง struct ที่มี
RefCell\<Vec\<String\>\> - Implement method ที่ modify Vec ผ่าน &self
- ลอง borrow ผิด rule และดู panic
สรุป
| Method | Return | Panics |
|---|---|---|
borrow() | Ref<T> | If mutably borrowed |
borrow_mut() | RefMut<T> | If any borrow exists |
try_borrow() | Result<Ref<T>, BorrowError> | Never |
try_borrow_mut() | Result<RefMut<T>, BorrowMutError> | Never |
เลือกใช้
| Situation | Use |
|---|---|
| Need mutability through &self | RefCell |
| Copy types | Cell |
| Thread-safe | Mutex |
| Multiple owners + mutability | Rc<RefCell<T>> |
👉 ต่อไป: Weak<T>
Weak<T>
Weak<T> เป็น reference ที่ไม่นับ ใช้ป้องกัน reference cycles (memory leak)
ปัญหา: Reference Cycle
เมื่อ Rc ชี้หากันเป็นวงกลม:
+--------------------------+
| |
v |
+------+ strong +------+|
| Node |<------------>| Node ||
| A | | B ||
+------+ +------+|
| |
+--------------------------+
When A and B go out of scope:
- A has strong reference from B -> not dropped
- B has strong reference from A -> not dropped
-> Memory leak!
ทางออก: ใช้ Weak
use std::rc::{Rc, Weak};
// Weak ไม่นับ reference
// ถ้า strong count เป็น 0 → data ถูก drop
// แม้จะยังมี weak references อยู่Rc::downgrade และ Weak::upgrade
use std::rc::{Rc, Weak};
fn main() {
let strong = Rc::new(5);
// สร้าง Weak จาก Rc
let weak: Weak<i32> = Rc::downgrade(&strong);
println!("Strong count: {}", Rc::strong_count(&strong)); // 1
println!("Weak count: {}", Rc::weak_count(&strong)); // 1
// Weak ต้อง upgrade เป็น Rc ก่อนใช้
if let Some(value) = weak.upgrade() {
println!("Value: {}", value); // 5
}
// Drop strong reference
drop(strong);
// Weak upgrade ไม่ได้แล้ว
assert!(weak.upgrade().is_none());
println!("Data is gone!");
}ตัวอย่าง: Tree Structure
use std::rc::{Rc, Weak};
use std::cell::RefCell;
#[derive(Debug)]
struct Node {
value: i32,
parent: RefCell<Weak<Node>>, // Weak ไป parent
children: RefCell<Vec<Rc<Node>>>, // Strong ไป children
}
fn main() {
// สร้าง leaf node
let leaf = Rc::new(Node {
value: 3,
parent: RefCell::new(Weak::new()),
children: RefCell::new(vec![]),
});
println!("leaf strong count: {}", Rc::strong_count(&leaf)); // 1
// สร้าง branch node
let branch = Rc::new(Node {
value: 5,
parent: RefCell::new(Weak::new()),
children: RefCell::new(vec![Rc::clone(&leaf)]),
});
// ตั้ง parent ของ leaf (weak reference)
*leaf.parent.borrow_mut() = Rc::downgrade(&branch);
println!("After linking:");
println!(" leaf strong: {}", Rc::strong_count(&leaf)); // 2 (leaf + branch's child)
println!(" branch strong: {}", Rc::strong_count(&branch)); // 1
println!(" branch weak: {}", Rc::weak_count(&branch)); // 1 (leaf's parent)
// Access parent
if let Some(parent) = leaf.parent.borrow().upgrade() {
println!("leaf's parent value: {}", parent.value); // 5
}
}ทำไมถึงไม่ leak?
branch (strong=1, weak=1)
^ Weak
|
+-+
|
leaf ---------+ Strong (in children vec)
When branch goes out of scope:
1. branch's strong=0 -> branch is dropped
2. leaf's strong -1 (from branch's children)
3. leaf's strong=1 -> still alive
4. leaf's parent.upgrade() = None
เมื่อไหร่ใช้ Weak?
| Situation | Use |
|---|---|
| Parent → Children | Rc (strong) |
| Children → Parent | Weak |
| Observer pattern | Weak (observers) |
| Cache | Weak (cached data) |
| Breaking cycles | Weak |
ตัวอย่าง: Observer Pattern
use std::rc::{Rc, Weak};
use std::cell::RefCell;
trait Observer {
fn notify(&self, message: &str);
}
struct Subject {
observers: RefCell<Vec<Weak<dyn Observer>>>,
}
impl Subject {
fn new() -> Subject {
Subject {
observers: RefCell::new(vec![]),
}
}
fn subscribe(&self, observer: &Rc<dyn Observer>) {
self.observers.borrow_mut().push(Rc::downgrade(observer));
}
fn notify_all(&self, message: &str) {
// Clean up dead observers and notify living ones
self.observers.borrow_mut().retain(|weak| {
if let Some(observer) = weak.upgrade() {
observer.notify(message);
true // keep
} else {
false // remove dead reference
}
});
}
}
struct Logger;
impl Observer for Logger {
fn notify(&self, message: &str) {
println!("[LOG] {}", message);
}
}
fn main() {
let subject = Subject::new();
{
let logger: Rc<dyn Observer> = Rc::new(Logger);
subject.subscribe(&logger);
subject.notify_all("Hello"); // [LOG] Hello
} // logger dropped here
subject.notify_all("World"); // Nothing printed, observer is gone
}Weak Methods
| Method | Description |
|---|---|
Rc::downgrade(&rc) | สร้าง Weak จาก Rc |
weak.upgrade() | Option\<Rc\<T\>\> - None ถ้า data ถูก drop |
Weak::new() | สร้าง Weak ว่าง (upgrade = None เสมอ) |
weak.strong_count() | จำนวน strong refs (0 ถ้า dropped) |
weak.weak_count() | จำนวน weak refs |
ลองทำดู! 🎯
- สร้าง doubly-linked list ด้วย Rc + Weak
- สร้าง observer pattern
- ลอง drop Rc แล้วดู Weak::upgrade()
สรุปบทที่ 14
| Type | Ownership | Count | Use Case |
|---|---|---|---|
Box\<T\> | Single | - | Heap allocation |
Rc\<T\> | Shared | Strong | Multiple owners |
Weak\<T\> | Non-owning | Weak | Break cycles |
RefCell\<T\> | Single | - | Interior mutability |
Patterns
// Tree data structure
struct Node {
value: i32,
parent: RefCell<Weak<Node>>, // Weak up
children: RefCell<Vec<Rc<Node>>>, // Strong down
}
// Shared mutable state
Rc<RefCell<T>>
// Break reference cycles
Weak<T>👉 ต่อไป: บทที่ 15: Concurrency
บทที่ 15: Concurrency - การทำงานพร้อมกัน
Rust ทำให้ concurrent programming ปลอดภัย
สิ่งที่จะได้เรียนรู้
| หัวข้อ | คำอธิบาย |
|---|---|
| Threads | สร้างและจัดการ threads |
| Message Passing | ส่งข้อมูลด้วย channels |
| Shared State | Mutex และ Arc |
| Sync & Send | Marker traits |
👉 Threads
Threads
การสร้างและจัดการ threads ใน Rust
🧵 Thread Visualization
+-------------------------------------------------------------------+
| Multi-Threading in Rust |
+-------------------------------------------------------------------+
| |
| Main Thread Spawned Thread |
| ----------- -------------- |
| | |
| | spawn -----------------------> | |
| | | |
| v v |
| +-------+ +-------+ |
| | Task1 | | TaskA | |
| +-------+ +-------+ |
| | | |
| +-------+ +-------+ |
| | Task2 | | TaskB | |
| +-------+ +-------+ |
| | | |
| | <-------- join() -------------+ |
| | |
| v |
| Continue |
| |
+-------------------------------------------------------------------+
สร้าง Thread
use std::thread;
use std::time::Duration;
fn main() {
let handle = thread::spawn(|| {
for i in 1..5 {
println!("hi from spawned thread: {}", i);
thread::sleep(Duration::from_millis(1));
}
});
for i in 1..3 {
println!("hi from main thread: {}", i);
thread::sleep(Duration::from_millis(1));
}
// รอ thread จบ
handle.join().unwrap();
}Output (อาจต่างกันแต่ละครั้ง):
hi from main thread: 1
hi from spawned thread: 1
hi from main thread: 2
hi from spawned thread: 2
hi from spawned thread: 3
hi from spawned thread: 4
JoinHandle
thread::spawn returns JoinHandle<T>:
use std::thread;
fn main() {
let handle = thread::spawn(|| {
// return value from thread
42
});
// join() returns Result<T, E>
let result = handle.join().unwrap();
println!("Thread returned: {}", result);
}รอหลาย Threads
use std::thread;
fn main() {
let mut handles = vec![];
for i in 0..5 {
let handle = thread::spawn(move || {
println!("Thread {} starting", i);
i * 2
});
handles.push(handle);
}
// รอทุก threads จบ
let results: Vec<i32> = handles
.into_iter()
.map(|h| h.join().unwrap())
.collect();
println!("Results: {:?}", results);
}Move Closure
ใช้ move เพื่อย้าย ownership เข้า thread:
use std::thread;
fn main() {
let v = vec![1, 2, 3];
// ❌ Error: closure may outlive the current function
// let handle = thread::spawn(|| {
// println!("vector: {:?}", v);
// });
// ✅ ใช้ move
let handle = thread::spawn(move || {
println!("vector: {:?}", v);
});
// println!("{:?}", v); // ❌ v was moved
handle.join().unwrap();
}Thread Builder
กำหนด thread name และ stack size:
use std::thread;
fn main() {
let builder = thread::Builder::new()
.name("worker".to_string())
.stack_size(4 * 1024 * 1024); // 4MB stack
let handle = builder.spawn(|| {
println!("Thread name: {:?}", thread::current().name());
}).unwrap();
handle.join().unwrap();
}Thread Information
use std::thread;
fn main() {
// Current thread info
let current = thread::current();
println!("Main thread name: {:?}", current.name());
println!("Main thread id: {:?}", current.id());
let handle = thread::spawn(|| {
let current = thread::current();
println!("Spawned thread name: {:?}", current.name());
println!("Spawned thread id: {:?}", current.id());
});
handle.join().unwrap();
// จำนวน CPU cores
println!("Available parallelism: {:?}", thread::available_parallelism());
}Panic Handling in Threads
Panic ใน thread หนึ่งไม่กระทบ threads อื่น:
use std::thread;
fn main() {
let handle = thread::spawn(|| {
panic!("oops!");
});
// join() returns Err if thread panicked
match handle.join() {
Ok(_) => println!("Thread completed successfully"),
Err(e) => println!("Thread panicked: {:?}", e),
}
println!("Main thread continues!");
}Thread Parking
หยุด thread ชั่วคราว:
use std::thread;
use std::time::Duration;
fn main() {
let parked_thread = thread::spawn(|| {
println!("Thread starting, will park...");
thread::park(); // รอจนกว่าจะถูก unpark
println!("Thread unparked!");
});
thread::sleep(Duration::from_secs(1));
println!("Main thread unparking the other thread");
parked_thread.thread().unpark();
parked_thread.join().unwrap();
}Scoped Threads (Rust 1.63+)
ยืม data โดยไม่ต้อง move:
use std::thread;
fn main() {
let numbers = vec![1, 2, 3];
thread::scope(|s| {
s.spawn(|| {
println!("numbers: {:?}", numbers); // borrow, not move!
});
s.spawn(|| {
println!("length: {}", numbers.len());
});
}); // threads จบเมื่อ scope จบ
// numbers ยังใช้ได้!
println!("After scope: {:?}", numbers);
}ตัวอย่างจริง: Parallel Computation
use std::thread;
fn main() {
let data = vec![1, 2, 3, 4, 5, 6, 7, 8, 9, 10];
let chunk_size = data.len() / 2;
let (left, right) = data.split_at(chunk_size);
thread::scope(|s| {
let left_sum = s.spawn(|| -> i32 {
left.iter().sum()
});
let right_sum = s.spawn(|| -> i32 {
right.iter().sum()
});
let total = left_sum.join().unwrap() + right_sum.join().unwrap();
println!("Total sum: {}", total);
});
}ลองทำดู! 🎯
- สร้าง 3 threads ที่ print message แล้วรอทุก thread จบ
- ใช้ thread::scope เพื่อ borrow data
- จัดการ panic ใน thread ด้วย join()
💪 Advanced Exercises
Exercise 1: Parallel Sum
// เขียน function ที่คำนวณ sum ของ vector โดยแบ่งงานให้ 4 threads
fn parallel_sum(numbers: Vec<i32>) -> i32 {
// TODO: แบ่ง vector เป็น 4 ส่วน
// TODO: สร้าง 4 threads คำนวณ sum แต่ละส่วน
// TODO: รวมผลลัพธ์
todo!()
}ดูเฉลย
use std::thread;
fn parallel_sum(numbers: Vec<i32>) -> i32 {
let chunk_size = numbers.len() / 4;
let chunks: Vec<Vec<i32>> = numbers
.chunks(chunk_size)
.map(|c| c.to_vec())
.collect();
let handles: Vec<_> = chunks
.into_iter()
.map(|chunk| {
thread::spawn(move || chunk.iter().sum::<i32>())
})
.collect();
handles.into_iter().map(|h| h.join().unwrap()).sum()
}Exercise 2: Thread-Safe Counter
// สร้าง counter ที่หลาย threads เพิ่มค่าพร้อมกันได้
// Hint: ใช้ Arc<Mutex<i32>>ดูเฉลย
use std::sync::{Arc, Mutex};
use std::thread;
fn main() {
let counter = Arc::new(Mutex::new(0));
let mut handles = vec![];
for _ in 0..10 {
let counter = Arc::clone(&counter);
handles.push(thread::spawn(move || {
let mut num = counter.lock().unwrap();
*num += 1;
}));
}
for handle in handles {
handle.join().unwrap();
}
println!("Result: {}", *counter.lock().unwrap()); // 10
}📝 ทดสอบความเข้าใจ
Q1: ทำไมต้องใช้ move กับ closure ใน thread::spawn?
A: เพราะ thread อาจอยู่นานกว่า scope ที่สร้างมัน ดังนั้นต้อง move ownership ของ captured variables เข้าไปใน thread เพื่อป้องกัน dangling references
Q2: thread::scope ต่างจาก thread::spawn อย่างไร?
A: thread::scope รับประกันว่า threads ทั้งหมดจะจบก่อนออกจาก scope ทำให้สามารถ borrow data จาก parent scope ได้โดยไม่ต้อง move
Q3: จะจัดการ panic ใน thread อย่างไร?
A: ใช้ handle.join() ที่ return Result<T, Box<dyn Any>> หาก thread panic จะได้ Err ที่มีข้อมูล panic แทน
สรุป
| Function | คำอธิบาย |
|---|---|
thread::spawn | สร้าง thread ใหม่ |
handle.join() | รอ thread จบ |
move || {} | ย้าย ownership เข้า thread |
thread::scope | Scoped threads (borrow ได้) |
thread::current() | ข้อมูล current thread |
thread::park() | หยุด thread ชั่วคราว |
thread::Builder | กำหนด name/stack size |
👉 ต่อไป: Message Passing
Message Passing
ส่งข้อมูลระหว่าง threads ด้วย channels
Basic Channel
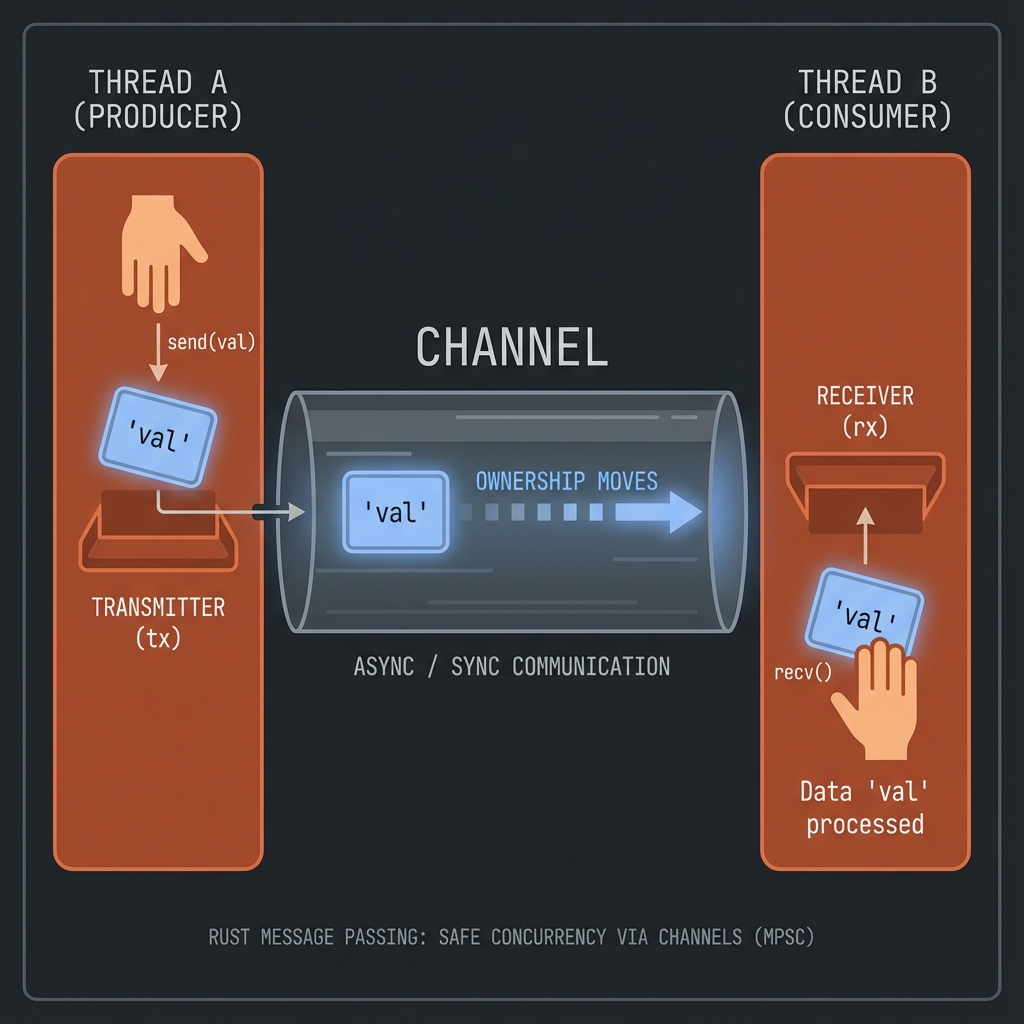
use std::sync::mpsc;
use std::thread;
fn main() {
let (tx, rx) = mpsc::channel();
thread::spawn(move || {
let val = String::from("hi");
tx.send(val).unwrap();
});
let received = rx.recv().unwrap();
println!("Got: {}", received);
}Multiple Messages
use std::sync::mpsc;
use std::thread;
use std::time::Duration;
fn main() {
let (tx, rx) = mpsc::channel();
thread::spawn(move || {
let vals = vec!["hi", "from", "thread"];
for val in vals {
tx.send(val).unwrap();
thread::sleep(Duration::from_millis(200));
}
});
for received in rx {
println!("Got: {}", received);
}
}Multiple Producers
use std::sync::mpsc;
use std::thread;
fn main() {
let (tx, rx) = mpsc::channel();
let tx1 = tx.clone();
thread::spawn(move || {
tx.send("from thread 1").unwrap();
});
thread::spawn(move || {
tx1.send("from thread 2").unwrap();
});
for received in rx {
println!("Got: {}", received);
}
}👉 ต่อไป: Shared State
Shared State
แชร์ข้อมูลระหว่าง threads ด้วย Mutex
Mutex
use std::sync::Mutex;
fn main() {
let m = Mutex::new(5);
{
let mut num = m.lock().unwrap();
*num = 6;
} // lock released here
println!("m = {:?}", m);
}⚠️ คำเตือน: อันตรายของ Concurrency
- 🔴 Deadlock - 2 threads รอกันไปมา ไม่มีใครทำงานต่อ
- 🔴 Data Race - หลาย threads แก้ไขข้อมูลพร้อมกัน
- 🔴 Poison - Mutex ถูก poison ถ้า thread panic ขณะถือ lock
+---------------------------------------------------------+ | Deadlock Example | +---------------------------------------------------------+ | Thread A: lock(mutex1) -> wait lock(mutex2) | | Thread B: lock(mutex2) -> wait lock(mutex1) | | !! ทั้งสองรอกันตลอดไป! | +---------------------------------------------------------+
💡 Best Practices
- ✅ Lock เร็วที่สุด, ปล่อยเร็วที่สุด
- ✅ Lock ตามลำดับเดียวกันทุก thread
- ✅ ใช้
try_lock()เพื่อหลีกเลี่ยง deadlock- ✅ ใช้ channels แทน shared state เมื่อเป็นไปได้
Arc + Mutex
Arc = Atomic Reference Counting (thread-safe Rc)
use std::sync::{Arc, Mutex};
use std::thread;
fn main() {
let counter = Arc::new(Mutex::new(0));
let mut handles = vec![];
for _ in 0..10 {
let counter = Arc::clone(&counter);
let handle = thread::spawn(move || {
let mut num = counter.lock().unwrap();
*num += 1;
});
handles.push(handle);
}
for handle in handles {
handle.join().unwrap();
}
println!("Result: {}", *counter.lock().unwrap()); // 10
}👉 ต่อไป: Sync & Send
Sync & Send
Marker traits สำหรับ concurrency
Send
Type ที่ส่งระหว่าง threads ได้:
#![allow(unused)]
fn main() {
// Most types are Send
// Rc<T> is NOT Send (use Arc<T> instead)
}Sync
Type ที่หลาย threads เข้าถึงพร้อมกันได้:
#![allow(unused)]
fn main() {
// T is Sync if &T is Send
// RefCell<T> is NOT Sync
// Mutex<T> IS Sync
}สรุปบทที่ 15
| แนวคิด | ใช้เมื่อ |
|---|---|
| thread::spawn | สร้าง thread |
| channel | ส่งข้อมูลระหว่าง threads |
| Mutex | ป้องกัน data race |
| Arc | แชร์ ownership ระหว่าง threads |
👉 ต่อไป: บทที่ 16: Async/Await
บทที่ 16: Async/Await
Asynchronous programming สำหรับ I/O-bound tasks
สิ่งที่จะได้เรียนรู้
| หัวข้อ | คำอธิบาย |
|---|---|
| async/await | พื้นฐาน |
| Futures | Future trait |
| Tokio | Runtime ยอดนิยม |
| Patterns | select!, join! |
Async พื้นฐาน
Asynchronous programming ใน Rust ช่วยจัดการ I/O-bound tasks อย่างมีประสิทธิภาพ
⚡ Async vs Sync Visualization
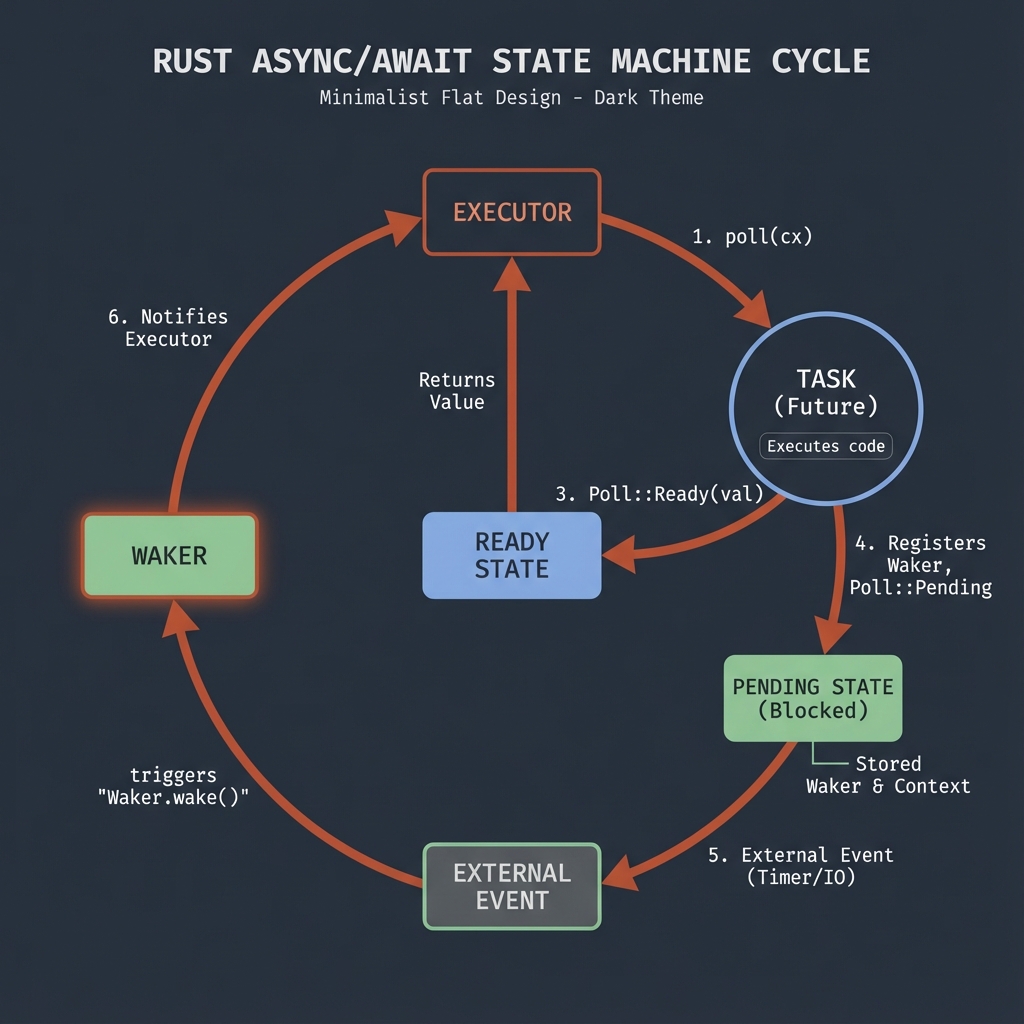
Sync vs Async
Synchronous (Blocking)
fn main() {
let data1 = fetch_data_1(); // รอ... 2 seconds
let data2 = fetch_data_2(); // รอ... 2 seconds
// Total: 4 seconds
}Asynchronous (Non-blocking)
async fn main() {
let (data1, data2) = join!(
fetch_data_1(), // เริ่มพร้อมกัน
fetch_data_2()
);
// Total: ~2 seconds
}async fn
async fn hello_world() {
println!("Hello, world!");
}
// async fn returns a Future
// must be run by an executorasync fn returns impl Future - ไม่รันทันที ต้อง await หรือใช้ executor
.await
async fn fetch_number() -> i32 {
// simulate async work
42
}
async fn main() {
let number = fetch_number().await; // รอ Future complete
println!("Number: {}", number);
}Sequential vs Concurrent
async fn learn_song() -> String {
tokio::time::sleep(std::time::Duration::from_secs(1)).await;
"La la la".to_string()
}
async fn sing_song(song: &str) {
println!("Singing: {}", song);
}
async fn dance() {
tokio::time::sleep(std::time::Duration::from_secs(1)).await;
println!("Dancing!");
}
// Sequential
async fn sequential() {
let song = learn_song().await; // 1 sec
sing_song(&song).await;
dance().await; // 1 sec
// Total: 2+ seconds
}
// Concurrent - dance while learning
async fn concurrent() {
let (song, _) = tokio::join!(
learn_song(), // start learning
dance() // dance at the same time
);
sing_song(&song).await;
// Total: ~1 second (overlapped)
}Runtime: Tokio
Rust ไม่มี async runtime ในตัว ต้องใช้ library:
# Cargo.toml
[dependencies]
tokio = { version = "1", features = ["full"] }
Basic Usage
#[tokio::main]
async fn main() {
println!("Hello from async main!");
let result = do_something().await;
println!("Result: {}", result);
}
async fn do_something() -> i32 {
// simulate async work
tokio::time::sleep(std::time::Duration::from_millis(100)).await;
42
}Manual Runtime
fn main() {
let rt = tokio::runtime::Runtime::new().unwrap();
rt.block_on(async {
println!("Running on tokio runtime");
});
}async Block
async fn example() {
let future = async {
// code here runs lazily
println!("Inside async block");
42
};
// future ยังไม่รัน!
let result = future.await;
println!("Result: {}", result);
}Capture Variables
async fn example() {
let name = String::from("Alice");
// move ownership into async block
let greeting = async move {
format!("Hello, {}!", name)
};
// name moved, can't use here
// println!("{}", name); // ❌
println!("{}", greeting.await);
}Futures are Lazy
async fn my_async_fn() {
println!("This runs when awaited");
}
fn main() {
let future = my_async_fn(); // ไม่รันอะไรเลย!
// ต้อง await หรือใช้ executor
// future.await; // or
// tokio::runtime::Runtime::new().unwrap().block_on(future);
}Return Types
use std::future::Future;
// These are equivalent:
async fn foo() -> i32 {
42
}
fn bar() -> impl Future<Output = i32> {
async {
42
}
}Error Handling in Async
async fn fetch_data() -> Result<String, std::io::Error> {
// simulate possible failure
Ok("data".to_string())
}
#[tokio::main]
async fn main() -> Result<(), Box<dyn std::error::Error>> {
let data = fetch_data().await?;
println!("Data: {}", data);
Ok(())
}Async in Traits (Rust 1.75+)
trait AsyncFetcher {
async fn fetch(&self) -> String;
}
struct MyFetcher;
impl AsyncFetcher for MyFetcher {
async fn fetch(&self) -> String {
"data".to_string()
}
}When to Use Async
| Situation | Use |
|---|---|
| I/O-bound (network, files) | ✅ Async |
| CPU-bound (computation) | ❌ Use threads |
| Need simple code | ❌ Stick with sync |
| High concurrency | ✅ Async |
ลองทำดู! 🎯
- สร้าง async function ที่ return Result
- ใช้ tokio::time::sleep แล้ว await
- ลอง tokio::join! กับ 2 futures
สรุป
| Concept | Description |
|---|---|
async fn | Returns Future |
.await | Wait for Future |
async { } | Async block |
#[tokio::main] | Async main entry |
| Lazy | Futures don’t run until awaited |
Runtimes
| Runtime | Use Case |
|---|---|
| Tokio | General purpose, most popular |
| async-std | Simpler, std-like API |
| smol | Minimal, lightweight |
👉 ต่อไป: Futures
Futures
Future คือ trait หลักของ async programming ใน Rust
Future Trait
pub trait Future {
type Output;
fn poll(self: Pin<&mut Self>, cx: &mut Context<'_>) -> Poll<Self::Output>;
}
pub enum Poll<T> {
Ready(T), // Future เสร็จแล้ว มีค่า T
Pending, // ยังไม่เสร็จ ให้ poll อีกทีหลัง
}ทำงานอย่างไร?
+-------------+
| Future |
+------+------+
| poll()
v
+-------------+-------------+
| |
Poll::Ready(T) Poll::Pending
(เสร็จแล้ว) (รอก่อน)
| |
v v
ใช้ค่า T Executor จะ poll อีกครั้งเมื่อพร้อม
async Block
สร้าง anonymous Future:
async fn example() {
let future = async {
println!("Inside async block");
42
};
// future ยังไม่รัน!
let result = future.await; // รันตอนนี้
println!("Result: {}", result);
}Futures are Lazy
สำคัญมาก: Future ไม่ทำอะไรจนกว่าจะถูก poll
async fn do_something() {
println!("This runs when polled!");
}
fn main() {
let future = do_something(); // ไม่ print!
// ต้อง await หรือใช้ executor
// ไม่งั้น future จะไม่ทำอะไรเลย
drop(future); // ทิ้งทั้งที่ยังไม่ได้รัน
}Combine Futures
Sequential
async fn sequential() {
let a = async_fn_1().await; // รัน 1 ก่อน
let b = async_fn_2().await; // แล้วรัน 2
println!("{} {}", a, b);
}Concurrent กับ join!
use tokio::join;
async fn concurrent() {
// รันพร้อมกัน!
let (a, b) = join!(
async_fn_1(),
async_fn_2()
);
println!("{} {}", a, b);
}Racing กับ select!
use tokio::select;
async fn race() {
select! {
result = async_fn_1() => println!("1 finished: {}", result),
result = async_fn_2() => println!("2 finished: {}", result),
}
// แค่อันแรกที่เสร็จ
}Pin คืออะไร?
Pin ป้องกัน Future ไม่ให้ถูก move ในหน่วยความจำ:
use std::pin::Pin;
use std::future::Future;
fn takes_future(future: Pin<&mut dyn Future<Output = i32>>) {
// future ถูก pin ไว้จะ move ไม่ได้
}ทำไมต้อง Pin?
- บาง Future มี self-references
- ถ้า move แล้ว references จะ invalid
- Pin รับประกันว่าจะไม่ move
สร้าง Future เอง (Advanced)
use std::future::Future;
use std::pin::Pin;
use std::task::{Context, Poll};
struct MyFuture {
count: u32,
}
impl Future for MyFuture {
type Output = u32;
fn poll(mut self: Pin<&mut Self>, cx: &mut Context<'_>) -> Poll<Self::Output> {
self.count += 1;
if self.count >= 3 {
Poll::Ready(self.count)
} else {
cx.waker().wake_by_ref(); // บอกให้ poll อีกครั้ง
Poll::Pending
}
}
}async fn vs Future
// ทั้งสองเหมือนกัน:
async fn foo() -> i32 {
42
}
fn bar() -> impl Future<Output = i32> {
async { 42 }
}ลองทำดู! 🎯
- สร้าง async function ที่ return String
- ใช้ join! รวม 2 futures
- ลองสร้าง future แล้วไม่ await ดูว่าเกิดอะไร
สรุป
| Concept | Description |
|---|---|
| Future | Trait สำหรับ async values |
| Poll::Ready | Future เสร็จแล้ว |
| Poll::Pending | ยังไม่เสร็จ |
| Lazy | ไม่รันจนกว่าจะ poll |
| Pin | ป้องกันการ move |
👉 ต่อไป: Tokio Runtime
Tokio Runtime
Tokio เป็น async runtime ที่นิยมที่สุดใน Rust ecosystem
Setup
# Cargo.toml
[dependencies]
tokio = { version = "1", features = ["full"] }
```text
Features ที่มี:
| Feature | Description |
| ----------------- | ------------------------------ |
| `rt` | Runtime core |
| `rt-multi-thread` | Multi-threaded runtime |
| `time` | tokio::time |
| `net` | TCP/UDP networking |
| `io-util` | I/O utilities |
| `sync` | Synchronization primitives |
| `macros` | #[tokio::main], #[tokio::test] |
| `full` | ทุกอย่าง |
---
## Basic Usage
```rust,ignore
#[tokio::main]
async fn main() {
println!("Hello from Tokio!");
let result = do_something().await;
println!("Result: {}", result);
}
async fn do_something() -> String {
// simulate async work
tokio::time::sleep(std::time::Duration::from_millis(100)).await;
"Done!".to_string()
}
#[tokio::main] ทำอะไร?
// มันแปลง:
#[tokio::main]
async fn main() {
// code
}
// เป็น:
fn main() {
tokio::runtime::Builder::new_multi_thread()
.enable_all()
.build()
.unwrap()
.block_on(async {
// code
})
}Manual Runtime
fn main() {
// สร้าง runtime เอง
let rt = tokio::runtime::Runtime::new().unwrap();
// รัน future
rt.block_on(async {
println!("Running on Tokio!");
});
// หรือ spawn และ block
let handle = rt.spawn(async {
42
});
let result = rt.block_on(handle).unwrap();
println!("Result: {}", result);
}Runtime Types
// Multi-threaded (default)
let rt = tokio::runtime::Builder::new_multi_thread()
.worker_threads(4)
.enable_all()
.build()
.unwrap();
// Single-threaded (current thread)
let rt = tokio::runtime::Builder::new_current_thread()
.enable_all()
.build()
.unwrap();Spawning Tasks
tokio::spawn
use tokio::task;
#[tokio::main]
async fn main() {
// Spawn task - รันแบบ concurrent
let handle = task::spawn(async {
println!("Hello from spawned task!");
42
});
// รอผลลัพธ์
let result = handle.await.unwrap();
println!("Task returned: {}", result);
}Multiple Tasks
use tokio::task;
#[tokio::main]
async fn main() {
let mut handles = vec![];
for i in 0..5 {
let handle = task::spawn(async move {
println!("Task {} running", i);
i * 2
});
handles.push(handle);
}
// รอทุก tasks
for handle in handles {
let result = handle.await.unwrap();
println!("Result: {}", result);
}
}Concurrent Execution
join! - รอทุก futures
use tokio::join;
use tokio::time::{sleep, Duration};
async fn task_a() -> i32 {
sleep(Duration::from_millis(100)).await;
1
}
async fn task_b() -> i32 {
sleep(Duration::from_millis(200)).await;
2
}
#[tokio::main]
async fn main() {
// รันพร้อมกัน, รอทุกอันเสร็จ
let (a, b) = join!(task_a(), task_b());
println!("Results: {} + {} = {}", a, b, a + b);
// ใช้เวลา ~200ms (ไม่ใช่ 300ms)
}try_join! - หยุดเมื่อ error
use tokio::try_join;
async fn may_fail(succeed: bool) -> Result<i32, &'static str> {
if succeed {
Ok(42)
} else {
Err("failed!")
}
}
#[tokio::main]
async fn main() {
let result = try_join!(
may_fail(true),
may_fail(true)
);
match result {
Ok((a, b)) => println!("Both succeeded: {}, {}", a, b),
Err(e) => println!("One failed: {}", e),
}
}Tokio Time
use tokio::time::{sleep, interval, Duration, Instant};
#[tokio::main]
async fn main() {
// Sleep
println!("Sleeping...");
sleep(Duration::from_secs(1)).await;
println!("Woke up!");
// Interval
let mut interval = interval(Duration::from_millis(500));
for _ in 0..3 {
interval.tick().await;
println!("Tick!");
}
// Measure time
let start = Instant::now();
sleep(Duration::from_millis(100)).await;
println!("Elapsed: {:?}", start.elapsed());
}Tokio Channels
mpsc - Multiple Producer Single Consumer
use tokio::sync::mpsc;
#[tokio::main]
async fn main() {
let (tx, mut rx) = mpsc::channel(32); // buffer size 32
// Spawn sender
let tx1 = tx.clone();
tokio::spawn(async move {
tx1.send("Hello from task 1").await.unwrap();
});
tokio::spawn(async move {
tx.send("Hello from task 2").await.unwrap();
});
// Receive
while let Some(msg) = rx.recv().await {
println!("Received: {}", msg);
}
}oneshot - Single value
use tokio::sync::oneshot;
#[tokio::main]
async fn main() {
let (tx, rx) = oneshot::channel();
tokio::spawn(async move {
tx.send("Result!").unwrap();
});
let result = rx.await.unwrap();
println!("Got: {}", result);
}ลองทำดู! 🎯
- สร้าง 3 tasks ด้วย tokio::spawn และรอทุก task
- ใช้ interval พิมพ์ทุก 1 วินาที
- ใช้ mpsc channel ส่งข้อมูลระหว่าง tasks
สรุป
| Function | Description |
|---|---|
#[tokio::main] | Async main entry |
tokio::spawn | Spawn task |
join! | Wait for all |
try_join! | Wait, fail fast |
sleep | Async delay |
interval | Periodic timer |
mpsc::channel | Multi-producer channel |
oneshot::channel | Single value channel |
👉 ต่อไป: Async Patterns
Async Patterns
รูปแบบการเขียน async code ที่พบบ่อย
select! - Racing Futures
รอหลาย futures พร้อมกัน ใช้อันแรกที่เสร็จ:
use tokio::select;
use tokio::time::{sleep, Duration};
#[tokio::main]
async fn main() {
select! {
_ = sleep(Duration::from_secs(1)) => {
println!("1 second elapsed");
}
_ = sleep(Duration::from_secs(2)) => {
println!("2 seconds elapsed");
}
}
// จะ print "1 second elapsed" เพราะเสร็จก่อน
}select! กับ Return Values
use tokio::select;
use tokio::sync::mpsc;
#[tokio::main]
async fn main() {
let (tx1, mut rx1) = mpsc::channel::<i32>(1);
let (tx2, mut rx2) = mpsc::channel::<String>(1);
// Spawn senders
tokio::spawn(async move {
tokio::time::sleep(std::time::Duration::from_millis(100)).await;
tx1.send(42).await.unwrap();
});
tokio::spawn(async move {
tokio::time::sleep(std::time::Duration::from_millis(50)).await;
tx2.send("hello".to_string()).await.unwrap();
});
select! {
Some(val) = rx1.recv() => println!("Got number: {}", val),
Some(val) = rx2.recv() => println!("Got string: {}", val),
}
// จะได้ string เพราะ 50ms < 100ms
}Timeout
ให้ future มีเวลาจำกัด:
use tokio::time::{timeout, Duration};
async fn slow_function() -> String {
tokio::time::sleep(Duration::from_secs(10)).await;
"Done!".to_string()
}
#[tokio::main]
async fn main() {
let result = timeout(
Duration::from_secs(2), // timeout หลัง 2 วินาที
slow_function()
).await;
match result {
Ok(value) => println!("Got: {}", value),
Err(_) => println!("Timeout! Function took too long."),
}
}Timeout กับ select!
use tokio::select;
use tokio::time::{sleep, Duration};
async fn fetch_data() -> String {
sleep(Duration::from_secs(5)).await;
"Data".to_string()
}
#[tokio::main]
async fn main() {
select! {
result = fetch_data() => {
println!("Got: {}", result);
}
_ = sleep(Duration::from_secs(2)) => {
println!("Timeout!");
}
}
}Retry Pattern
ลองใหม่เมื่อ fail:
use std::sync::atomic::{AtomicU32, Ordering};
async fn fallible_operation() -> Result<String, &'static str> {
// Simulate random failure
static ATTEMPT: AtomicU32 = AtomicU32::new(0);
// fetch_add returns the previous value
let count = ATTEMPT.fetch_add(1, Ordering::SeqCst);
if count < 3 {
Err("failed")
} else {
Ok("success!".to_string())
}
}
async fn retry<F, Fut, T, E>(f: F, max_retries: u32) -> Result<T, E>
where
F: Fn() -> Fut,
Fut: std::future::Future<Output = Result<T, E>>,
{
let mut attempt = 0;
loop {
match f().await {
Ok(value) => return Ok(value),
Err(e) => {
attempt += 1;
if attempt >= max_retries {
return Err(e);
}
println!("Retry attempt {}/{}", attempt, max_retries);
sleep(Duration::from_millis(100 * attempt as u64)).await;
}
}
}
}
#[tokio::main]
async fn main() {
let result = retry(|| fallible_operation(), 5).await;
println!("Result: {:?}", result);
}Graceful Shutdown
ปิดโปรแกรมอย่างสะอาด:
use tokio::signal;
use tokio::sync::broadcast;
#[tokio::main]
async fn main() {
// สร้าง shutdown signal
let (shutdown_tx, _) = broadcast::channel::<()>(1);
// Spawn workers
for i in 0..3 {
let mut rx = shutdown_tx.subscribe();
tokio::spawn(async move {
loop {
tokio::select! {
_ = rx.recv() => {
println!("Worker {} shutting down", i);
break;
}
_ = tokio::time::sleep(std::time::Duration::from_secs(1)) => {
println!("Worker {} working...", i);
}
}
}
});
}
// รอ Ctrl+C
signal::ctrl_c().await.unwrap();
println!("Shutdown signal received!");
// ส่ง shutdown
drop(shutdown_tx);
// รอให้ workers เสร็จ
tokio::time::sleep(std::time::Duration::from_millis(100)).await;
println!("Goodbye!");
}Rate Limiting
จำกัดความถี่:
use tokio::time::{interval, Duration};
use tokio::sync::Semaphore;
use std::sync::Arc;
#[tokio::main]
async fn main() {
// อนุญาตแค่ 3 concurrent requests
let semaphore = Arc::new(Semaphore::new(3));
let mut handles = vec![];
for i in 0..10 {
let permit = semaphore.clone().acquire_owned().await.unwrap();
let handle = tokio::spawn(async move {
println!("Request {} started", i);
tokio::time::sleep(Duration::from_millis(500)).await;
println!("Request {} done", i);
drop(permit); // release permit
});
handles.push(handle);
}
for handle in handles {
handle.await.unwrap();
}
}Buffering and Batching
รวม items ก่อน process:
use tokio::sync::mpsc;
use tokio::time::{timeout, Duration};
#[tokio::main]
async fn main() {
let (tx, mut rx) = mpsc::channel::<i32>(100);
// Producer
tokio::spawn(async move {
for i in 0..20 {
tx.send(i).await.unwrap();
tokio::time::sleep(Duration::from_millis(50)).await;
}
});
// Consumer with batching
let batch_size = 5;
let batch_timeout = Duration::from_millis(200);
loop {
let mut batch = Vec::with_capacity(batch_size);
// Collect batch
loop {
let result = timeout(batch_timeout, rx.recv()).await;
match result {
Ok(Some(item)) => {
batch.push(item);
if batch.len() >= batch_size {
break;
}
}
Ok(None) => break, // channel closed
Err(_) => break, // timeout
}
}
if batch.is_empty() {
break;
}
println!("Processing batch: {:?}", batch);
}
}ลองทำดู! 🎯
- ใช้ select! เลือกระหว่าง 2 async operations
- สร้าง function ที่มี timeout
- implement retry logic สำหรับ API call
สรุปบทที่ 16
| Pattern | Use Case |
|---|---|
select! | Race futures |
timeout | Limit execution time |
| Retry | Handle transient failures |
| Semaphore | Rate limiting |
| Batching | Efficient processing |
| Graceful shutdown | Clean exit |
เปรียบเทียบ
| Macro | Behavior |
|---|---|
join! | รอทุกอันเสร็จ |
select! | ใช้อันแรกที่เสร็จ |
try_join! | รอทุกอัน หยุดเมื่อ error |
👉 ต่อไป: บทที่ 17: Unsafe Rust
บทที่ 17: Unsafe Rust
unsafe ช่วยให้ทำสิ่งที่ compiler ตรวจสอบไม่ได้
สิ่งที่จะได้เรียนรู้
| หัวข้อ | คำอธิบาย |
|---|---|
| Unsafe คืออะไร | เมื่อไหร่ควรใช้ |
| Raw Pointers | Pointers แบบ C |
| Unsafe Functions | FFI และ extern |
| Safe Abstractions | ห่อ unsafe ด้วย safe API |
Unsafe คืออะไร
unsafe ปลดล็อคความสามารถพิเศษที่ compiler ตรวจสอบไม่ได้
🚨 อันตราย!
unsafeหมายความว่าคุณ รับผิดชอบ ความถูกต้องแทน compiler:
- ❌ Memory corruption
- ❌ Data races
- ❌ Undefined behavior
- ❌ Security vulnerabilities
ใช้ unsafe เมื่อจำเป็นจริงๆ เท่านั้น!
Unsafe Superpowers
ใน unsafe block ทำได้ 5 อย่าง:
| Superpower | คำอธิบาย |
|---|---|
| Dereference raw pointers | ใช้ *const T, *mut T |
| Call unsafe functions | ฟังก์ชันที่มี unsafe |
| Access mutable statics | ตัวแปร static mut |
| Implement unsafe traits | เช่น Send, Sync |
| Access union fields | union แบบ C |
🔒 Safe vs Unsafe Visualization
+-------------------------------------------------------------------+
| Rust's Safety Layers |
+-------------------------------------------------------------------+
| |
| +-----------------------------------------------------------+ |
| | SAFE RUST (99% of code) | |
| | +---------------------------------------------------------+ |
| | | * Ownership rules | |
| | | * Borrow checker | |
| | | * Type safety | |
| | | * Memory safety | |
| | +---------------------------------------------------------+ |
| +-----------------------------------------------------------+ |
| | |
| v |
| +-----------------------------------------------------------+ |
| | UNSAFE BLOCK (1% - when needed) | |
| | +---------------------------------------------------------+ |
| | | * Raw pointers | |
| | | * FFI (Foreign Function Interface) | |
| | | * Mutable statics | |
| | | * You are responsible for correctness! | |
| | +---------------------------------------------------------+ |
| +-----------------------------------------------------------+ |
| |
+-------------------------------------------------------------------+
🌍 Real-World Use Cases
| Use Case | ตัวอย่าง | ทำไมต้อง Unsafe |
|---|---|---|
| FFI | เรียก C libraries (OpenSSL, SQLite) | C ไม่มี safety guarantees |
| Hardware | เข้าถึง memory-mapped I/O | ต้อง raw pointer |
| Performance | Custom allocators, SIMD | ควบคุม memory เอง |
| OS APIs | System calls | Low-level interface |
💡 ตัวอย่างจริง:
Vec<T>และStringimplement ด้วย unsafe ภายใน แต่ให้ safe API ออกมา
1. Dereference Raw Pointers
fn main() {
let mut num = 5;
// สร้าง raw pointers (safe - ยังไม่ได้ dereference)
let r1 = &num as *const i32; // immutable raw
let r2 = &mut num as *mut i32; // mutable raw
// dereference ต้อง unsafe
unsafe {
println!("r1 is: {}", *r1);
*r2 = 10;
println!("r2 is: {}", *r2);
}
}Raw Pointers vs References
| Aspect | References | Raw Pointers |
|---|---|---|
| Null | ไม่ได้ | ได้ |
| Dangling | Compiler ป้องกัน | ไม่ป้องกัน |
| Aliasing | มี rules | ไม่มี rules |
| Auto-cleanup | ผ่าน Drop | ไม่มี |
2. Call Unsafe Functions
unsafe fn dangerous() {
println!("Doing dangerous stuff!");
}
fn main() {
// เรียก unsafe function ต้องอยู่ใน unsafe block
unsafe {
dangerous();
}
}3. Access Mutable Statics
static mut COUNTER: u32 = 0;
fn add_to_count(inc: u32) {
unsafe {
COUNTER += inc;
}
}
fn main() {
add_to_count(3);
unsafe {
println!("COUNTER: {}", COUNTER);
}
}คำเตือน:
static mutอันตรายมากใน multi-threaded ใช้MutexหรือAtomicแทน
4. Implement Unsafe Traits
#![allow(unused)]
fn main() {
unsafe trait MyUnsafeTrait {
fn do_something(&self);
}
unsafe impl MyUnsafeTrait for i32 {
fn do_something(&self) {
println!("{}", self);
}
}
}ตัวอย่างจริง: Send และ Sync traits
5. Access Union Fields
#[repr(C)]
union MyUnion {
f1: u32,
f2: f32,
}
fn main() {
let u = MyUnion { f1: 1 };
// อ่าน field ต้อง unsafe เพราะไม่รู้ว่า field ไหนถูก set
unsafe {
println!("f1: {}", u.f1);
}
}เมื่อไหร่ควรใช้ unsafe?
✅ ใช้เมื่อ
- FFI - เรียก C/C++ code
- Performance - hot paths ที่ต้องเร็วมาก
- Hardware - เข้าถึง hardware โดยตรง
- Implement abstractions - สร้าง safe wrapper
❌ ไม่ควรใช้
- ข้าม borrow checker เพราะไม่เข้าใจ
- แก้ compile error แบบขี้เกียจ
- ทุกที่ที่มีทางเลือก safe
FFI: เรียก C Code
ตัวอย่างเรียก function จาก C library:
// ประกาศ external C function
extern "C" {
fn abs(input: i32) -> i32;
fn sqrt(input: f64) -> f64;
}
fn main() {
unsafe {
println!("abs(-5) = {}", abs(-5)); // 5
println!("sqrt(9.0) = {}", sqrt(9.0)); // 3.0
}
}สร้าง Rust function ที่ C เรียกได้
// export function สำหรับ C
#[no_mangle]
pub extern "C" fn rust_add(a: i32, b: i32) -> i32 {
a + b
}Safe Abstractions
วิธีที่ถูกต้อง: ห่อ unsafe ด้วย safe interface
#![allow(unused)]
fn main() {
pub fn split_at_mut(slice: &mut [i32], mid: usize) -> (&mut [i32], &mut [i32]) {
let len = slice.len();
let ptr = slice.as_mut_ptr();
assert!(mid <= len);
// unsafe ภายใน แต่ interface เป็น safe
unsafe {
(
std::slice::from_raw_parts_mut(ptr, mid),
std::slice::from_raw_parts_mut(ptr.add(mid), len - mid),
)
}
}
}ลองทำดู! 🎯
- สร้าง raw pointer และ dereference
- สร้าง unsafe function
- ลองเข้าถึง static mut
🌍 Real-World Example: FFI เรียก C Function
ตัวอย่างเรียก strlen จาก C standard library:
use std::ffi::CString;
// ประกาศ external C function
extern "C" {
fn strlen(s: *const i8) -> usize;
}
fn safe_strlen(s: &str) -> usize {
// แปลง Rust string เป็น C string
let c_string = CString::new(s).expect("CString failed");
// เรียก C function ใน unsafe block
unsafe {
strlen(c_string.as_ptr())
}
}
fn main() {
let text = "Hello, Rust!";
let len = safe_strlen(text);
println!("Length: {}", len); // Length: 12
}FFI Pattern
+-------------------------------------------------------------------+
| Safe Wrapper Pattern |
+-------------------------------------------------------------------+
| |
| User Code (Safe) |
| | |
| v |
| +--------------------------------------------+ |
| | safe_strlen(s: &str) -> usize | <--- Safe API |
| | * Validate input | |
| | * Convert to C types | |
| | * Call unsafe code | |
| | * Convert result back | |
| +--------------------------------------------+ |
| | |
| v |
| +--------------------------------------------+ |
| | unsafe { strlen(ptr) } | <--- Unsafe FFI |
| +--------------------------------------------+ |
| | |
| v |
| C Library (libc) |
| |
+-------------------------------------------------------------------+
สรุป
| Keyword | ใช้เมื่อ |
|---|---|
unsafe { } | Block ที่ทำ unsafe operations |
unsafe fn | Function ที่ต้องเรียกใน unsafe |
unsafe trait | Trait ที่ต้อง impl ใน unsafe |
unsafe impl | Implement unsafe trait |
Best Practices
- ลด unsafe ให้น้อยที่สุด
- Document invariants ที่ต้องรักษา
- Test extensively
- Wrap ด้วย safe API
👉 ต่อไป: Raw Pointers
Raw Pointers
Raw Pointers (*const T และ *mut T) คือ pointers แบบ C ไม่มี safety guarantees
สร้าง Raw Pointers
fn main() {
let mut num = 5;
// สร้าง raw pointers จาก references (safe)
let r1: *const i32 = # // immutable raw pointer
let r2: *mut i32 = &mut num; // mutable raw pointer
println!("r1 address: {:p}", r1);
println!("r2 address: {:p}", r2);
// การสร้าง pointer เป็น safe
// แต่การใช้งาน (dereference) ต้อง unsafe
}Dereference Raw Pointers
fn main() {
let mut num = 5;
let r1 = &num as *const i32;
let r2 = &mut num as *mut i32;
// ❌ Error: ทำนอก unsafe ไม่ได้
// println!("{}", *r1);
// ✅ ต้องใช้ unsafe block
unsafe {
println!("r1: {}", *r1); // อ่านค่า
*r2 = 10; // เขียนค่า
println!("r2: {}", *r2);
}
}Raw Pointers vs References
| Aspect | References (&T) | Raw Pointers (*const T) |
|---|---|---|
| Null | ❌ ไม่ได้ | ✅ ได้ |
| Dangling | ❌ Compiler ป้องกัน | ✅ อาจเกิดได้ |
| Aliasing | มี rules | ไม่มี rules |
| Auto-deref | ✅ ได้ | ❌ ต้อง unsafe |
| Lifetime | ✅ tracked | ❌ ไม่ tracked |
สร้าง Null Pointer
fn main() {
// null pointer
let null_ptr: *const i32 = std::ptr::null();
let null_mut_ptr: *mut i32 = std::ptr::null_mut();
// ตรวจสอบ null
if null_ptr.is_null() {
println!("Pointer is null!");
}
// ❌ อันตราย: dereference null pointer จะ crash
// unsafe { println!("{}", *null_ptr); }
}Pointer Arithmetic
fn main() {
let arr = [1, 2, 3, 4, 5];
let ptr = arr.as_ptr(); // *const i32
unsafe {
// เข้าถึง elements ด้วย pointer arithmetic
println!("arr[0] = {}", *ptr);
println!("arr[1] = {}", *ptr.add(1));
println!("arr[2] = {}", *ptr.add(2));
// offset ใช้ signed integer
println!("arr[4] = {}", *ptr.offset(4));
}
}Pointer Methods
| Method | Description |
|---|---|
ptr.add(n) | เลื่อนไปข้างหน้า n elements |
ptr.sub(n) | เลื่อนไปข้างหลัง n elements |
ptr.offset(n) | เลื่อนด้วย signed offset |
ptr.is_null() | ตรวจ null |
ptr.read() | อ่านค่า (unsafe) |
ptr.write(v) | เขียนค่า (unsafe) |
Casting Between Pointer Types
fn main() {
let mut num = 42i32;
// reference -> raw pointer
let ptr: *mut i32 = &mut num;
// const <-> mut (อันตราย!)
let const_ptr: *const i32 = ptr;
let mut_ptr: *mut i32 = const_ptr as *mut i32;
// pointer -> integer
let addr: usize = ptr as usize;
println!("Address: 0x{:x}", addr);
// integer -> pointer (อันตรายมาก!)
let ptr_from_int: *const i32 = addr as *const i32;
unsafe {
println!("Value: {}", *ptr_from_int);
}
}ตัวอย่างจริง: Swap Values
unsafe fn swap<T>(a: *mut T, b: *mut T) {
let temp = std::ptr::read(a);
std::ptr::copy_nonoverlapping(b, a, 1);
std::ptr::write(b, temp);
}
fn main() {
let mut x = 1;
let mut y = 2;
unsafe {
swap(&mut x, &mut y);
}
println!("x = {}, y = {}", x, y); // x = 2, y = 1
}Safe Pointer Functions
use std::ptr;
fn main() {
let mut arr = [1, 2, 3, 4, 5];
let src = [10, 20, 30];
unsafe {
// copy_nonoverlapping: memcpy
ptr::copy_nonoverlapping(
src.as_ptr(),
arr.as_mut_ptr(),
3
);
}
println!("{:?}", arr); // [10, 20, 30, 4, 5]
}ลองทำดู! 🎯
- สร้าง raw pointer จาก reference
- ใช้ pointer arithmetic เข้าถึง array
- ลอง swap values ด้วย raw pointers
สรุป
| Concept | Syntax |
|---|---|
| Immutable | *const T |
| Mutable | *mut T |
| Create | &x as *const T |
| Null | std::ptr::null() |
| Dereference | unsafe { *ptr } |
| Add | ptr.add(n) |
ข้อควรระวัง
- ❌ อย่า dereference null pointer
- ❌ อย่า dereference dangling pointer
- ❌ อย่าละเมิด aliasing rules
- ✅ ใช้เฉพาะเมื่อจำเป็น
👉 ต่อไป: Unsafe Functions
Unsafe Functions
ฟังก์ชันที่ต้องเรียกภายใน unsafe block
Defining Unsafe Functions
// ประกาศด้วย unsafe fn
unsafe fn dangerous() {
println!("Doing something dangerous!");
}
fn main() {
// ❌ Error: เรียกนอก unsafe ไม่ได้
// dangerous();
// ✅ ต้องเรียกใน unsafe block
unsafe {
dangerous();
}
}เมื่อไหร่ใช้ unsafe fn?
ใช้เมื่อฟังก์ชันมี preconditions ที่ compiler ตรวจไม่ได้:
/// Divides two numbers without checking for zero.
///
/// # Safety
///
/// Caller must ensure that `divisor` is not zero.
unsafe fn divide_unchecked(dividend: i32, divisor: i32) -> i32 {
dividend / divisor
}
fn main() {
let a = 10;
let b = 2;
// Caller รับผิดชอบเรื่อง preconditions
unsafe {
let result = divide_unchecked(a, b);
println!("{} / {} = {}", a, b, result);
}
}Document Safety Requirements
สำคัญ: ทุก unsafe fn ควรมี # Safety section:
#![allow(unused)]
fn main() {
/// Reads a value from the given pointer.
///
/// # Safety
///
/// - `ptr` must be valid and properly aligned.
/// - `ptr` must point to a properly initialized value of type `T`.
/// - The memory at `ptr` must not be mutated while this function runs.
unsafe fn read_value<T>(ptr: *const T) -> T {
ptr.read()
}
}FFI - Foreign Function Interface
เรียกฟังก์ชันจากภาษาอื่น (เช่น C):
เรียก C Functions
// ประกาศ external functions
extern "C" {
fn abs(input: i32) -> i32;
fn sqrt(x: f64) -> f64;
}
fn main() {
unsafe {
println!("abs(-5) = {}", abs(-5));
println!("sqrt(16.0) = {}", sqrt(16.0));
}
}Calling Convention
| ABI | ใช้กับ |
|---|---|
"C" | C functions (default) |
"system" | Windows API |
"stdcall" | Win32 API |
"fastcall" | Optimized |
extern "system" {
fn GetCurrentProcessId() -> u32;
}Export Rust to C
#[no_mangle] // ไม่เปลี่ยนชื่อ function
pub extern "C" fn add(a: i32, b: i32) -> i32 {
a + b
}
#[no_mangle]
pub extern "C" fn greet(name: *const std::ffi::c_char) {
unsafe {
let c_str = std::ffi::CStr::from_ptr(name);
if let Ok(s) = c_str.to_str() {
println!("Hello, {}!", s);
}
}
}Build as Library
# Cargo.toml
[lib]
crate-type = ["cdylib"] # Dynamic library
# หรือ
crate-type = ["staticlib"] # Static library
Working with C Strings
use std::ffi::{CStr, CString};
use std::os::raw::c_char;
extern "C" {
fn strlen(s: *const c_char) -> usize;
}
fn main() {
// Rust String -> C string
let rust_string = "Hello, C!";
let c_string = CString::new(rust_string).unwrap();
unsafe {
let len = strlen(c_string.as_ptr());
println!("Length: {}", len);
}
// C string -> Rust String
let c_ptr: *const c_char = c_string.as_ptr();
unsafe {
let c_str = CStr::from_ptr(c_ptr);
let rust_str = c_str.to_str().unwrap();
println!("Back to Rust: {}", rust_str);
}
}ตัวอย่างจริง: Binding to C Library
// Binding to libc
#[link(name = "c")]
extern "C" {
fn puts(s: *const std::ffi::c_char) -> i32;
fn getenv(name: *const std::ffi::c_char) -> *const std::ffi::c_char;
}
fn main() {
use std::ffi::{CString, CStr};
let msg = CString::new("Hello from Rust via C!").unwrap();
let var = CString::new("PATH").unwrap();
unsafe {
puts(msg.as_ptr());
let path = getenv(var.as_ptr());
if !path.is_null() {
let path_str = CStr::from_ptr(path).to_str().unwrap();
println!("PATH = {}", &path_str[..50.min(path_str.len())]);
}
}
}Static Mut Variables
static mut COUNTER: u32 = 0;
fn increment() {
unsafe {
COUNTER += 1;
}
}
fn get_count() -> u32 {
unsafe { COUNTER }
}
fn main() {
increment();
increment();
increment();
println!("Count: {}", get_count()); // 3
}คำเตือน:
static mutอันตรายใน multi-threaded! ใช้MutexหรือAtomicU32แทน
ลองทำดู! 🎯
- สร้าง unsafe fn พร้อม Safety documentation
- เรียก C function
absและsqrt - สร้าง Rust function ที่ export ไป C
สรุป
| Concept | Syntax |
|---|---|
| Declare | unsafe fn name() {} |
| Call | unsafe { name(); } |
| FFI declare | extern "C" { fn name(); } |
| FFI export | #[no_mangle] pub extern "C" fn |
| C string | CString::new(), CStr::from_ptr() |
| Static mut | static mut NAME: T = value; |
👉 ต่อไป: Safe Abstractions
Safe Abstractions
ห่อ unsafe code ด้วย safe API - วิธีที่ถูกต้องในการใช้ unsafe
หลักการ
Unsafe ควรอยู่ข้างใน, Safe ควรอยู่ข้างนอก
+-------------------------------+
| Safe API | <--- ผู้ใช้เรียกที่นี่
| +-------------------------+ |
| | Unsafe Implementation | | <--- unsafe อยู่ข้างใน
| | (hidden) | |
| +-------------------------+ |
+-------------------------------+
ตัวอย่าง 1: split_at_mut
Standard library ใช้ pattern นี้:
fn split_at_mut(values: &mut [i32], mid: usize) -> (&mut [i32], &mut [i32]) {
let len = values.len();
let ptr = values.as_mut_ptr();
// Safe precondition check
assert!(mid <= len, "mid must be <= len");
// Unsafe implementation ที่ถูกต้อง
unsafe {
(
std::slice::from_raw_parts_mut(ptr, mid),
std::slice::from_raw_parts_mut(ptr.add(mid), len - mid),
)
}
}
fn main() {
let mut v = vec![1, 2, 3, 4, 5, 6];
let (left, right) = split_at_mut(&mut v, 3);
left[0] = 100;
right[0] = 200;
println!("{:?}", left); // [100, 2, 3]
println!("{:?}", right); // [200, 5, 6]
}ทำไมถึง Safe?
- Precondition check:
assert!(mid <= len)ป้องกัน out-of-bounds - Non-overlapping: สอง slices ไม่ทับกัน
- Valid lifetimes: ทั้งคู่ผูกกับ input lifetime
ตัวอย่าง 2: Custom Vec
pub struct MyVec<T> {
ptr: *mut T,
len: usize,
cap: usize,
}
impl<T> MyVec<T> {
pub fn new() -> Self {
MyVec {
ptr: std::ptr::null_mut(),
len: 0,
cap: 0,
}
}
pub fn push(&mut self, value: T) {
if self.len == self.cap {
self.grow();
}
unsafe {
std::ptr::write(self.ptr.add(self.len), value);
}
self.len += 1;
}
pub fn get(&self, index: usize) -> Option<&T> {
if index < self.len {
unsafe { Some(&*self.ptr.add(index)) }
} else {
None
}
}
fn grow(&mut self) {
let new_cap = if self.cap == 0 { 1 } else { self.cap * 2 };
let new_layout = std::alloc::Layout::array::<T>(new_cap).unwrap();
let new_ptr = if self.cap == 0 {
unsafe { std::alloc::alloc(new_layout) as *mut T }
} else {
let old_layout = std::alloc::Layout::array::<T>(self.cap).unwrap();
unsafe {
std::alloc::realloc(
self.ptr as *mut u8,
old_layout,
new_layout.size(),
) as *mut T
}
};
self.ptr = new_ptr;
self.cap = new_cap;
}
}
impl<T> Drop for MyVec<T> {
fn drop(&mut self) {
if self.cap > 0 {
// Drop all elements
for i in 0..self.len {
unsafe {
std::ptr::drop_in_place(self.ptr.add(i));
}
}
// Free memory
let layout = std::alloc::Layout::array::<T>(self.cap).unwrap();
unsafe {
std::alloc::dealloc(self.ptr as *mut u8, layout);
}
}
}
}ตัวอย่าง 3: Thread-safe Counter
#![allow(unused)]
fn main() {
use std::sync::atomic::{AtomicUsize, Ordering};
pub struct Counter {
value: AtomicUsize,
}
impl Counter {
pub fn new() -> Self {
Counter {
value: AtomicUsize::new(0),
}
}
pub fn increment(&self) -> usize {
self.value.fetch_add(1, Ordering::SeqCst)
}
pub fn get(&self) -> usize {
self.value.load(Ordering::SeqCst)
}
}
// Safe to share across threads
unsafe impl Sync for Counter {}
}Best Practices
1. Minimize Unsafe Scope
// ❌ Bad: unsafe block ใหญ่เกินไป
unsafe {
let ptr = some_pointer();
let len = calculate_length();
validate_input(len);
let slice = std::slice::from_raw_parts(ptr, len);
process(slice);
}
// ✅ Good: unsafe แค่ที่จำเป็น
let ptr = some_pointer();
let len = calculate_length();
validate_input(len);
let slice = unsafe { std::slice::from_raw_parts(ptr, len) };
process(slice);2. Document Invariants
/// A non-empty string that is guaranteed to be valid UTF-8.
///
/// # Invariants
///
/// - `ptr` always points to valid memory
/// - The memory contains valid UTF-8 bytes
/// - `len` is always > 0
pub struct NonEmptyString {
ptr: *const u8,
len: usize,
}3. Validate Early
pub fn from_raw_parts(ptr: *const u8, len: usize) -> Result<Self, Error> {
// ตรวจสอบก่อน unsafe
if ptr.is_null() {
return Err(Error::NullPointer);
}
if len == 0 {
return Err(Error::EmptyString);
}
// unsafe เฉพาะส่วนที่ต้องใช้จริง
let slice = unsafe { std::slice::from_raw_parts(ptr, len) };
// ตรวจสอบหลัง
if std::str::from_utf8(slice).is_err() {
return Err(Error::InvalidUtf8);
}
Ok(Self { ptr, len })
}4. Test Extensively
#![allow(unused)]
fn main() {
#[cfg(test)]
mod tests {
use super::*;
#[test]
fn test_split_at_mut_basic() {
let mut v = vec![1, 2, 3, 4];
let (left, right) = split_at_mut(&mut v, 2);
assert_eq!(left, &[1, 2]);
assert_eq!(right, &[3, 4]);
}
#[test]
fn test_split_at_mut_empty_left() {
let mut v = vec![1, 2, 3];
let (left, right) = split_at_mut(&mut v, 0);
assert!(left.is_empty());
assert_eq!(right, &[1, 2, 3]);
}
#[test]
#[should_panic]
fn test_split_at_mut_out_of_bounds() {
let mut v = vec![1, 2, 3];
split_at_mut(&mut v, 10); // should panic
}
}
}ลองทำดู! 🎯
- สร้าง safe wrapper สำหรับ raw pointer operation
- implement
get_uncheckedใน custom collection - เขียน tests สำหรับ edge cases
สรุปบทที่ 17
| แนวคิด | คำอธิบาย |
|---|---|
| unsafe block | เปิดใช้ unsafe features |
| raw pointers | *const T, *mut T |
| unsafe fn | ฟังก์ชันที่ต้อง unsafe |
| extern | FFI |
| safe abstraction | ห่อ unsafe ด้วย safe API |
Checklist ก่อน Ship unsafe Code
- Preconditions ถูก document
- ทุก invariant ถูกรักษา
- unsafe scope น้อยที่สุด
- มี tests ครอบคลุม
- Code review แล้ว
👉 ต่อไป: บทที่ 18: Macros
บทที่ 18: Macros
Macros สร้าง code ตอน compile time
สิ่งที่จะได้เรียนรู้
| หัวข้อ | คำอธิบาย |
|---|---|
| Declarative | macro_rules! |
| Procedural | derive, attribute |
| Common Macros | println!, vec!, format! |
Declarative Macros
Declarative macros หรือ macro_rules! สร้าง code patterns ที่ซ้ำๆ
ทำไมต้องใช้ Macros?
// ❌ ซ้ำซาก
let v1 = vec![1, 2, 3];
let v2 = {
let mut temp = Vec::new();
temp.push(1);
temp.push(2);
temp.push(3);
temp
};
// ✅ ใช้ macro - สั้นกว่า
let v1 = vec![1, 2, 3];🔄 Macro Expansion Visualization
+-------------------------------------------------------------------+
| Macro Expansion Process |
+-------------------------------------------------------------------+
| |
| Source Code (you write) Expanded Code (Compiler sees) |
| ------------------- --> -------------------------- |
| |
| vec![1, 2, 3] { |
| | let mut temp = Vec::new(); |
| | temp.push(1); |
| | temp.push(2); |
| | temp.push(3); |
| | temp |
| +------------------------> } |
| |
| println!("x = {}", x) std::io::_print( |
| | format_args!("x = {}", x) |
| +------------------------> ) |
| |
+-------------------------------------------------------------------+
📋 Macro Cheatsheet
| Pattern | ความหมาย | ตัวอย่าง |
|---|---|---|
$x:expr | Expression ใดๆ | 1 + 2, foo() |
$x:ident | Identifier | my_var, foo |
$x:ty | Type | i32, String |
$($x:expr),* | Repeat 0+ ครั้ง | 1, 2, 3 |
$($x:expr),+ | Repeat 1+ ครั้ง | ต้องมีอย่างน้อย 1 |
$($x:expr);* | Repeat คั่นด้วย ; | a; b; c |
Syntax พื้นฐาน
macro_rules! macro_name {
( pattern ) => {
expansion
};
}ตัวอย่าง 1: Simple Macro
macro_rules! say_hello {
() => {
println!("Hello!");
};
}
fn main() {
say_hello!(); // Hello!
}ตัวอย่าง 2: With Arguments
macro_rules! greet {
($name:expr) => {
println!("Hello, {}!", $name);
};
}
fn main() {
greet!("World"); // Hello, World!
greet!("Rust"); // Hello, Rust!
greet!(1 + 2); // Hello, 3!
}Designators (ตัวจับ)
| Designator | Matches |
|---|---|
expr | Expression เช่น 1 + 2, x |
ident | Identifier เช่น foo, x |
ty | Type เช่น i32, String |
pat | Pattern เช่น Some(x), _ |
block | Block { ... } |
stmt | Statement |
literal | Literal เช่น "hello", 42 |
tt | Token tree (ทุกอย่าง) |
ตัวอย่าง 3: Multiple Patterns
macro_rules! calculate {
(add $a:expr, $b:expr) => {
$a + $b
};
(sub $a:expr, $b:expr) => {
$a - $b
};
(mul $a:expr, $b:expr) => {
$a * $b
};
}
fn main() {
println!("{}", calculate!(add 1, 2)); // 3
println!("{}", calculate!(sub 5, 3)); // 2
println!("{}", calculate!(mul 4, 5)); // 20
}ตัวอย่าง 4: Repetition
ใช้ $(...)* หรือ $(...)+ สำหรับซ้ำ:
macro_rules! vec_of_strings {
// ( pattern ),* = zero or more, comma separated
($($x:expr),*) => {
{
let mut temp = Vec::new();
$(
temp.push($x.to_string());
)*
temp
}
};
}
fn main() {
let v = vec_of_strings!["a", "b", "c"];
println!("{:?}", v); // ["a", "b", "c"]
let v2 = vec_of_strings![1, 2, 3];
println!("{:?}", v2); // ["1", "2", "3"]
}Repetition Operators
| Operator | Meaning |
|---|---|
* | Zero or more |
+ | One or more |
? | Zero or one |
ตัวอย่าง 5: สร้าง HashMap
macro_rules! hashmap {
($($key:expr => $value:expr),* $(,)?) => {
{
let mut map = std::collections::HashMap::new();
$(
map.insert($key, $value);
)*
map
}
};
}
fn main() {
let scores = hashmap! {
"Alice" => 100,
"Bob" => 85,
"Charlie" => 90,
};
println!("{:?}", scores);
}ตัวอย่าง 6: Debug Macro
macro_rules! debug_var {
($var:expr) => {
println!("{} = {:?}", stringify!($var), $var);
};
}
fn main() {
let x = 42;
let name = "Rust";
let vec = vec![1, 2, 3];
debug_var!(x); // x = 42
debug_var!(name); // name = "Rust"
debug_var!(vec); // vec = [1, 2, 3]
}stringify! แปลง expression เป็น string literal
ตัวอย่าง 7: Multiple Types
macro_rules! create_function {
($func_name:ident) => {
fn $func_name() {
println!("Called {:?}()", stringify!($func_name));
}
};
}
create_function!(foo);
create_function!(bar);
fn main() {
foo(); // Called "foo"()
bar(); // Called "bar"()
}ลองทำดู! 🎯
- สร้าง macro
min!ที่หาค่าต่ำสุดของ 2 ค่า - สร้าง macro
println_all!ที่ print หลายค่า - สร้าง macro ที่สร้าง struct
🌍 Real-World Example: Hashmap Literal Macro
สร้าง HashMap แบบสั้นๆ เหมือน vec!:
macro_rules! hashmap {
// Empty hashmap
() => {
std::collections::HashMap::new()
};
// With key-value pairs
($($key:expr => $value:expr),+ $(,)?) => {{
let mut map = std::collections::HashMap::new();
$(
map.insert($key, $value);
)+
map
}};
}
fn main() {
// ใช้งาน macro
let scores = hashmap! {
"Alice" => 100,
"Bob" => 85,
"Charlie" => 92,
};
println!("{:?}", scores);
// {"Alice": 100, "Bob": 85, "Charlie": 92}
}📋 Common Macro Patterns
| Pattern | Use Case | Example |
|---|---|---|
| Literal | สร้าง collection | vec!, hashmap! |
| DSL | Domain-specific syntax | html!, sql! |
| Code Gen | สร้าง boilerplate | #[derive(...)] |
| Assertion | Testing | assert!, assert_eq! |
เปรียบเทียบ Macros vs Functions
| Aspect | Macros | Functions |
|---|---|---|
| Evaluation | Compile-time | Runtime |
| Types | ไม่ต้องระบุ | ต้องระบุ |
| Arguments | Variable | Fixed |
| Syntax | Flexible | Fixed |
| Debug | ยากกว่า | ง่ายกว่า |
สรุป
| Pattern | Meaning |
|---|---|
$x:expr | Match expression |
$x:ident | Match identifier |
$($x:expr),* | Zero or more exprs |
$($x:expr),+ | One or more exprs |
$($x:expr)? | Optional expr |
stringify!($x) | Convert to string |
👉 ต่อไป: Procedural Macros
Procedural Macros
Procedural Macros แปลง Rust code เป็น code อื่น ณ compile time
3 ประเภท
| Type | Syntax | Use Case |
|---|---|---|
| Derive | #[derive(MyMacro)] | Generate impl blocks |
| Attribute | #[my_attr] | Modify items |
| Function-like | my_macro!(...) | Custom syntax |
Setup
Procedural macros ต้องอยู่ใน separate crate:
# my-macro/Cargo.toml
[package]
name = "my-macro"
version = "0.1.0"
[lib]
proc-macro = true
[dependencies]
quote = "1"
syn = { version = "2", features = ["full"] }
proc-macro2 = "1"
Derive Macro Example
สร้าง derive macro สำหรับ HelloMacro trait:
1. Define Trait (main crate)
// src/lib.rs
pub trait HelloMacro {
fn hello_macro();
}2. Create Derive Macro (macro crate)
// my-macro/src/lib.rs
use proc_macro::TokenStream;
use quote::quote;
use syn::{parse_macro_input, DeriveInput};
#[proc_macro_derive(HelloMacro)]
pub fn hello_macro_derive(input: TokenStream) -> TokenStream {
// Parse input
let input = parse_macro_input!(input as DeriveInput);
let name = &input.ident;
// Generate code
let expanded = quote! {
impl HelloMacro for #name {
fn hello_macro() {
println!("Hello from {}!", stringify!(#name));
}
}
};
TokenStream::from(expanded)
}3. Use It
use hello_macro::HelloMacro;
use hello_macro_derive::HelloMacro;
#[derive(HelloMacro)]
struct Pancakes;
fn main() {
Pancakes::hello_macro(); // "Hello from Pancakes!"
}Derive with Fields
อ่าน struct fields:
use proc_macro::TokenStream;
use quote::quote;
use syn::{parse_macro_input, DeriveInput, Data, Fields};
#[proc_macro_derive(Describe)]
pub fn describe_derive(input: TokenStream) -> TokenStream {
let input = parse_macro_input!(input as DeriveInput);
let name = &input.ident;
// Get field names
let field_names: Vec<_> = match &input.data {
Data::Struct(data) => match &data.fields {
Fields::Named(fields) => fields
.named
.iter()
.map(|f| f.ident.as_ref().unwrap().to_string())
.collect(),
_ => vec![],
},
_ => vec![],
};
let fields_str = field_names.join(", ");
let expanded = quote! {
impl #name {
pub fn describe() {
println!("{} has fields: {}", stringify!(#name), #fields_str);
}
}
};
TokenStream::from(expanded)
}Usage:
#[derive(Describe)]
struct User {
name: String,
age: u32,
}
fn main() {
User::describe(); // "User has fields: name, age"
}Attribute Macro Example
use proc_macro::TokenStream;
use quote::quote;
use syn::{parse_macro_input, ItemFn};
#[proc_macro_attribute]
pub fn log_call(_attr: TokenStream, item: TokenStream) -> TokenStream {
let input = parse_macro_input!(item as ItemFn);
let name = &input.sig.ident;
let block = &input.block;
let sig = &input.sig;
let expanded = quote! {
#sig {
println!("Calling function: {}", stringify!(#name));
let result = (|| #block)();
println!("Function {} returned", stringify!(#name));
result
}
};
TokenStream::from(expanded)
}Usage:
#[log_call]
fn add(a: i32, b: i32) -> i32 {
a + b
}
fn main() {
let sum = add(2, 3);
// Output:
// Calling function: add
// Function add returned
println!("Sum: {}", sum);
}Function-like Macro
use proc_macro::TokenStream;
use quote::quote;
use syn::{parse_macro_input, LitStr};
#[proc_macro]
pub fn make_greeting(input: TokenStream) -> TokenStream {
let name = parse_macro_input!(input as LitStr);
let greeting = format!("Hello, {}!", name.value());
let expanded = quote! {
#greeting
};
TokenStream::from(expanded)
}Usage:
let msg = make_greeting!("World");
println!("{}", msg); // "Hello, World!"Real-world Examples
หลาย crates ใช้ procedural macros:
| Crate | Macro | Purpose |
|---|---|---|
| serde | #[derive(Serialize, Deserialize)] | JSON/YAML serialization |
| tokio | #[tokio::main] | Async runtime setup |
| axum | #[debug_handler] | Better error messages |
| sqlx | #[derive(FromRow)] | Database mapping |
| thiserror | #[derive(Error)] | Error types |
ลองทำดู! 🎯
- สร้าง derive macro สำหรับ
Debugclone - สร้าง attribute macro สำหรับ timing functions
- ศึกษา syn และ quote documentation
สรุป
| Concept | Description |
|---|---|
proc_macro | Rust’s proc macro crate |
syn | Parse Rust code |
quote | Generate Rust code |
TokenStream | Input/Output of macros |
Crate Structure
my-project/
├── Cargo.toml
├── src/lib.rs # Main library
└── my-macro/
├── Cargo.toml # proc-macro = true
└── src/lib.rs # Macro implementations
👉 ต่อไป: Macros ที่ใช้บ่อย
Macros ที่ใช้บ่อย
รวม macros ที่ใช้บ่อยใน Rust standard library
Output Macros
println! และ print!
fn main() {
// Basic
println!("Hello, World!");
print!("No newline");
println!(" - now with newline");
// With placeholders
println!("Value: {}", 42);
println!("Multiple: {} and {}", 1, 2);
// Named arguments
println!("{name} is {age} years old", name = "Alice", age = 30);
// Debug format
let v = vec![1, 2, 3];
println!("{:?}", v); // [1, 2, 3]
println!("{:#?}", v); // Pretty print
// Formatting
println!("{:>10}", "right"); // " right"
println!("{:<10}", "left"); // "left "
println!("{:^10}", "center"); // " center "
println!("{:0>5}", 42); // "00042"
println!("{:.2}", 3.14159); // "3.14"
}eprintln! และ eprint!
พิมพ์ไปยัง stderr:
fn main() {
eprintln!("Error: something went wrong!");
eprint!("Warning: ");
eprintln!("check your input");
}format!
สร้าง String โดยไม่พิมพ์:
fn main() {
let s = format!("Hello, {}!", "World");
println!("{}", s);
let num = 42;
let formatted = format!("Number: {:05}", num); // "Number: 00042"
// Useful for building strings
let mut log = String::new();
log.push_str(&format!("[INFO] Started at {}\n", "10:00"));
log.push_str(&format!("[INFO] Finished at {}\n", "10:05"));
println!("{}", log);
}vec!
สร้าง Vec:
fn main() {
// With elements
let v1 = vec![1, 2, 3, 4, 5];
// Repeat value
let v2 = vec![0; 5]; // [0, 0, 0, 0, 0]
// Empty with type
let v3: Vec<String> = vec![];
// With expressions
let v4 = vec![1 + 1, 2 + 2, 3 + 3]; // [2, 4, 6]
println!("{:?}", v1);
}Assertion Macros
assert!
fn main() {
assert!(true);
assert!(1 + 1 == 2);
// With message
let x = 5;
assert!(x > 0, "x must be positive!");
assert!(x > 0, "x was {}, expected positive", x);
}assert_eq! และ assert_ne!
fn main() {
let a = 4;
let b = 2 + 2;
assert_eq!(a, b); // passes
assert_ne!(a, 5); // passes
// With message
assert_eq!(a, b, "Expected {} to equal {}", a, b);
}debug_assert!
เฉพาะ debug builds:
fn process(x: i32) {
// ถูกลบใน release builds
debug_assert!(x > 0, "x must be positive in debug mode");
println!("Processing {}", x);
}
fn main() {
process(5);
}dbg!
Debug print พร้อม file/line:
fn main() {
let x = 5;
dbg!(x); // [src/main.rs:3] x = 5
// Returns the value
let y = dbg!(x * 2) + 1; // [src/main.rs:6] x * 2 = 10
dbg!(y); // [src/main.rs:7] y = 11
// Multiple values
let a = 1;
let b = 2;
dbg!(a, b, a + b);
}todo! และ unimplemented!
Placeholder สำหรับโค้ดที่ยังไม่เสร็จ:
fn not_done_yet() -> i32 {
todo!("implement this function") // panics with message
}
fn old_way() -> i32 {
unimplemented!("use new_way() instead")
}
fn main() {
// not_done_yet(); // would panic
}unreachable!
สำหรับโค้ดที่ไม่ควรถึง:
fn divide(a: i32, b: i32) -> i32 {
match b {
0 => panic!("division by zero"),
_ => a / b,
}
}
fn process(x: i32) {
match x {
1..=100 => println!("Valid"),
_ if x > 100 => println!("Too big"),
_ if x < 1 => println!("Too small"),
_ => unreachable!("all cases covered"),
}
}panic!
หยุดโปรแกรมทันที:
fn main() {
let v = vec![1, 2, 3];
if v.is_empty() {
panic!("Vector is empty!");
}
// With format
let index = 10;
if index >= v.len() {
panic!("Index {} out of bounds for length {}", index, v.len());
}
}include_str! และ include_bytes!
รวมไฟล์ใน binary:
// Include as string
const README: &str = include_str!("../../README.md");
// Include as bytes
const LOGO: &[u8] = include_bytes!("../../logo.png");
fn main() {
println!("First 100 chars of README:");
println!("{}", &README[..100.min(README.len())]);
println!("Logo size: {} bytes", LOGO.len());
}concat! และ stringify!
Compile-time string operations:
const VERSION: &str = concat!("v", "1", ".", "0");
fn main() {
println!("Version: {}", VERSION); // "v1.0"
// stringify! converts expression to string literal
let x = 1 + 2;
println!("{} = {}", stringify!(1 + 2), x); // "1 + 2 = 3"
}cfg!
Check compile-time configuration:
fn main() {
if cfg!(target_os = "windows") {
println!("Running on Windows");
} else if cfg!(target_os = "linux") {
println!("Running on Linux");
} else if cfg!(target_os = "macos") {
println!("Running on macOS");
}
if cfg!(debug_assertions) {
println!("Debug mode");
} else {
println!("Release mode");
}
}ลองทำดู! 🎯
- ใช้ format! สร้าง formatted string
- ใช้ dbg! debug expression
- ใช้ cfg! ตรวจสอบ OS
สรุปบทที่ 18
| Macro | Purpose | Returns |
|---|---|---|
println! | Print to stdout | () |
eprintln! | Print to stderr | () |
format! | Create String | String |
vec! | Create Vec | Vec<T> |
assert! | Check condition | () or panic |
assert_eq! | Check equality | () or panic |
dbg! | Debug print | Same as input |
todo! | Placeholder | panic |
panic! | Stop program | never |
include_str! | Include file | &str |
cfg! | Check config | bool |
👉 ต่อไป: บทที่ 19: Web Development
บทที่ 19: Web Development
สร้าง Web Applications ด้วย Rust
สิ่งที่จะได้เรียนรู้
| หัวข้อ | คำอธิบาย |
|---|---|
| Web ด้วย Rust | Ecosystem overview |
| Axum พื้นฐาน | Framework ยอดนิยม |
| REST API | CRUD operations |
| Database | เชื่อมต่อ SQLx |
Web ด้วย Rust
Frameworks ยอดนิยม
| Framework | คำอธิบาย |
|---|---|
| Axum | Modern, tower-based |
| Actix-web | High performance |
| Rocket | Easy to use |
| Warp | Composable filters |
🏗️ Web Application Architecture
+-------------------------------------------------------------------+
| Rust Web Application Stack |
+-------------------------------------------------------------------+
| |
| Client (Browser/Mobile) |
| | |
| v |
| +---------------------------------------------------------------+
| | Load Balancer |
| | (nginx/traefik) |
| +---------------------------------------------------------------+
| | |
| v |
| +---------------------------------------------------------------+
| | Rust Web Server (Axum/Actix) |
| | +----------+ +----------+ +------------+ |
| | | Routes | | Handlers | | Middleware | |
| | +----------+ +----------+ +------------+ |
| +---------------------------------------------------------------+
| | |
| v |
| +---------------------------------------------------------------+
| | Database (PostgreSQL/SQLite/Redis) |
| +---------------------------------------------------------------+
| |
+-------------------------------------------------------------------+
ทำไมใช้ Rust สำหรับ Web?
| คุณสมบัติ | Rust | Node.js | Python |
|---|---|---|---|
| Performance | ⭐⭐⭐ | ⭐⭐ | ⭐ |
| Memory | Low | Medium | High |
| Concurrency | ⭐⭐⭐ | ⭐⭐ | ⭐ |
| Type Safety | ⭐⭐⭐ | ⭐ | ⭐ |
🚀 Deployment Options
| Option | ตัวอย่าง | เหมาะกับ |
|---|---|---|
| Docker | docker build -t myapp . | Production |
| Cloud | AWS ECS, Google Cloud Run | Scalable |
| Serverless | AWS Lambda (+ cargo-lambda) | Low traffic |
| VPS | DigitalOcean, Linode | Simple deploy |
เราจะใช้ Axum
Axum เป็น framework จาก Tokio team:
- ใช้ง่าย
- Async native
- Type-safe
- Extensible
👉 ต่อไป: Axum พื้นฐาน
Axum พื้นฐาน
Axum เป็น web framework จาก Tokio team ออกแบบมาสำหรับ async Rust
Setup
# Cargo.toml
[dependencies]
axum = "0.7"
tokio = { version = "1", features = ["full"] }
serde = { version = "1.0", features = ["derive"] }
serde_json = "1.0"
Hello World
use axum::{routing::get, Router};
#[tokio::main]
async fn main() {
// สร้าง router
let app = Router::new()
.route("/", get(hello));
// สร้าง TCP listener
let listener = tokio::net::TcpListener::bind("0.0.0.0:3000")
.await
.unwrap();
println!("🚀 Server running at http://localhost:3000");
// รัน server
axum::serve(listener, app).await.unwrap();
}
async fn hello() -> &'static str {
"Hello, World!"
}รัน:
cargo run
```text
เปิดเบราว์เซอร์ไปที่ http://localhost:3000
---
## Routes
### Basic Routes
```rust,ignore
let app = Router::new()
.route("/", get(index))
.route("/about", get(about))
.route("/contact", get(contact));
HTTP Methods
use axum::routing::{get, post, put, delete};
let app = Router::new()
.route("/users", get(list_users).post(create_user))
.route("/users/:id", get(get_user).put(update_user).delete(delete_user));Nested Routes
let api_routes = Router::new()
.route("/users", get(list_users))
.route("/posts", get(list_posts));
let app = Router::new()
.nest("/api/v1", api_routes)
.route("/", get(index));
// ผลลัพธ์:
// GET /api/v1/users
// GET /api/v1/posts
// GET /Handler Functions
Basic Handler
async fn hello() -> &'static str {
"Hello, World!"
}
async fn json_response() -> axum::Json<serde_json::Value> {
axum::Json(serde_json::json!({
"message": "Hello JSON"
}))
}Return Types
| Type | Description |
|---|---|
&'static str | Plain text |
String | Dynamic text |
Json\<T\> | JSON response |
Html\<String\> | HTML response |
(StatusCode, T) | Custom status |
Result\<T, E\> | With error handling |
use axum::{response::Html, http::StatusCode};
async fn html_page() -> Html<String> {
Html("<h1>Hello HTML</h1>".to_string())
}
async fn custom_status() -> (StatusCode, &'static str) {
(StatusCode::CREATED, "Created!")
}Extractors
ดึงข้อมูลจาก request:
Path Parameters
use axum::extract::Path;
// GET /users/123
async fn get_user(Path(id): Path<u32>) -> String {
format!("User ID: {}", id)
}
// GET /users/123/posts/456
async fn get_user_post(Path((user_id, post_id)): Path<(u32, u32)>) -> String {
format!("User {} Post {}", user_id, post_id)
}Query Parameters
use axum::extract::Query;
use serde::Deserialize;
#[derive(Deserialize)]
struct SearchParams {
q: String,
page: Option<u32>,
}
// GET /search?q=rust&page=2
async fn search(Query(params): Query<SearchParams>) -> String {
format!("Searching: '{}' page {:?}", params.q, params.page)
}JSON Body
use axum::extract::Json;
use serde::{Deserialize, Serialize};
#[derive(Deserialize)]
struct CreateUser {
name: String,
email: String,
}
#[derive(Serialize)]
struct User {
id: u32,
name: String,
email: String,
}
// POST /users with JSON body
async fn create_user(Json(payload): Json<CreateUser>) -> Json<User> {
let user = User {
id: 1,
name: payload.name,
email: payload.email,
};
Json(user)
}Headers
use axum::http::HeaderMap;
async fn read_headers(headers: HeaderMap) -> String {
if let Some(auth) = headers.get("authorization") {
format!("Auth: {:?}", auth)
} else {
"No auth header".to_string()
}
}State
แชร์ข้อมูลระหว่าง handlers:
use axum::extract::State;
use std::sync::Arc;
struct AppState {
db_pool: String, // ปกติใช้ connection pool จริง
}
#[tokio::main]
async fn main() {
let state = Arc::new(AppState {
db_pool: "postgres://...".to_string(),
});
let app = Router::new()
.route("/", get(handler))
.with_state(state);
// ...
}
async fn handler(State(state): State<Arc<AppState>>) -> String {
format!("DB: {}", state.db_pool)
}Error Handling
use axum::{
http::StatusCode,
response::{IntoResponse, Response},
};
enum AppError {
NotFound,
InternalError(String),
}
impl IntoResponse for AppError {
fn into_response(self) -> Response {
let (status, message) = match self {
AppError::NotFound => (StatusCode::NOT_FOUND, "Not found"),
AppError::InternalError(msg) => (StatusCode::INTERNAL_SERVER_ERROR, msg.leak()),
};
(status, message).into_response()
}
}
async fn fallible_handler() -> Result<String, AppError> {
// อาจ return Err(AppError::NotFound)
Ok("Success!".to_string())
}Middleware
use axum::middleware;
use tower_http::cors::CorsLayer;
use tower_http::trace::TraceLayer;
let app = Router::new()
.route("/", get(handler))
.layer(CorsLayer::permissive())
.layer(TraceLayer::new_for_http());ลองทำดู! 🎯
- สร้าง API ที่มี GET และ POST
- ใช้ Path extractor รับ id
- ใช้ Json extractor รับ body
🌍 Complete CRUD API Example
ตัวอย่าง Todo API แบบครบ:
use axum::{
extract::{Path, State},
http::StatusCode,
routing::{get, post, put, delete},
Json, Router,
};
use serde::{Deserialize, Serialize};
use std::sync::{Arc, RwLock};
// Data models
#[derive(Clone, Serialize, Deserialize)]
struct Todo {
id: u32,
title: String,
completed: bool,
}
#[derive(Deserialize)]
struct CreateTodo {
title: String,
}
type Db = Arc<RwLock<Vec<Todo>>>;
// Handlers
async fn list_todos(State(db): State<Db>) -> Json<Vec<Todo>> {
let todos = db.read().unwrap().clone();
Json(todos)
}
async fn create_todo(
State(db): State<Db>,
Json(input): Json<CreateTodo>,
) -> (StatusCode, Json<Todo>) {
let mut todos = db.write().unwrap();
let id = todos.len() as u32 + 1;
let todo = Todo {
id,
title: input.title,
completed: false,
};
todos.push(todo.clone());
(StatusCode::CREATED, Json(todo))
}
async fn get_todo(
State(db): State<Db>,
Path(id): Path<u32>,
) -> Result<Json<Todo>, StatusCode> {
let todos = db.read().unwrap();
todos
.iter()
.find(|t| t.id == id)
.cloned()
.map(Json)
.ok_or(StatusCode::NOT_FOUND)
}
async fn delete_todo(
State(db): State<Db>,
Path(id): Path<u32>,
) -> StatusCode {
let mut todos = db.write().unwrap();
if let Some(pos) = todos.iter().position(|t| t.id == id) {
todos.remove(pos);
StatusCode::NO_CONTENT
} else {
StatusCode::NOT_FOUND
}
}
#[tokio::main]
async fn main() {
let db: Db = Arc::new(RwLock::new(vec![]));
let app = Router::new()
.route("/todos", get(list_todos).post(create_todo))
.route("/todos/:id", get(get_todo).delete(delete_todo))
.with_state(db);
let listener = tokio::net::TcpListener::bind("0.0.0.0:3000")
.await
.unwrap();
println!("🚀 Server running at http://localhost:3000");
axum::serve(listener, app).await.unwrap();
}📋 API Endpoints
| Method | Endpoint | Description |
|---|---|---|
| GET | /todos | List all todos |
| POST | /todos | Create new todo |
| GET | /todos/:id | Get todo by ID |
| DELETE | /todos/:id | Delete todo |
🚀 Deployment Checklist
+-------------------------------------------------------------------+
| Production Deployment |
+-------------------------------------------------------------------+
| |
| 1. Build Release |
| cargo build --release |
| |
| 2. Dockerfile |
| FROM rust:1.75 as builder |
| WORKDIR /app |
| COPY . . |
| RUN cargo build --release |
| |
| FROM debian:bookworm-slim |
| COPY --from=builder /app/target/release/myapp /usr/local/bin |
| CMD ["myapp"] |
| |
| 3. Environment Variables |
| DATABASE_URL=postgres://... |
| PORT=3000 |
| |
| 4. Deploy Options |
| * Docker -> AWS ECS / Google Cloud Run |
| * Binary -> VPS (DigitalOcean, Linode) |
| * Serverless -> AWS Lambda + cargo-lambda |
| |
+-------------------------------------------------------------------+
สรุป
| Concept | Example |
|---|---|
| Route | .route("/path", get(handler)) |
| Path | Path(id): Path<u32> |
| Query | Query(params): Query<T> |
| JSON | Json(body): Json<T> |
| State | State(state): State<Arc<T>> |
| Nested | .nest("/api", routes) |
👉 ต่อไป: สร้าง REST API
สร้าง REST API
สร้าง CRUD API ด้วย Axum
Project Setup
# Cargo.toml
[package]
name = "todo-api"
version = "0.1.0"
edition = "2024"
[dependencies]
axum = "0.7"
tokio = { version = "1", features = ["full"] }
serde = { version = "1.0", features = ["derive"] }
serde_json = "1.0"
uuid = { version = "1", features = ["v4", "serde"] }
Data Model
use serde::{Deserialize, Serialize};
use uuid::Uuid;
#[derive(Debug, Clone, Serialize, Deserialize)]
pub struct Todo {
pub id: Uuid,
pub title: String,
pub description: Option<String>,
pub completed: bool,
pub created_at: String,
}
#[derive(Debug, Deserialize)]
pub struct CreateTodo {
pub title: String,
pub description: Option<String>,
}
#[derive(Debug, Deserialize)]
pub struct UpdateTodo {
pub title: Option<String>,
pub description: Option<String>,
pub completed: Option<bool>,
}Application State
use std::sync::Arc;
use tokio::sync::RwLock;
use std::collections::HashMap;
pub type Db = Arc<RwLock<HashMap<Uuid, Todo>>>;
fn create_db() -> Db {
Arc::new(RwLock::new(HashMap::new()))
}ใช้ RwLock แทน Mutex เพราะ:
- อ่านได้หลาย concurrent readers
- เขียนได้ทีละคน
Complete API
use axum::{
extract::{Path, State, Json},
http::StatusCode,
routing::{get, post, put, delete},
Router,
response::IntoResponse,
};
use serde::{Deserialize, Serialize};
use std::sync::Arc;
use tokio::sync::RwLock;
use std::collections::HashMap;
use uuid::Uuid;
// === Models ===
#[derive(Debug, Clone, Serialize, Deserialize)]
struct Todo {
id: Uuid,
title: String,
description: Option<String>,
completed: bool,
}
#[derive(Debug, Deserialize)]
struct CreateTodo {
title: String,
description: Option<String>,
}
#[derive(Debug, Deserialize)]
struct UpdateTodo {
title: Option<String>,
description: Option<String>,
completed: Option<bool>,
}
type Db = Arc<RwLock<HashMap<Uuid, Todo>>>;
// === Handlers ===
// GET /todos
async fn list_todos(State(db): State<Db>) -> Json<Vec<Todo>> {
let todos = db.read().await;
let list: Vec<Todo> = todos.values().cloned().collect();
Json(list)
}
// GET /todos/:id
async fn get_todo(
Path(id): Path<Uuid>,
State(db): State<Db>,
) -> Result<Json<Todo>, StatusCode> {
let todos = db.read().await;
todos
.get(&id)
.cloned()
.map(Json)
.ok_or(StatusCode::NOT_FOUND)
}
// POST /todos
async fn create_todo(
State(db): State<Db>,
Json(input): Json<CreateTodo>,
) -> (StatusCode, Json<Todo>) {
let todo = Todo {
id: Uuid::new_v4(),
title: input.title,
description: input.description,
completed: false,
};
db.write().await.insert(todo.id, todo.clone());
(StatusCode::CREATED, Json(todo))
}
// PUT /todos/:id
async fn update_todo(
Path(id): Path<Uuid>,
State(db): State<Db>,
Json(input): Json<UpdateTodo>,
) -> Result<Json<Todo>, StatusCode> {
let mut todos = db.write().await;
let todo = todos.get_mut(&id).ok_or(StatusCode::NOT_FOUND)?;
if let Some(title) = input.title {
todo.title = title;
}
if let Some(description) = input.description {
todo.description = Some(description);
}
if let Some(completed) = input.completed {
todo.completed = completed;
}
Ok(Json(todo.clone()))
}
// DELETE /todos/:id
async fn delete_todo(
Path(id): Path<Uuid>,
State(db): State<Db>,
) -> StatusCode {
let mut todos = db.write().await;
if todos.remove(&id).is_some() {
StatusCode::NO_CONTENT
} else {
StatusCode::NOT_FOUND
}
}
// === Main ===
#[tokio::main]
async fn main() {
let db: Db = Arc::new(RwLock::new(HashMap::new()));
let app = Router::new()
.route("/todos", get(list_todos).post(create_todo))
.route("/todos/:id", get(get_todo).put(update_todo).delete(delete_todo))
.with_state(db);
let listener = tokio::net::TcpListener::bind("0.0.0.0:3000")
.await
.unwrap();
println!("🚀 Server running at http://localhost:3000");
axum::serve(listener, app).await.unwrap();
}Testing with curl
# Create todo
curl -X POST http://localhost:3000/todos \
-H "Content-Type: application/json" \
-d '{"title": "Learn Rust", "description": "Complete the tutorial"}'
# List all todos
curl http://localhost:3000/todos
# Get single todo
curl http://localhost:3000/todos/{id}
# Update todo
curl -X PUT http://localhost:3000/todos/{id} \
-H "Content-Type: application/json" \
-d '{"completed": true}'
# Delete todo
curl -X DELETE http://localhost:3000/todos/{id}
Error Handling
use axum::response::{IntoResponse, Response};
#[derive(Debug)]
enum AppError {
NotFound,
InvalidInput(String),
Internal(String),
}
impl IntoResponse for AppError {
fn into_response(self) -> Response {
let (status, message) = match self {
AppError::NotFound => (StatusCode::NOT_FOUND, "Not found"),
AppError::InvalidInput(msg) => (StatusCode::BAD_REQUEST, msg.leak()),
AppError::Internal(msg) => (StatusCode::INTERNAL_SERVER_ERROR, msg.leak()),
};
(status, Json(serde_json::json!({
"error": message
}))).into_response()
}
}
// Use in handler
async fn get_todo_v2(
Path(id): Path<Uuid>,
State(db): State<Db>,
) -> Result<Json<Todo>, AppError> {
let todos = db.read().await;
todos
.get(&id)
.cloned()
.map(Json)
.ok_or(AppError::NotFound)
}Add Middleware (CORS, Logging)
use tower_http::cors::{CorsLayer, Any};
use tower_http::trace::TraceLayer;
let app = Router::new()
.route("/todos", get(list_todos).post(create_todo))
.route("/todos/:id", get(get_todo).put(update_todo).delete(delete_todo))
.with_state(db)
.layer(CorsLayer::new().allow_origin(Any).allow_methods(Any))
.layer(TraceLayer::new_for_http());ลองทำดู! 🎯
- เพิ่ม field
priorityใน Todo - เพิ่ม endpoint
GET /todos?completed=truefilter - เพิ่ม validation สำหรับ title (ไม่ว่าง)
สรุป
| Endpoint | Method | Description |
|---|---|---|
/todos | GET | List all |
/todos | POST | Create |
/todos/:id | GET | Get one |
/todos/:id | PUT | Update |
/todos/:id | DELETE | Delete |
👉 ต่อไป: เชื่อมต่อ Database
เชื่อมต่อ Database
ใช้ SQLx เชื่อมต่อ PostgreSQL, MySQL, หรือ SQLite
Setup
# Cargo.toml
[dependencies]
# PostgreSQL
sqlx = { version = "0.7", features = ["runtime-tokio", "postgres"] }
# หรือ SQLite (ง่ายกว่าสำหรับพัฒนา)
sqlx = { version = "0.7", features = ["runtime-tokio", "sqlite"] }
# หรือ MySQL
sqlx = { version = "0.7", features = ["runtime-tokio", "mysql"] }
tokio = { version = "1", features = ["full"] }
SQLite Example (Beginner-friendly)
use sqlx::sqlite::{SqlitePool, SqlitePoolOptions};
#[tokio::main]
async fn main() -> Result<(), sqlx::Error> {
// Create database file if not exists
let pool = SqlitePoolOptions::new()
.max_connections(5)
.connect("sqlite:todos.db?mode=create")
.await?;
// Create table
sqlx::query(
r#"
CREATE TABLE IF NOT EXISTS todos (
id INTEGER PRIMARY KEY AUTOINCREMENT,
title TEXT NOT NULL,
completed BOOLEAN NOT NULL DEFAULT 0
)
"#
)
.execute(&pool)
.await?;
println!("Database ready!");
Ok(())
}PostgreSQL Connection Pool
use sqlx::postgres::{PgPool, PgPoolOptions};
async fn create_pool() -> Result<PgPool, sqlx::Error> {
let database_url = std::env::var("DATABASE_URL")
.unwrap_or_else(|_| "postgres://user:pass@localhost/mydb".to_string());
PgPoolOptions::new()
.max_connections(10)
.min_connections(2)
.acquire_timeout(std::time::Duration::from_secs(30))
.connect(&database_url)
.await
}
#[tokio::main]
async fn main() {
let pool = create_pool().await.expect("Failed to create pool");
println!("Connected to database!");
}Basic Queries
Execute (INSERT, UPDATE, DELETE)
use sqlx::PgPool;
async fn insert_todo(pool: &PgPool, title: &str) -> Result<i64, sqlx::Error> {
let result = sqlx::query(
"INSERT INTO todos (title, completed) VALUES ($1, false)"
)
.bind(title)
.execute(pool)
.await?;
Ok(result.rows_affected() as i64)
}
async fn update_todo(pool: &PgPool, id: i32, completed: bool) -> Result<bool, sqlx::Error> {
let result = sqlx::query(
"UPDATE todos SET completed = $1 WHERE id = $2"
)
.bind(completed)
.bind(id)
.execute(pool)
.await?;
Ok(result.rows_affected() > 0)
}
async fn delete_todo(pool: &PgPool, id: i32) -> Result<bool, sqlx::Error> {
let result = sqlx::query("DELETE FROM todos WHERE id = $1")
.bind(id)
.execute(pool)
.await?;
Ok(result.rows_affected() > 0)
}Fetch with FromRow
use sqlx::FromRow;
#[derive(Debug, FromRow)]
struct Todo {
id: i32,
title: String,
completed: bool,
}
async fn get_all_todos(pool: &PgPool) -> Result<Vec<Todo>, sqlx::Error> {
sqlx::query_as::<_, Todo>("SELECT id, title, completed FROM todos")
.fetch_all(pool)
.await
}
async fn get_todo_by_id(pool: &PgPool, id: i32) -> Result<Option<Todo>, sqlx::Error> {
sqlx::query_as::<_, Todo>("SELECT id, title, completed FROM todos WHERE id = $1")
.bind(id)
.fetch_optional(pool)
.await
}
async fn get_completed_todos(pool: &PgPool) -> Result<Vec<Todo>, sqlx::Error> {
sqlx::query_as::<_, Todo>("SELECT * FROM todos WHERE completed = true")
.fetch_all(pool)
.await
}query_as! Macro (Compile-time checked)
// ต้อง set DATABASE_URL env var
// และรัน: cargo sqlx prepare
async fn get_users_checked(pool: &PgPool) -> Result<Vec<User>, sqlx::Error> {
sqlx::query_as!(
User,
r#"SELECT id, name, email FROM users WHERE active = true"#
)
.fetch_all(pool)
.await
}
async fn create_user_checked(
pool: &PgPool,
name: &str,
email: &str
) -> Result<User, sqlx::Error> {
sqlx::query_as!(
User,
r#"
INSERT INTO users (name, email)
VALUES ($1, $2)
RETURNING id, name, email
"#,
name,
email
)
.fetch_one(pool)
.await
}Transactions
use sqlx::PgPool;
async fn transfer_money(
pool: &PgPool,
from_id: i32,
to_id: i32,
amount: f64,
) -> Result<(), sqlx::Error> {
let mut tx = pool.begin().await?;
// Deduct from sender
sqlx::query("UPDATE accounts SET balance = balance - $1 WHERE id = $2")
.bind(amount)
.bind(from_id)
.execute(&mut *tx)
.await?;
// Add to receiver
sqlx::query("UPDATE accounts SET balance = balance + $1 WHERE id = $2")
.bind(amount)
.bind(to_id)
.execute(&mut *tx)
.await?;
// Commit transaction
tx.commit().await?;
Ok(())
}Integration with Axum
use axum::{
extract::{State, Path, Json},
routing::get,
Router,
http::StatusCode,
};
use sqlx::PgPool;
#[derive(Clone)]
struct AppState {
db: PgPool,
}
async fn list_todos(State(state): State<AppState>) -> Json<Vec<Todo>> {
let todos = sqlx::query_as::<_, Todo>("SELECT * FROM todos")
.fetch_all(&state.db)
.await
.unwrap_or_default();
Json(todos)
}
async fn create_todo(
State(state): State<AppState>,
Json(input): Json<CreateTodo>,
) -> Result<(StatusCode, Json<Todo>), StatusCode> {
let todo = sqlx::query_as::<_, Todo>(
"INSERT INTO todos (title) VALUES ($1) RETURNING *"
)
.bind(&input.title)
.fetch_one(&state.db)
.await
.map_err(|_| StatusCode::INTERNAL_SERVER_ERROR)?;
Ok((StatusCode::CREATED, Json(todo)))
}
#[tokio::main]
async fn main() {
let pool = PgPoolOptions::new()
.connect("postgres://user:pass@localhost/mydb")
.await
.expect("Failed to connect");
let state = AppState { db: pool };
let app = Router::new()
.route("/todos", get(list_todos).post(create_todo))
.with_state(state);
let listener = tokio::net::TcpListener::bind("0.0.0.0:3000")
.await
.unwrap();
axum::serve(listener, app).await.unwrap();
}Migrations
# Install sqlx-cli
cargo install sqlx-cli
# Create migration
sqlx migrate add create_todos_table
# Edit migration file: migrations/20231225_create_todos_table.sql
# CREATE TABLE todos (...)
# Run migrations
sqlx migrate run
ลองทำดู! 🎯
- สร้าง SQLite database และ table
- เขียน CRUD functions
- เชื่อมต่อกับ Axum handlers
สรุปบทที่ 19
| Concept | Description |
|---|---|
PgPool | Connection pool |
query() | Basic query |
query_as() | Query with struct mapping |
query_as!() | Compile-time checked |
FromRow | Derive for struct |
begin() | Start transaction |
commit() | Commit transaction |
Error Handling
match result {
Ok(todo) => println!("Got: {:?}", todo),
Err(sqlx::Error::RowNotFound) => println!("Not found"),
Err(e) => eprintln!("Database error: {}", e),
}👉 ต่อไป: บทที่ 20: Final Project
บทที่ 20: Final Project - โปรเจกต์จบ 🎓
นำความรู้ทั้งหมดมาสร้าง CLI Todo App ที่สมบูรณ์!
สิ่งที่จะได้เรียนรู้
| หัวข้อ | คำอธิบาย |
|---|---|
| Project Overview | สิ่งที่จะสร้าง |
| การออกแบบ | โครงสร้างและ modules |
| Implementation | Step-by-step coding |
| สรุป | Review สิ่งที่เรียนมา |
Features ที่จะสร้าง
- ✅ Add tasks
- ✅ List tasks
- ✅ Complete tasks
- ✅ Remove tasks
- ✅ Save to file
Project Overview
Todo CLI App
สร้าง command-line todo app ที่มี features:
$ todo add "Learn Rust"
✅ Added: Learn Rust
$ todo list
1. [ ] Learn Rust
2. [x] Read the book
$ todo complete 1
✅ Completed: Learn Rust
$ todo remove 1
✅ Removed: Learn Rust
🏗️ Project Architecture
+-------------------------------------------------------------------+
| Todo CLI App Architecture |
+-------------------------------------------------------------------+
| |
| +---------------------------------------------------------------+
| | main.rs (Entry Point) |
| | * Parse command-line arguments |
| | * Route to appropriate handler |
| +-------------------------------+-------------------------------+
| | |
| +-----------------------+-----------------------+ |
| | | | |
| v v v |
| +------------+ +------------+ +------------+|
| | todo.rs | | storage.rs | | cli.rs ||
| | (Model) | | (I/O) | | (Interface)||
| | | | | | ||
| | struct Todo| | load/save | | add, list ||
| | enum Status| | JSON file | | complete ||
| +------------+ +------------+ +------------+|
| | |
| v |
| todos.json |
| |
+-------------------------------------------------------------------+
ความรู้ที่ใช้
| บท | ความรู้ |
|---|---|
| 2 | Variables & Types |
| 5 | Ownership |
| 6 | Structs |
| 7 | Enums |
| 8 | Collections (Vec) |
| 9 | Error Handling |
| 11 | Modules |
Dependencies
[dependencies]
serde = { version = "1.0", features = ["derive"] }
serde_json = "1.0"
👉 ต่อไป: การออกแบบ
การออกแบบ
ออกแบบ CLI Todo App ให้รองรับการขยาย
Requirements
Functional Requirements
- เพิ่ม todo ใหม่ได้
- แสดงรายการ todos ทั้งหมด
- ทำเครื่องหมาย complete ได้
- ลบ todo ได้
- บันทึกลงไฟล์ (persistent)
Non-functional Requirements
- ใช้งานง่าย (simple CLI)
- Error handling ที่ดี
- Code ที่ test ได้
- แยก concerns ชัดเจน
โครงสร้างโปรเจกต์
todo-cli/
├── Cargo.toml
├── src/
│ ├── main.rs ← Entry point, CLI parsing
│ ├── lib.rs ← Application logic
│ ├── todo.rs ← Todo struct
│ └── storage.rs ← File I/O
├── tests/
│ └── integration_test.rs
└── todos.json ← Data storage
Architecture Diagram
+---------------------------------------------+
| main.rs |
| - Parse CLI arguments |
| - Create Command enum |
| - Call lib::run() |
+----------------------+----------------------+
|
v
+---------------------------------------------+
| lib.rs |
| - Application logic |
| - Handle Commands |
| - Orchestrate todo + storage |
+----------------------+----------------------+
|
+-------------+-------------+
v v
+-----------------+ +-----------------+
| todo.rs | | storage.rs |
| - Todo struct | | - load() |
| - new() | | - save() |
| - toggle() | | - JSON I/O |
+-----------------+ +-----------------+
Data Structures
Todo Struct
// src/todo.rs
use serde::{Deserialize, Serialize};
use chrono::{DateTime, Utc};
#[derive(Debug, Clone, Serialize, Deserialize)]
pub struct Todo {
pub id: u32,
pub title: String,
pub completed: bool,
pub created_at: DateTime<Utc>,
pub completed_at: Option<DateTime<Utc>>,
}
impl Todo {
pub fn new(id: u32, title: String) -> Self {
Self {
id,
title,
completed: false,
created_at: Utc::now(),
completed_at: None,
}
}
pub fn toggle(&mut self) {
self.completed = !self.completed;
if self.completed {
self.completed_at = Some(Utc::now());
} else {
self.completed_at = None;
}
}
}
impl std::fmt::Display for Todo {
fn fmt(&self, f: &mut std::fmt::Formatter<'_>) -> std::fmt::Result {
let status = if self.completed { "✓" } else { " " };
write!(f, "[{}] {}. {}", status, self.id, self.title)
}
}Command Enum
// src/lib.rs
#[derive(Debug, PartialEq)]
pub enum Command {
Add(String),
List,
Complete(u32),
Uncomplete(u32),
Remove(u32),
Clear,
Help,
}
impl Command {
pub fn from_args(args: &[String]) -> Self {
match args.get(1).map(|s| s.as_str()) {
Some("add") => {
let title = args[2..].join(" ");
if title.is_empty() {
Command::Help
} else {
Command::Add(title)
}
}
Some("list") | Some("ls") => Command::List,
Some("complete") | Some("done") => {
args.get(2)
.and_then(|s| s.parse().ok())
.map(Command::Complete)
.unwrap_or(Command::Help)
}
Some("uncomplete") | Some("undo") => {
args.get(2)
.and_then(|s| s.parse().ok())
.map(Command::Uncomplete)
.unwrap_or(Command::Help)
}
Some("remove") | Some("rm") => {
args.get(2)
.and_then(|s| s.parse().ok())
.map(Command::Remove)
.unwrap_or(Command::Help)
}
Some("clear") => Command::Clear,
_ => Command::Help,
}
}
}Modules Responsibility
| Module | Responsibility | Dependencies |
|---|---|---|
main.rs | CLI parsing, entry point | lib |
lib.rs | Application logic | todo, storage |
todo.rs | Todo data model | serde, chrono |
storage.rs | File I/O | serde_json, todo |
Error Handling Strategy
// src/lib.rs
use thiserror::Error;
#[derive(Error, Debug)]
pub enum AppError {
#[error("Todo with id {0} not found")]
NotFound(u32),
#[error("Storage error: {0}")]
Storage(#[from] StorageError),
#[error("Invalid command")]
InvalidCommand,
}
// src/storage.rs
#[derive(Error, Debug)]
pub enum StorageError {
#[error("Failed to read file: {0}")]
ReadError(#[from] std::io::Error),
#[error("Failed to parse JSON: {0}")]
ParseError(#[from] serde_json::Error),
}Dependencies
# Cargo.toml
[package]
name = "todo-cli"
version = "0.1.0"
edition = "2024"
[dependencies]
serde = { version = "1.0", features = ["derive"] }
serde_json = "1.0"
chrono = { version = "0.4", features = ["serde"] }
thiserror = "1.0"
CLI Design
# Add todo
$ todo add Buy groceries
✅ Added: Buy groceries
# List todos
$ todo list
[✓] 1. Buy groceries
[ ] 2. Read Rust book
[ ] 3. Exercise
# Complete todo
$ todo complete 2
✅ Completed: Read Rust book
# Remove todo
$ todo remove 1
✅ Removed: Buy groceries
# Help
$ todo help
Usage: todo <command> [args]
Commands:
add <title> Add a new todo
list List all todos
complete <id> Mark todo as complete
remove <id> Remove a todo
clear Remove all todos
help Show this help
ลองทำดู! 🎯
- ออกแบบ struct เพิ่มเติม (priority, tags)
- วาด sequence diagram สำหรับ “add todo”
- ออกแบบ error types
สรุป
| Component | Role |
|---|---|
| main.rs | Parse args → Command → run() |
| lib.rs | Handle command → update state |
| todo.rs | Data model |
| storage.rs | Persistence layer |
Design Principles Used
- Single Responsibility: แต่ละ module ทำหน้าที่เดียว
- Dependency Injection: Storage trait สำหรับ testing
- Error Handling: Custom error types พร้อม context
- Separation of Concerns: UI/Logic/Data แยกกัน
👉 ต่อไป: Implementation
Implementation
main.rs
use std::env;
use todo_cli::{run, Command};
fn main() {
let args: Vec<String> = env::args().collect();
let command = match args.get(1).map(|s| s.as_str()) {
Some("add") => {
let title = args[2..].join(" ");
Command::Add(title)
}
Some("list") => Command::List,
Some("complete") => {
let id: u32 = args[2].parse().expect("Invalid ID");
Command::Complete(id)
}
Some("remove") => {
let id: u32 = args[2].parse().expect("Invalid ID");
Command::Remove(id)
}
_ => Command::Help,
};
if let Err(e) = run(command) {
eprintln!("Error: {}", e);
}
}lib.rs
mod todo;
mod storage;
pub use todo::Todo;
pub enum Command {
Add(String),
List,
Complete(u32),
Remove(u32),
Help,
}
pub fn run(command: Command) -> Result<(), Box<dyn std::error::Error>> {
let mut todos = storage::load()?;
match command {
Command::Add(title) => {
let id = todos.len() as u32 + 1;
let todo = Todo::new(id, title.clone());
todos.push(todo);
storage::save(&todos)?;
println!("✅ Added: {}", title);
}
Command::List => {
for todo in &todos {
let status = if todo.completed { "x" } else { " " };
println!("{}. [{}] {}", todo.id, status, todo.title);
}
}
Command::Complete(id) => {
if let Some(todo) = todos.iter_mut().find(|t| t.id == id) {
todo.completed = true;
storage::save(&todos)?;
println!("✅ Completed: {}", todo.title);
}
}
Command::Remove(id) => {
todos.retain(|t| t.id != id);
storage::save(&todos)?;
println!("✅ Removed task {}", id);
}
Command::Help => {
println!("Usage: todo <command> [args]");
println!("Commands: add, list, complete, remove");
}
}
Ok(())
}storage.rs
use crate::Todo;
use std::fs;
const FILE_PATH: &str = "todos.json";
pub fn load() -> Result<Vec<Todo>, Box<dyn std::error::Error>> {
if !std::path::Path::new(FILE_PATH).exists() {
return Ok(vec![]);
}
let content = fs::read_to_string(FILE_PATH)?;
let todos: Vec<Todo> = serde_json::from_str(&content)?;
Ok(todos)
}
pub fn save(todos: &[Todo]) -> Result<(), Box<dyn std::error::Error>> {
let content = serde_json::to_string_pretty(todos)?;
fs::write(FILE_PATH, content)?;
Ok(())
}👉 ต่อไป: สรุป
สรุป 🎉
ยินดีด้วย! คุณจบคอร์ส Rust แล้ว!
คุณได้เรียนรู้ภาษา Rust จากพื้นฐานจนถึงขั้นสูง และสร้าง CLI application ที่ใช้งานได้จริง!
สิ่งที่คุณได้เรียนรู้
Part 1: พื้นฐาน (บทที่ 1-4)
| บท | หัวข้อ | Key Concepts |
|---|---|---|
| 1 | Getting Started | Installation, Cargo, Hello World |
| 2 | Variables | Mutability, Data Types, Constants |
| 3 | Functions | Parameters, Return Values, Expressions |
| 4 | Control Flow | If/Else, Loops, Match |
Part 2: Core Concepts (บทที่ 5-9)
| บท | หัวข้อ | Key Concepts |
|---|---|---|
| 5 | Ownership | The 3 Rules, Move, Clone, References |
| 6 | Structs | Defining, Methods, Associated Functions |
| 7 | Enums | Option, Result, Pattern Matching |
| 8 | Collections | Vec, String, HashMap |
| 9 | Error Handling | panic!, Result, ? Operator |
Part 3: Advanced (บทที่ 10-14)
| บท | หัวข้อ | Key Concepts |
|---|---|---|
| 10 | Generics & Traits | Type Parameters, Trait Bounds, Lifetimes |
| 11 | Modules | Packages, Crates, Visibility |
| 12 | Testing | Unit Tests, Integration Tests, Doc Tests |
| 13 | Iterators & Closures | Adapters, Consumers, Fn Traits |
| 14 | Smart Pointers | Box, Rc, RefCell, Weak |
Part 4: Systems Programming (บทที่ 15-18)
| บท | หัวข้อ | Key Concepts |
|---|---|---|
| 15 | Concurrency | Threads, Channels, Mutex, Arc |
| 16 | Async/Await | Futures, Tokio, select! |
| 17 | Unsafe | Raw Pointers, FFI, Safe Abstractions |
| 18 | Macros | Declarative, Procedural, Built-in |
Part 5: Real World (บทที่ 19-20)
| บท | หัวข้อ | Key Concepts |
|---|---|---|
| 19 | Web Development | Axum, REST API, SQLx |
| 20 | Final Project | CLI App Design & Implementation |
Key Skills คุณได้
// 1. Memory safety without GC
let s1 = String::from("hello");
let s2 = &s1; // Borrowing
// 2. Error handling
fn read_file() -> Result<String, Error> {
let content = std::fs::read_to_string("file.txt")?;
Ok(content)
}
// 3. Zero-cost abstractions
let sum: i32 = vec![1, 2, 3]
.iter()
.map(|x| x * 2)
.filter(|x| x > &2)
.sum();
// 4. Fearless concurrency
std::thread::spawn(move || {
println!("Running in parallel!");
});โปรเจกต์ที่ควรลองทำต่อ
Beginner Projects
- Guessing Game - Text-based number guessing
- Temperature Converter - Fahrenheit ↔ Celsius
- Todo List - CLI task manager (บทนี้!)
Intermediate Projects
- Markdown Parser - Convert MD to HTML
- HTTP Client - Simple
curlclone - File Searcher - Like
grepcommand
Advanced Projects
- REST API Server - Full CRUD with database
- Async Crawler - Web scraper with Tokio
- Chat Server - Real-time with WebSockets
- Compiler - Simple expression language
Resources สำหรับเรียนต่อ
ดูรายละเอียดเพิ่มเติมที่ � Appendix: Resources
☕ สนับสนุนผู้เขียน
ขอบคุณที่อ่านจนจบครับ! ถ้าหนังสือเล่มนี้มีประโยชน์ คุณสามารถเลี้ยงกาแฟผมเพื่อเป็นกำลังใจในการทำคอนเทนต์ดีๆ ต่อไปได้ที่:
Final Tips
- อ่าน Error Messages - Rust มี error messages ที่ดีมาก
- ใช้ Clippy -
cargo clippyหา improvements - Format Code -
cargo fmtจัด format อัตโนมัติ - Write Tests -
cargo testทดสอบ code - Read Documentation -
cargo doc --open
ขอบคุณที่เรียนกับเรา! 🦀
_~^~^~_
\) / o o \ (/
'_ ∿ _'
/ '-----' \
Happy Coding!
Rust makes systems programming accessible to everyone.
ขอให้โชคดีกับการเขียน Rust!
ภาคผนวก
เนื้อหาเพิ่มเติมสำหรับอ้างอิง
สารบัญ
| หัวข้อ | คำอธิบาย |
|---|---|
| Rust Cheatsheet | สรุป syntax ที่ใช้บ่อย |
| Cargo Commands | คำสั่ง Cargo ทั้งหมด |
| Resources | แหล่งเรียนรู้เพิ่มเติม |
| แบบฝึกหัด | 100+ ข้อพร้อมเฉลย |
| Quiz | ทดสอบความเข้าใจ |
| Example Code | โค้ดตัวอย่างรันได้ |
Rust Cheatsheet
สรุปคำสั่งและ syntax ที่ใช้บ่อยใน Rust
Variables
// Immutable (ค่าคงที่)
let x = 5;
// Mutable (เปลี่ยนค่าได้)
let mut y = 10;
y = 20;
// Type annotation
let z: i32 = 100;
// Constants (ต้องระบุ type)
const MAX_POINTS: u32 = 100_000;
// Shadowing
let x = 5;
let x = x + 1; // x = 6Data Types
Scalar Types
| Type | ตัวอย่าง |
|---|---|
i8, i16, i32, i64, i128 | -128, 42 |
u8, u16, u32, u64, u128 | 0, 255 |
f32, f64 | 3.14, 2.0 |
bool | true, false |
char | 'a', '🦀' |
Compound Types
// Tuple
let tup: (i32, f64, bool) = (500, 6.4, true);
let (x, y, z) = tup; // destructuring
let first = tup.0; // indexing
// Array (fixed size)
let arr: [i32; 5] = [1, 2, 3, 4, 5];
let first = arr[0];
let arr = [3; 5]; // [3, 3, 3, 3, 3]Functions
// Basic function
fn greet() {
println!("Hello!");
}
// With parameters
fn greet_name(name: &str) {
println!("Hello, {}!", name);
}
// With return value
fn add(a: i32, b: i32) -> i32 {
a + b // no semicolon = return
}
// Early return
fn check(x: i32) -> bool {
if x > 10 {
return true;
}
false
}Control Flow
If/Else
if x > 5 {
println!("Big");
} else if x > 0 {
println!("Small");
} else {
println!("Zero or negative");
}
// As expression
let result = if x > 5 { "big" } else { "small" };Loops
// Infinite loop
loop {
break; // exit
}
// While loop
while x > 0 {
x -= 1;
}
// For loop
for i in 0..5 {
println!("{}", i); // 0, 1, 2, 3, 4
}
for item in &vec {
println!("{}", item);
}Ownership
// Move
let s1 = String::from("hello");
let s2 = s1; // s1 is invalid now
// Clone (deep copy)
let s1 = String::from("hello");
let s2 = s1.clone(); // s1 still valid
// Reference (borrow)
let s1 = String::from("hello");
let len = calculate_length(&s1); // s1 still valid
// Mutable reference
fn change(s: &mut String) {
s.push_str(" world");
}Structs
// Define
struct User {
username: String,
email: String,
active: bool,
}
// Create
let user = User {
username: String::from("john"),
email: String::from("john@example.com"),
active: true,
};
// Methods
impl User {
fn new(username: String) -> Self {
Self {
username,
email: String::new(),
active: true,
}
}
fn is_active(&self) -> bool {
self.active
}
}Enums & Match
// Define
enum Message {
Quit,
Move { x: i32, y: i32 },
Write(String),
}
// Match
match msg {
Message::Quit => println!("Quit"),
Message::Move { x, y } => println!("Move to {}, {}", x, y),
Message::Write(text) => println!("Write: {}", text),
}
// Option
let x: Option<i32> = Some(5);
let y: Option<i32> = None;
match x {
Some(value) => println!("{}", value),
None => println!("No value"),
}
// if let
if let Some(value) = x {
println!("{}", value);
}Error Handling
// Result
fn divide(a: f64, b: f64) -> Result<f64, String> {
if b == 0.0 {
Err(String::from("Division by zero"))
} else {
Ok(a / b)
}
}
// Handle Result
match divide(10.0, 2.0) {
Ok(result) => println!("{}", result),
Err(e) => println!("Error: {}", e),
}
// ? operator
fn read_file() -> Result<String, std::io::Error> {
let content = std::fs::read_to_string("file.txt")?;
Ok(content)
}
// unwrap (panic if error)
let content = std::fs::read_to_string("file.txt").unwrap();
// expect (panic with message)
let content = std::fs::read_to_string("file.txt")
.expect("Failed to read file");Collections
Vec
let mut v: Vec<i32> = Vec::new();
let v = vec![1, 2, 3];
v.push(4);
v.pop();
let first = &v[0];
let first = v.get(0); // Option<&i32>
for i in &v {
println!("{}", i);
}String
let mut s = String::new();
let s = String::from("hello");
let s = "hello".to_string();
s.push_str(" world");
s.push('!');
let s3 = format!("{} {}", s1, s2);HashMap
use std::collections::HashMap;
let mut map = HashMap::new();
map.insert("key", "value");
let value = map.get("key"); // Option<&V>
for (key, value) in &map {
println!("{}: {}", key, value);
}Iterators
let v = vec![1, 2, 3, 4, 5];
// Common methods
v.iter().map(|x| x * 2);
v.iter().filter(|x| **x > 2);
v.iter().sum::<i32>();
v.iter().collect::<Vec<_>>();
v.iter().for_each(|x| println!("{}", x));
v.iter().find(|x| **x == 3);
v.iter().any(|x| *x > 2);
v.iter().all(|x| *x > 0);Smart Pointers
// Box - Heap allocation
let b = Box::new(5);
// Rc - Reference counting
use std::rc::Rc;
let a = Rc::new(5);
let b = Rc::clone(&a);
// RefCell - Interior mutability
use std::cell::RefCell;
let data = RefCell::new(5);
*data.borrow_mut() += 1;Traits
// Define
trait Summary {
fn summarize(&self) -> String;
// Default implementation
fn default_summary(&self) -> String {
String::from("...")
}
}
// Implement
impl Summary for Article {
fn summarize(&self) -> String {
format!("{} by {}", self.title, self.author)
}
}
// Trait bounds
fn notify<T: Summary>(item: &T) {
println!("{}", item.summarize());
}
// where clause
fn notify<T>(item: &T)
where
T: Summary + Clone,
{
println!("{}", item.summarize());
}Async
// Async function
async fn fetch_data() -> String {
// ...
String::from("data")
}
// Await
async fn process() {
let data = fetch_data().await;
println!("{}", data);
}
// Tokio main
#[tokio::main]
async fn main() {
process().await;
}Cargo Commands
คำสั่ง Cargo ที่ใช้บ่อย
🚀 พื้นฐาน
| คำสั่ง | คำอธิบาย |
|---|---|
cargo new project_name | สร้างโปรเจกต์ใหม่ (binary) |
cargo new --lib lib_name | สร้างโปรเจกต์ใหม่ (library) |
cargo init | สร้างโปรเจกต์ในโฟลเดอร์ปัจจุบัน |
cargo build | Build โปรเจกต์ (debug) |
cargo build --release | Build โปรเจกต์ (release/optimized) |
cargo run | Build และ Run |
cargo run --release | Run แบบ release |
🧪 Testing
| คำสั่ง | คำอธิบาย |
|---|---|
cargo test | รัน tests ทั้งหมด |
cargo test test_name | รัน test ที่ชื่อตรง |
cargo test -- --show-output | แสดง println! |
cargo test -- --test-threads=1 | รัน sequential |
cargo test -- --ignored | รัน ignored tests |
cargo test --doc | รัน doc tests |
📦 Dependencies
| คำสั่ง | คำอธิบาย |
|---|---|
cargo add crate_name | เพิ่ม dependency |
cargo add tokio --features full | เพิ่มพร้อม features |
cargo remove crate_name | ลบ dependency |
cargo update | อัปเดต dependencies |
cargo tree | แสดง dependency tree |
📋 ตรวจสอบ
| คำสั่ง | คำอธิบาย |
|---|---|
cargo check | Check ว่า compile ได้ (เร็วกว่า build) |
cargo clippy | Lint หา improvements |
cargo fmt | Format code |
cargo fmt --check | Check format |
cargo audit | ตรวจ security vulnerabilities |
📖 Documentation
| คำสั่ง | คำอธิบาย |
|---|---|
cargo doc | สร้าง documentation |
cargo doc --open | สร้างและเปิดใน browser |
cargo doc --no-deps | ไม่รวม dependencies |
🔧 Advanced
| คำสั่ง | คำอธิบาย |
|---|---|
cargo clean | ลบ target directory |
cargo publish | Publish ไป crates.io |
cargo install crate_name | ติดตั้ง binary |
cargo uninstall crate_name | ลบ binary |
cargo bench | Run benchmarks |
🎯 Examples
# สร้างโปรเจกต์ใหม่
cargo new my_project
cd my_project
# เพิ่ม dependencies
cargo add serde --features derive
cargo add tokio --features full
# Build และ Run
cargo run
# ตรวจสอบ code
cargo check
cargo clippy
cargo fmt
# รัน tests
cargo test
# Build สำหรับ production
cargo build --release
# สร้าง documentation
cargo doc --open
📁 Examples
# รัน example
cargo run --example example_name
# รัน specific binary
cargo run --bin binary_name
# รัน workspace member
cargo run -p package_name
🛠️ Workspace
# Cargo.toml (root)
[workspace]
members = [
"crate1",
"crate2",
]
# Build all
cargo build --workspace
# Test all
cargo test --workspace
# Run specific
cargo run -p crate1
🔍 Useful Flags
| Flag | คำอธิบาย |
|---|---|
--verbose หรือ -v | แสดงรายละเอียด |
--quiet หรือ -q | ลดการแสดงผล |
--jobs N หรือ -j N | จำนวน parallel jobs |
--target triple | Cross compile |
--features "f1 f2" | เปิด features |
--all-features | เปิดทุก features |
--no-default-features | ปิด default features |
Resources
แหล่งเรียนรู้ Rust เพิ่มเติม
📚 Official Documentation
| Resource | คำอธิบาย |
|---|---|
| The Rust Book | หนังสือ Rust อย่างเป็นทางการ |
| Rust by Example | เรียนจากตัวอย่าง |
| Rustlings | แบบฝึกหัดขนาดเล็ก |
| Rust Reference | Reference ภาษา |
| Standard Library | Documentation std |
🎓 Learning Platforms
| Platform | คำอธิบาย |
|---|---|
| Exercism Rust Track | แบบฝึกหัด + Mentoring |
| Rust Quiz | ทดสอบความรู้ |
| Tour of Rust | Interactive Tutorial |
| Comprehensive Rust | โดย Google |
📦 Crate Discovery
| Site | คำอธิบาย |
|---|---|
| crates.io | Official Registry |
| lib.rs | Alternative Search |
| Blessed.rs | Recommended Crates |
| Docs.rs | Auto-generated Docs |
🛠️ Popular Crates
Web Development
Async
Serialization
| Crate | คำอธิบาย |
|---|---|
| serde | Serialization |
| serde_json | JSON |
| toml | TOML |
Database
Error Handling
CLI
💬 Community
| Platform | Link |
|---|---|
| Discord | Rust Discord |
| Forum | Rust Users Forum |
| r/rust | |
| Twitter/X | @rustlang |
📺 YouTube Channels
| Channel | คำอธิบาย |
|---|---|
| Jon Gjengset | Deep dives |
| Let’s Get Rusty | Tutorials |
| Ryan Levick | Microsoft Rust |
| Rust | Official |
🎬 Recommended Videos by Topic
| หัวข้อ | Video แนะนำ |
|---|---|
| Ownership | Visualizing Rust Ownership - Let’s Get Rusty |
| Lifetimes | Rust Lifetimes Finally Explained - Let’s Get Rusty |
| Async | Async Rust Explained - Jon Gjengset |
| Smart Pointers | Box, Rc, Arc Explained - Let’s Get Rusty |
| Error Handling | Error Handling in Rust - Let’s Get Rusty |
🎮 Interactive Practice
| Resource | คำอธิบาย |
|---|---|
| Rust Playground | ทดลองโค้ดออนไลน์ |
| Rust Explorer | ดู Assembly output |
| Godbolt | Compiler Explorer |
| Rustlings | 100+ exercises |
| Exercism Rust | Mentored exercises |
🔗 Quick Playground Links
เปิด Rust Playground พร้อมโค้ดตัวอย่าง:
📖 Books
| Book | คำอธิบาย |
|---|---|
| Programming Rust | O’Reilly |
| Rust in Action | Manning |
| Zero to Production | Web Development |
🔧 Tools
| Tool | คำอธิบาย |
|---|---|
| Rust Analyzer | Language Server |
| cargo-watch | Auto rebuild |
| cargo-expand | Macro expansion |
| cargo-audit | Security |
Example Code
โค้ดตัวอย่างที่สามารถ clone และรันได้เลย
📦 วิธีใช้
# Clone repository
git clone https://github.com/premix-kernel/rust-tutorial.git
cd rust-tutorial
# รันตัวอย่าง
cargo run --example <name>
📋 รายการ Examples
| Example | บท | คำอธิบาย |
|---|---|---|
hello_world | 1-4 | ตัวแปร, ฟังก์ชัน, Control Flow |
ownership | 5 | Move, Clone, Borrowing, Slices |
structs_enums | 6-7 | Structs, Methods, Enums, Match |
collections | 8 | Vec, String, HashMap |
error_handling | 9 | Result, ?, unwrap_or |
generics_traits | 10 | Generics, Traits, Bounds |
iterators | 13 | Closures, map, filter, fold |
smart_pointers | 14 | Box, Rc, RefCell, Weak |
concurrency | 15 | Threads, Channels, Mutex |
async_await | 16 | async/await, join!, spawn |
web_server | 19 | Axum REST API |
🚀 ตัวอย่างคำสั่ง
# Hello World
cargo run --example hello_world
# Ownership (สำคัญมาก!)
cargo run --example ownership
# Web Server (เปิด http://localhost:3000)
cargo run --example web_server
📝 โครงสร้างไฟล์
examples/
├── hello_world.rs # บทที่ 1-4
├── ownership.rs # บทที่ 5
├── structs_enums.rs # บทที่ 6-7
├── collections.rs # บทที่ 8
├── error_handling.rs # บทที่ 9
├── generics_traits.rs # บทที่ 10
├── iterators.rs # บทที่ 13
├── smart_pointers.rs # บทที่ 14
├── concurrency.rs # บทที่ 15
├── async_await.rs # บทที่ 16
└── web_server.rs # บทที่ 19
✨ Output ตัวอย่าง
hello_world
🦀 สวัสดี Rust!
Hello, World!
📝 ตัวอย่างตัวแปร:
Name: Rustacean
Age: 25
Is Learning: true
ownership
🦀 Ownership Demo
1️⃣ Move:
s2 = hello
2️⃣ Clone:
s3 = world, s4 = world
3️⃣ Copy:
x = 5, y = 5
แบบฝึกหัด - Exercises
แบบฝึกหัดสำหรับทุกบทในหนังสือ
วิธีใช้
- อ่านบทเรียนให้จบก่อน
- ลองทำแบบฝึกหัดด้วยตัวเอง
- ดูเฉลย/คำตอบหลังจากพยายามแล้ว
Part 1: พื้นฐาน
Part 2: Core Concepts
- บทที่ 5: Ownership
- บทที่ 6: Structs
- บทที่ 7: Enums & Pattern Matching
- บทที่ 8: Collections
- บทที่ 9: Error Handling
Part 3: Advanced
- บทที่ 10: Generics & Traits
- บทที่ 11: Modules
- บทที่ 12: Testing
- บทที่ 13: Iterators & Closures
- บทที่ 14: Smart Pointers
Part 4: Concurrency & Advanced
Part 5: Real World
👉 Quiz
แบบฝึกหัด: บทที่ 1 - Getting Started
แบบฝึกหัดที่ 1: ติดตั้งและตรวจสอบ
ติดตั้ง Rust และตรวจสอบว่าติดตั้งสำเร็จ
คำถาม: คำสั่งอะไรใช้ตรวจสอบเวอร์ชัน Rust?
ดูเฉลย
rustc --version
cargo --version
แบบฝึกหัดที่ 2: Hello World
สร้างโปรเจกต์ใหม่และแก้ไขให้แสดง “สวัสดี Rust!”
ขั้นตอน:
- สร้างโปรเจกต์ใหม่ชื่อ
hello_thai - แก้ไข
main.rsให้แสดง “สวัสดี Rust!” - รันโปรแกรม
ดูเฉลย
cargo new hello_thai
cd hello_thai
// src/main.rs
fn main() {
println!("สวัสดี Rust!");
}cargo run
แบบฝึกหัดที่ 3: Cargo คำสั่งพื้นฐาน
เติมคำสั่ง Cargo ให้ถูกต้อง:
- สร้างโปรเจกต์ใหม่:
cargo ______ my_project - Build โปรเจกต์:
cargo ______ - รันโปรเจกต์:
cargo ______ - Check โค้ด (ไม่ build):
cargo ______
ดูเฉลย
cargo new my_projectcargo buildcargo runcargo check
แบบฝึกหัดที่ 4: โครงสร้างโปรเจกต์
หลังจากรัน cargo new my_project จะได้โครงสร้างแบบไหน?
ดูเฉลย
my_project/
├── Cargo.toml
└── src/
└── main.rs
Cargo.toml- ไฟล์ config ของโปรเจกต์src/main.rs- ไฟล์โค้ดหลัก
แบบฝึกหัดที่ 5: แก้ไข Cargo.toml
เพิ่ม dependency rand เวอร์ชัน 0.8 ใน Cargo.toml
ดูเฉลย
[package]
name = "my_project"
version = "0.1.0"
edition = "2024"
[dependencies]
rand = "0.8"
หรือใช้คำสั่ง:
cargo add rand
👉 บทที่ 2
แบบฝึกหัด: บทที่ 2 - Variables & Data Types
แบบฝึกหัดที่ 1: Mutability
แก้ไขโค้ดนี้ให้ทำงานได้:
fn main() {
let x = 5;
x = 10;
println!("{}", x);
}ดูเฉลย
fn main() {
let mut x = 5; // เพิ่ม mut
x = 10;
println!("{}", x);
}แบบฝึกหัดที่ 2: Type Annotation
เติม type ให้ถูกต้อง:
fn main() {
let a: ____ = 42;
let b: ____ = 3.14;
let c: ____ = true;
let d: ____ = 'A';
let e: ____ = "Hello";
}ดูเฉลย
fn main() {
let a: i32 = 42;
let b: f64 = 3.14;
let c: bool = true;
let d: char = 'A';
let e: &str = "Hello";
}แบบฝึกหัดที่ 3: Shadowing
ผลลัพธ์ของโค้ดนี้คืออะไร?
fn main() {
let x = 5;
let x = x + 1;
{
let x = x * 2;
println!("inner: {}", x);
}
println!("outer: {}", x);
}ดูเฉลย
inner: 12
outer: 6
อธิบาย:
x = 5x = 5 + 1 = 6(shadowing)- ใน block:
x = 6 * 2 = 12(shadowing เฉพาะใน block) - เมื่อออกจาก block:
xกลับมาเป็น 6
แบบฝึกหัดที่ 4: Tuple และ Array
สร้างโค้ดที่:
- สร้าง tuple
(i32, f64, bool)ค่า(10, 3.14, true) - Destructure ออกมาเป็น 3 ตัวแปร
- สร้าง array ของ i32 ขนาด 5 ค่า [1, 2, 3, 4, 5]
- Print ค่าแรกและค่าสุดท้าย
ดูเฉลย
fn main() {
// Tuple
let tup: (i32, f64, bool) = (10, 3.14, true);
let (a, b, c) = tup;
println!("a={}, b={}, c={}", a, b, c);
// Array
let arr: [i32; 5] = [1, 2, 3, 4, 5];
println!("first: {}, last: {}", arr[0], arr[4]);
}แบบฝึกหัดที่ 5: Constants
ประกาศ constant ที่:
- ชื่อ
MAX_USERS - Type
u32 - ค่า 1000
ดูเฉลย
const MAX_USERS: u32 = 1000;
fn main() {
println!("Max users: {}", MAX_USERS);
}หมายเหตุ:
constต้องระบุ type เสมอ- ใช้ SCREAMING_SNAKE_CASE
- ต้องกำหนดค่าตอน compile time
👉 บทที่ 3
แบบฝึกหัด: บทที่ 3 - Functions
แบบฝึกหัดที่ 1: Function พื้นฐาน
เขียน function greet ที่:
- รับ parameter
name: &str - Print “Hello, {name}!”
ดูเฉลย
fn greet(name: &str) {
println!("Hello, {}!", name);
}
fn main() {
greet("World");
greet("Rust");
}แบบฝึกหัดที่ 2: Return Value
เขียน function add ที่:
- รับ
a: i32และb: i32 - Return ผลรวม
ดูเฉลย
fn add(a: i32, b: i32) -> i32 {
a + b // ไม่มี semicolon = return
}
// หรือ
fn add_explicit(a: i32, b: i32) -> i32 {
return a + b;
}
fn main() {
let sum = add(5, 3);
println!("5 + 3 = {}", sum);
}แบบฝึกหัดที่ 3: Multiple Parameters
เขียน function calculate_rectangle_area ที่:
- รับ
width: f64และheight: f64 - Return พื้นที่ (width * height)
ดูเฉลย
fn calculate_rectangle_area(width: f64, height: f64) -> f64 {
width * height
}
fn main() {
let area = calculate_rectangle_area(5.0, 3.0);
println!("Area: {}", area); // 15.0
}แบบฝึกหัดที่ 4: Early Return
เขียน function is_even ที่:
- รับ
n: i32 - Return
trueถ้าเป็นเลขคู่,falseถ้าเป็นเลขคี่
ดูเฉลย
fn is_even(n: i32) -> bool {
n % 2 == 0
}
// หรือใช้ early return
fn is_even_v2(n: i32) -> bool {
if n % 2 == 0 {
return true;
}
false
}
fn main() {
println!("4 is even: {}", is_even(4)); // true
println!("7 is even: {}", is_even(7)); // false
}แบบฝึกหัดที่ 5: Function ที่ Return Tuple
เขียน function min_max ที่:
- รับ
a: i32,b: i32,c: i32 - Return tuple
(min, max)
ดูเฉลย
fn min_max(a: i32, b: i32, c: i32) -> (i32, i32) {
let min = a.min(b).min(c);
let max = a.max(b).max(c);
(min, max)
}
fn main() {
let (min, max) = min_max(5, 2, 8);
println!("min: {}, max: {}", min, max); // min: 2, max: 8
}👉 บทที่ 4
แบบฝึกหัด: บทที่ 4 - Control Flow
แบบฝึกหัดที่ 1: If/Else
เขียน function grade ที่:
- รับ
score: i32 - Return เกรดตามเกณฑ์:
- 80+ = “A”
- 70-79 = “B”
- 60-69 = “C”
- 50-59 = “D”
- ต่ำกว่า 50 = “F”
ดูเฉลย
fn grade(score: i32) -> &'static str {
if score >= 80 {
"A"
} else if score >= 70 {
"B"
} else if score >= 60 {
"C"
} else if score >= 50 {
"D"
} else {
"F"
}
}
fn main() {
println!("85 -> {}", grade(85)); // A
println!("72 -> {}", grade(72)); // B
println!("45 -> {}", grade(45)); // F
}แบบฝึกหัดที่ 2: Loop
เขียน loop ที่:
- นับจาก 1 ถึง 5
- Print แต่ละเลข
- หยุดเมื่อถึง 5
ดูเฉลย
fn main() {
let mut count = 1;
loop {
println!("{}", count);
if count == 5 {
break;
}
count += 1;
}
}แบบฝึกหัดที่ 3: While Loop
เขียนโค้ดที่:
- ใช้ while loop นับถอยหลังจาก 10 ถึง 1
- Print “Liftoff!” หลังจบ
ดูเฉลย
fn main() {
let mut n = 10;
while n > 0 {
println!("{}", n);
n -= 1;
}
println!("Liftoff!");
}แบบฝึกหัดที่ 4: For Loop
เขียนโค้ดที่:
- สร้าง array
[10, 20, 30, 40, 50] - ใช้ for loop แสดงแต่ละค่าพร้อม index
ดูเฉลย
fn main() {
let numbers = [10, 20, 30, 40, 50];
for (index, value) in numbers.iter().enumerate() {
println!("Index {}: {}", index, value);
}
}Output:
Index 0: 10
Index 1: 20
Index 2: 30
Index 3: 40
Index 4: 50
แบบฝึกหัดที่ 5: FizzBuzz
เขียน FizzBuzz:
- เลข 1 ถึง 20
- หาร 3 ลงตัว print “Fizz”
- หาร 5 ลงตัว print “Buzz”
- หารทั้งสองลงตัว print “FizzBuzz”
- ไม่ลงตัวทั้งคู่ print เลขนั้น
ดูเฉลย
fn main() {
for n in 1..=20 {
if n % 3 == 0 && n % 5 == 0 {
println!("FizzBuzz");
} else if n % 3 == 0 {
println!("Fizz");
} else if n % 5 == 0 {
println!("Buzz");
} else {
println!("{}", n);
}
}
}👉 บทที่ 5
แบบฝึกหัด: บทที่ 5 - Ownership
แบบฝึกหัดที่ 1: Move
โค้ดนี้มี error อะไร? แก้ไขให้ทำงานได้
fn main() {
let s1 = String::from("hello");
let s2 = s1;
println!("{}", s1);
}ดูเฉลย
Error: s1 ถูก move ไป s2 แล้ว
วิธีแก้ 1: ใช้ clone
fn main() {
let s1 = String::from("hello");
let s2 = s1.clone();
println!("{}", s1); // ✅ OK
}วิธีแก้ 2: ใช้ reference
fn main() {
let s1 = String::from("hello");
let s2 = &s1;
println!("{}", s1); // ✅ OK
}แบบฝึกหัดที่ 2: Function Ownership
โค้ดนี้มี error อะไร? แก้ไขให้ทำงานได้
fn print_string(s: String) {
println!("{}", s);
}
fn main() {
let s = String::from("hello");
print_string(s);
println!("{}", s); // Error!
}ดูเฉลย
Error: s ถูก move เข้า function แล้ว
วิธีแก้: ใช้ reference
fn print_string(s: &String) { // รับ reference
println!("{}", s);
}
fn main() {
let s = String::from("hello");
print_string(&s); // ส่ง reference
println!("{}", s); // ✅ OK
}แบบฝึกหัดที่ 3: Mutable Reference
เขียน function append_world ที่:
- รับ mutable reference ของ String
- เพิ่ม “ World“ ต่อท้าย
ดูเฉลย
fn append_world(s: &mut String) {
s.push_str(" World");
}
fn main() {
let mut greeting = String::from("Hello");
append_world(&mut greeting);
println!("{}", greeting); // Hello World
}แบบฝึกหัดที่ 4: Borrowing Rules
โค้ดนี้ถูกหรือผิด? อธิบาย
fn main() {
let mut s = String::from("hello");
let r1 = &s;
let r2 = &s;
let r3 = &mut s;
println!("{}, {}, {}", r1, r2, r3);
}ดูเฉลย
ผิด! ไม่สามารถมี mutable reference พร้อมกับ immutable reference ได้
วิธีแก้:
fn main() {
let mut s = String::from("hello");
let r1 = &s;
let r2 = &s;
println!("{}, {}", r1, r2); // ใช้ r1, r2 ก่อน
let r3 = &mut s; // แล้วค่อยสร้าง mutable ref
println!("{}", r3);
}แบบฝึกหัดที่ 5: Slice
เขียน function first_word ที่:
- รับ
&String - Return slice ของคำแรก (ก่อน space แรก)
ดูเฉลย
fn first_word(s: &String) -> &str {
let bytes = s.as_bytes();
for (i, &byte) in bytes.iter().enumerate() {
if byte == b' ' {
return &s[0..i];
}
}
&s[..]
}
fn main() {
let s = String::from("Hello World");
let first = first_word(&s);
println!("First word: {}", first); // Hello
}👉 บทที่ 6
แบบฝึกหัด: บทที่ 6 - Structs
แบบฝึกหัดที่ 1: สร้าง Struct
สร้าง struct Person ที่มี:
name: Stringage: u32email: String
ดูเฉลย
struct Person {
name: String,
age: u32,
email: String,
}
fn main() {
let person = Person {
name: String::from("สมชาย"),
age: 30,
email: String::from("somchai@example.com"),
};
println!("{} อายุ {} ปี", person.name, person.age);
}แบบฝึกหัดที่ 2: Methods
เพิ่ม method introduce ให้ struct Person ที่ print “สวัสดี ผมชื่อ {name}”
ดูเฉลย
struct Person {
name: String,
age: u32,
}
impl Person {
fn introduce(&self) {
println!("สวัสดี ผมชื่อ {}", self.name);
}
}
fn main() {
let person = Person {
name: String::from("สมชาย"),
age: 30,
};
person.introduce(); // สวัสดี ผมชื่อ สมชาย
}แบบฝึกหัดที่ 3: Associated Function
เพิ่ม associated function new ที่สร้าง Person ใหม่
ดูเฉลย
struct Person {
name: String,
age: u32,
}
impl Person {
fn new(name: String, age: u32) -> Self {
Self { name, age }
}
}
fn main() {
let person = Person::new(String::from("สมชาย"), 30);
println!("{}, {} ปี", person.name, person.age);
}แบบฝึกหัดที่ 4: Tuple Struct
สร้าง tuple struct สำหรับ RGB color
ดูเฉลย
struct Color(u8, u8, u8);
fn main() {
let red = Color(255, 0, 0);
let green = Color(0, 255, 0);
println!("Red: RGB({}, {}, {})", red.0, red.1, red.2);
}แบบฝึกหัดที่ 5: Rectangle Area
สร้าง struct Rectangle ที่มี method:
area()คำนวณพื้นที่can_hold(&other)ตรวจสอบว่าใส่ rectangle อื่นได้ไหม
ดูเฉลย
struct Rectangle {
width: u32,
height: u32,
}
impl Rectangle {
fn area(&self) -> u32 {
self.width * self.height
}
fn can_hold(&self, other: &Rectangle) -> bool {
self.width > other.width && self.height > other.height
}
}
fn main() {
let rect1 = Rectangle { width: 30, height: 50 };
let rect2 = Rectangle { width: 10, height: 40 };
println!("Area: {}", rect1.area());
println!("Can hold rect2: {}", rect1.can_hold(&rect2));
}👉 บทที่ 7
แบบฝึกหัด: บทที่ 7 - Enums & Pattern Matching
แบบฝึกหัดที่ 1: สร้าง Enum
สร้าง enum Direction ที่มี North, South, East, West
ดูเฉลย
enum Direction {
North,
South,
East,
West,
}
fn main() {
let dir = Direction::North;
match dir {
Direction::North => println!("ไปทางเหนือ"),
Direction::South => println!("ไปทางใต้"),
Direction::East => println!("ไปทางตะวันออก"),
Direction::West => println!("ไปทางตะวันตก"),
}
}แบบฝึกหัดที่ 2: Enum with Data
สร้าง enum Message ที่มี:
Quit(ไม่มีข้อมูล)Move { x: i32, y: i32 }Write(String)
ดูเฉลย
enum Message {
Quit,
Move { x: i32, y: i32 },
Write(String),
}
fn main() {
let msg = Message::Move { x: 10, y: 20 };
match msg {
Message::Quit => println!("Quit"),
Message::Move { x, y } => println!("Move to ({}, {})", x, y),
Message::Write(text) => println!("Write: {}", text),
}
}แบบฝึกหัดที่ 3: Option
เขียน function divide ที่ return Option<f64>:
- Return
Noneถ้าหาร 0 - Return
Some(result)ถ้าหารได้
ดูเฉลย
fn divide(a: f64, b: f64) -> Option<f64> {
if b == 0.0 {
None
} else {
Some(a / b)
}
}
fn main() {
match divide(10.0, 2.0) {
Some(result) => println!("Result: {}", result),
None => println!("Cannot divide by zero"),
}
// หรือใช้ if let
if let Some(result) = divide(10.0, 0.0) {
println!("Result: {}", result);
} else {
println!("Cannot divide by zero");
}
}แบบฝึกหัดที่ 4: Match with Guards
เขียน function ที่รับ Option<i32> และ:
- ถ้า
Some(n)และ n > 0: print “positive” - ถ้า
Some(n)และ n < 0: print “negative” - ถ้า
Some(0): print “zero” - ถ้า
None: print “no value”
ดูเฉลย
fn describe(value: Option<i32>) {
match value {
Some(n) if n > 0 => println!("positive"),
Some(n) if n < 0 => println!("negative"),
Some(0) => println!("zero"),
None => println!("no value"),
_ => unreachable!(),
}
}
fn main() {
describe(Some(5)); // positive
describe(Some(-3)); // negative
describe(Some(0)); // zero
describe(None); // no value
}แบบฝึกหัดที่ 5: if let
แปลง match นี้เป็น if let:
match some_value {
Some(x) => println!("{}", x),
None => (),
}ดูเฉลย
if let Some(x) = some_value {
println!("{}", x);
}👉 บทที่ 8
แบบฝึกหัด: บทที่ 8 - Collections
แบบฝึกหัดที่ 1: Vec
สร้าง Vec และหาผลรวม:
- สร้าง Vec ของ i32: [1, 2, 3, 4, 5]
- เพิ่ม 6, 7, 8 เข้าไป
- หาผลรวมทั้งหมด
ดูเฉลย
fn main() {
let mut numbers = vec![1, 2, 3, 4, 5];
numbers.push(6);
numbers.push(7);
numbers.push(8);
let sum: i32 = numbers.iter().sum();
println!("Sum: {}", sum); // 36
}แบบฝึกหัดที่ 2: String
เขียน function ที่รับ &str และ return String ที่กลับหัวกลับหาง
ดูเฉลย
fn reverse_string(s: &str) -> String {
s.chars().rev().collect()
}
fn main() {
let original = "Hello";
let reversed = reverse_string(original);
println!("{} -> {}", original, reversed); // Hello -> olleH
}แบบฝึกหัดที่ 3: HashMap
สร้าง HashMap ที่เก็บคะแนนนักเรียน:
- “สมชาย” = 85
- “สมหญิง” = 92
- หาคะแนนเฉลี่ย
ดูเฉลย
use std::collections::HashMap;
fn main() {
let mut scores = HashMap::new();
scores.insert("สมชาย", 85);
scores.insert("สมหญิง", 92);
let total: i32 = scores.values().sum();
let count = scores.len() as i32;
let average = total / count;
println!("Average: {}", average); // 88
}แบบฝึกหัดที่ 4: Word Count
นับความถี่ของแต่ละคำใน string:
"the quick brown fox jumps over the lazy dog"
ดูเฉลย
use std::collections::HashMap;
fn main() {
let text = "the quick brown fox jumps over the lazy dog";
let mut word_count = HashMap::new();
for word in text.split_whitespace() {
let count = word_count.entry(word).or_insert(0);
*count += 1;
}
for (word, count) in &word_count {
println!("{}: {}", word, count);
}
}แบบฝึกหัดที่ 5: Vec กับ Enum
สร้าง Vec ที่เก็บได้หลาย types โดยใช้ Enum:
- ตัวเลข (i32)
- ทศนิยม (f64)
- ข้อความ (String)
ดูเฉลย
enum Value {
Int(i32),
Float(f64),
Text(String),
}
fn main() {
let data = vec![
Value::Int(42),
Value::Float(3.14),
Value::Text(String::from("Hello")),
];
for item in &data {
match item {
Value::Int(n) => println!("Int: {}", n),
Value::Float(f) => println!("Float: {}", f),
Value::Text(s) => println!("Text: {}", s),
}
}
}👉 บทที่ 9
แบบฝึกหัด: บทที่ 9 - Error Handling
แบบฝึกหัดที่ 1: Result
เขียน function parse_number ที่:
- รับ
&str - Return
Result<i32, String>
ดูเฉลย
fn parse_number(s: &str) -> Result<i32, String> {
s.parse::<i32>()
.map_err(|_| format!("'{}' is not a valid number", s))
}
fn main() {
match parse_number("42") {
Ok(n) => println!("Parsed: {}", n),
Err(e) => println!("Error: {}", e),
}
match parse_number("abc") {
Ok(n) => println!("Parsed: {}", n),
Err(e) => println!("Error: {}", e),
}
}แบบฝึกหัดที่ 2: ? Operator
แปลงโค้ดนี้ให้ใช้ ?:
fn read_username() -> Result<String, std::io::Error> {
let file = match std::fs::read_to_string("username.txt") {
Ok(content) => content,
Err(e) => return Err(e),
};
Ok(file.trim().to_string())
}ดูเฉลย
fn read_username() -> Result<String, std::io::Error> {
let content = std::fs::read_to_string("username.txt")?;
Ok(content.trim().to_string())
}แบบฝึกหัดที่ 3: unwrap_or
แก้ไขโค้ดให้ใช้ unwrap_or แทน match:
let value = match some_option {
Some(v) => v,
None => 0,
};ดูเฉลย
let value = some_option.unwrap_or(0);
// หรือใช้ unwrap_or_default() ถ้า type implement Default
let value = some_option.unwrap_or_default();แบบฝึกหัดที่ 4: Custom Error
สร้าง custom error DivisionError สำหรับการหารที่ผิดพลาด
ดูเฉลย
use std::fmt;
#[derive(Debug)]
struct DivisionError {
message: String,
}
impl fmt::Display for DivisionError {
fn fmt(&self, f: &mut fmt::Formatter) -> fmt::Result {
write!(f, "{}", self.message)
}
}
impl std::error::Error for DivisionError {}
fn divide(a: i32, b: i32) -> Result<i32, DivisionError> {
if b == 0 {
Err(DivisionError {
message: String::from("Cannot divide by zero"),
})
} else {
Ok(a / b)
}
}
fn main() {
match divide(10, 0) {
Ok(result) => println!("Result: {}", result),
Err(e) => println!("Error: {}", e),
}
}แบบฝึกหัดที่ 5: Chaining Results
เขียน function ที่:
- Parse string เป็น number
- คูณด้วย 2
- Return Result
ดูเฉลย
fn parse_and_double(s: &str) -> Result<i32, std::num::ParseIntError> {
s.parse::<i32>().map(|n| n * 2)
}
fn main() {
println!("{:?}", parse_and_double("5")); // Ok(10)
println!("{:?}", parse_and_double("abc")); // Err(...)
}👉 บทที่ 10
แบบฝึกหัด: บทที่ 10 - Generics & Traits
แบบฝึกหัดที่ 1: Generic Function
เขียน generic function largest ที่หาค่าสูงสุดจาก slice
ดูเฉลย
fn largest<T: PartialOrd>(list: &[T]) -> &T {
let mut largest = &list[0];
for item in list {
if item > largest {
largest = item;
}
}
largest
}
fn main() {
let numbers = vec![34, 50, 25, 100, 65];
println!("Largest: {}", largest(&numbers));
let chars = vec!['y', 'm', 'a', 'q'];
println!("Largest: {}", largest(&chars));
}แบบฝึกหัดที่ 2: Generic Struct
สร้าง generic struct Pair<T> ที่เก็บ 2 ค่าของ type เดียวกัน
ดูเฉลย
struct Pair<T> {
first: T,
second: T,
}
impl<T> Pair<T> {
fn new(first: T, second: T) -> Self {
Self { first, second }
}
}
fn main() {
let pair = Pair::new(1, 2);
println!("{}, {}", pair.first, pair.second);
let pair = Pair::new("hello", "world");
println!("{}, {}", pair.first, pair.second);
}แบบฝึกหัดที่ 3: Trait Definition
สร้าง trait Describable ที่มี method describe(&self) -> String
ดูเฉลย
trait Describable {
fn describe(&self) -> String;
}
struct Person {
name: String,
age: u32,
}
impl Describable for Person {
fn describe(&self) -> String {
format!("{} อายุ {} ปี", self.name, self.age)
}
}
struct Product {
name: String,
price: f64,
}
impl Describable for Product {
fn describe(&self) -> String {
format!("{} ราคา {} บาท", self.name, self.price)
}
}
fn main() {
let person = Person { name: String::from("สมชาย"), age: 30 };
let product = Product { name: String::from("iPhone"), price: 35000.0 };
println!("{}", person.describe());
println!("{}", product.describe());
}แบบฝึกหัดที่ 4: Trait Bounds
เขียน function ที่รับ type ที่ implement ทั้ง Display และ Clone
ดูเฉลย
use std::fmt::Display;
fn print_and_clone<T: Display + Clone>(item: T) -> T {
println!("{}", item);
item.clone()
}
fn main() {
let s = String::from("Hello");
let cloned = print_and_clone(s);
println!("Cloned: {}", cloned);
}แบบฝึกหัดที่ 5: Lifetime
แก้ไขให้ compile ได้:
#![allow(unused)]
fn main() {
fn longest(x: &str, y: &str) -> &str {
if x.len() > y.len() {
x
} else {
y
}
}
}ดูเฉลย
fn longest<'a>(x: &'a str, y: &'a str) -> &'a str {
if x.len() > y.len() {
x
} else {
y
}
}
fn main() {
let s1 = String::from("long");
let s2 = String::from("short");
let result = longest(&s1, &s2);
println!("Longest: {}", result);
}👉 บทที่ 11
แบบฝึกหัด: บทที่ 11 - Modules
แบบฝึกหัดที่ 1: Module พื้นฐาน
สร้าง module math ที่มี function add และ multiply
ดูเฉลย
mod math {
pub fn add(a: i32, b: i32) -> i32 {
a + b
}
pub fn multiply(a: i32, b: i32) -> i32 {
a * b
}
}
fn main() {
println!("5 + 3 = {}", math::add(5, 3));
println!("5 * 3 = {}", math::multiply(5, 3));
}แบบฝึกหัดที่ 2: use Statement
ใช้ use เพื่อ import function จาก module
ดูเฉลย
mod math {
pub fn add(a: i32, b: i32) -> i32 {
a + b
}
}
use math::add;
fn main() {
println!("5 + 3 = {}", add(5, 3));
}แบบฝึกหัดที่ 3: Nested Modules
สร้าง module shapes ที่มี submodule circle และ rectangle
ดูเฉลย
mod shapes {
pub mod circle {
pub fn area(radius: f64) -> f64 {
std::f64::consts::PI * radius * radius
}
}
pub mod rectangle {
pub fn area(width: f64, height: f64) -> f64 {
width * height
}
}
}
use shapes::circle;
use shapes::rectangle;
fn main() {
println!("Circle area: {}", circle::area(5.0));
println!("Rectangle area: {}", rectangle::area(4.0, 3.0));
}แบบฝึกหัดที่ 4: pub struct
สร้าง public struct ใน module แต่บาง field เป็น private
ดูเฉลย
mod user {
pub struct User {
pub username: String,
email: String, // private
}
impl User {
pub fn new(username: String, email: String) -> Self {
Self { username, email }
}
pub fn email(&self) -> &str {
&self.email
}
}
}
fn main() {
let user = user::User::new(
String::from("john"),
String::from("john@example.com"),
);
println!("Username: {}", user.username);
println!("Email: {}", user.email());
}แบบฝึกหัดที่ 5: re-export
ใช้ pub use เพื่อ re-export items
ดูเฉลย
mod internal {
pub mod helpers {
pub fn format_name(name: &str) -> String {
format!("Hello, {}!", name)
}
}
}
// Re-export ให้ใช้ง่ายขึ้น
pub use internal::helpers::format_name;
fn main() {
// ใช้ได้โดยตรง
println!("{}", format_name("World"));
}👉 บทที่ 12
แบบฝึกหัด: บทที่ 12 - Testing
แบบฝึกหัดที่ 1: Unit Test
เขียน unit test สำหรับ function add:
fn add(a: i32, b: i32) -> i32 {
a + b
}ดูเฉลย
fn add(a: i32, b: i32) -> i32 {
a + b
}
#[cfg(test)]
mod tests {
use super::*;
#[test]
fn test_add_positive() {
assert_eq!(add(2, 3), 5);
}
#[test]
fn test_add_negative() {
assert_eq!(add(-2, -3), -5);
}
#[test]
fn test_add_zero() {
assert_eq!(add(0, 0), 0);
}
}แบบฝึกหัดที่ 2: assert! Macros
ใช้ assert ต่างๆ:
assert!assert_eq!assert_ne!
ดูเฉลย
#![allow(unused)]
fn main() {
#[cfg(test)]
mod tests {
#[test]
fn test_assertions() {
// assert! - ตรวจสอบ boolean
assert!(1 + 1 == 2);
assert!(true);
// assert_eq! - ตรวจสอบเท่ากัน
assert_eq!(2 + 2, 4);
assert_eq!("hello", "hello");
// assert_ne! - ตรวจสอบไม่เท่ากัน
assert_ne!(2 + 2, 5);
assert_ne!("hello", "world");
}
}
}แบบฝึกหัดที่ 3: Test Panic
เขียน test ที่ตรวจสอบว่า function panic
ดูเฉลย
fn divide(a: i32, b: i32) -> i32 {
if b == 0 {
panic!("Division by zero!");
}
a / b
}
#[cfg(test)]
mod tests {
use super::*;
#[test]
#[should_panic]
fn test_divide_by_zero() {
divide(10, 0);
}
#[test]
#[should_panic(expected = "Division by zero")]
fn test_divide_by_zero_message() {
divide(10, 0);
}
}แบบฝึกหัดที่ 4: Test Result
เขียน test ที่ return Result แทน panic
ดูเฉลย
#![allow(unused)]
fn main() {
#[cfg(test)]
mod tests {
#[test]
fn test_with_result() -> Result<(), String> {
let value = "42".parse::<i32>()
.map_err(|_| String::from("Parse failed"))?;
if value == 42 {
Ok(())
} else {
Err(String::from("Wrong value"))
}
}
}
}แบบฝึกหัดที่ 5: Ignore Test
เขียน test ที่จะถูกข้ามไป เว้นแต่ระบุให้รัน
ดูเฉลย
#![allow(unused)]
fn main() {
#[cfg(test)]
mod tests {
#[test]
#[ignore]
fn expensive_test() {
// Test ที่ใช้เวลานาน
std::thread::sleep(std::time::Duration::from_secs(10));
assert!(true);
}
}
// รัน ignored tests:
// cargo test -- --ignored
// รันทั้งหมด รวม ignored:
// cargo test -- --include-ignored
}👉 บทที่ 13
แบบฝึกหัด: บทที่ 13 - Iterators & Closures
แบบฝึกหัดที่ 1: Closure พื้นฐาน
สร้าง closure ที่บวกเลข 2 ตัว
ดูเฉลย
fn main() {
let add = |a, b| a + b;
println!("5 + 3 = {}", add(5, 3));
// หรือระบุ type
let add_typed = |a: i32, b: i32| -> i32 { a + b };
println!("5 + 3 = {}", add_typed(5, 3));
}แบบฝึกหัดที่ 2: Closure ที่ capture
สร้าง closure ที่ capture ตัวแปรจากภายนอก
ดูเฉลย
fn main() {
let multiplier = 10;
// Capture by reference
let multiply = |x| x * multiplier;
println!("5 * {} = {}", multiplier, multiply(5));
// Capture by value (move)
let greeting = String::from("Hello");
let greet = move |name| format!("{}, {}!", greeting, name);
println!("{}", greet("World"));
// println!("{}", greeting); // Error: greeting moved
}แบบฝึกหัดที่ 3: Iterator Methods
ใช้ map, filter, collect:
- สร้าง Vec [1, 2, 3, 4, 5]
- กรองเอาเฉพาะเลขคู่
- คูณแต่ละตัวด้วย 2
- Collect เป็น Vec
ดูเฉลย
fn main() {
let numbers = vec![1, 2, 3, 4, 5];
let result: Vec<i32> = numbers
.iter()
.filter(|&x| x % 2 == 0)
.map(|x| x * 2)
.collect();
println!("{:?}", result); // [4, 8]
}แบบฝึกหัดที่ 4: fold
ใช้ fold หาผลรวมและผลคูณ
ดูเฉลย
fn main() {
let numbers = vec![1, 2, 3, 4, 5];
// ผลรวม
let sum = numbers.iter().fold(0, |acc, x| acc + x);
println!("Sum: {}", sum); // 15
// ผลคูณ
let product = numbers.iter().fold(1, |acc, x| acc * x);
println!("Product: {}", product); // 120
}แบบฝึกหัดที่ 5: Custom Iterator
สร้าง iterator ที่นับเลข
ดูเฉลย
struct Counter {
count: u32,
max: u32,
}
impl Counter {
fn new(max: u32) -> Self {
Self { count: 0, max }
}
}
impl Iterator for Counter {
type Item = u32;
fn next(&mut self) -> Option<Self::Item> {
if self.count < self.max {
self.count += 1;
Some(self.count)
} else {
None
}
}
}
fn main() {
let counter = Counter::new(5);
for num in counter {
println!("{}", num);
}
// 1, 2, 3, 4, 5
}👉 บทที่ 14
แบบฝึกหัด: บทที่ 14 - Smart Pointers
แบบฝึกหัดที่ 1: Box
ใช้ Box สร้าง recursive data structure (linked list)
ดูเฉลย
enum List {
Cons(i32, Box<List>),
Nil,
}
use List::{Cons, Nil};
fn main() {
let list = Cons(1, Box::new(Cons(2, Box::new(Cons(3, Box::new(Nil))))));
// Print list
fn print_list(list: &List) {
match list {
Cons(value, next) => {
print!("{} -> ", value);
print_list(next);
}
Nil => println!("Nil"),
}
}
print_list(&list); // 1 -> 2 -> 3 -> Nil
}แบบฝึกหัดที่ 2: Rc
ใช้ Rc สร้าง shared ownership
ดูเฉลย
use std::rc::Rc;
fn main() {
let data = Rc::new(String::from("Hello"));
println!("Count after creation: {}", Rc::strong_count(&data));
{
let clone1 = Rc::clone(&data);
println!("Count after clone1: {}", Rc::strong_count(&data));
let clone2 = Rc::clone(&data);
println!("Count after clone2: {}", Rc::strong_count(&data));
}
println!("Count after block: {}", Rc::strong_count(&data));
}Output:
Count after creation: 1
Count after clone1: 2
Count after clone2: 3
Count after block: 1
แบบฝึกหัดที่ 3: RefCell
ใช้ RefCell สำหรับ interior mutability
ดูเฉลย
use std::cell::RefCell;
fn main() {
let data = RefCell::new(5);
println!("Before: {:?}", data.borrow());
*data.borrow_mut() += 10;
println!("After: {:?}", data.borrow());
}แบบฝึกหัดที่ 4: Rc + RefCell
รวม Rc และ RefCell เพื่อ shared mutable data
ดูเฉลย
use std::rc::Rc;
use std::cell::RefCell;
fn main() {
let data = Rc::new(RefCell::new(vec![1, 2, 3]));
let clone1 = Rc::clone(&data);
let clone2 = Rc::clone(&data);
// แก้ไขผ่าน clone1
clone1.borrow_mut().push(4);
// แก้ไขผ่าน clone2
clone2.borrow_mut().push(5);
// ดูผลลัพธ์
println!("{:?}", data.borrow()); // [1, 2, 3, 4, 5]
}แบบฝึกหัดที่ 5: Weak
ใช้ Weak เพื่อป้องกัน reference cycle
ดูเฉลย
use std::rc::{Rc, Weak};
use std::cell::RefCell;
struct Node {
value: i32,
parent: RefCell<Weak<Node>>,
children: RefCell<Vec<Rc<Node>>>,
}
fn main() {
let leaf = Rc::new(Node {
value: 3,
parent: RefCell::new(Weak::new()),
children: RefCell::new(vec![]),
});
let branch = Rc::new(Node {
value: 5,
parent: RefCell::new(Weak::new()),
children: RefCell::new(vec![Rc::clone(&leaf)]),
});
// Set parent (weak reference)
*leaf.parent.borrow_mut() = Rc::downgrade(&branch);
println!("Leaf value: {}", leaf.value);
// Access parent through weak reference
if let Some(parent) = leaf.parent.borrow().upgrade() {
println!("Parent value: {}", parent.value);
}
}👉 บทที่ 15
แบบฝึกหัด: บทที่ 15 - Concurrency
แบบฝึกหัดที่ 1: Spawn Thread
สร้าง thread ที่ print เลข 1-5
ดูเฉลย
use std::thread;
use std::time::Duration;
fn main() {
let handle = thread::spawn(|| {
for i in 1..=5 {
println!("Thread: {}", i);
thread::sleep(Duration::from_millis(100));
}
});
// Main thread
for i in 1..=3 {
println!("Main: {}", i);
thread::sleep(Duration::from_millis(100));
}
handle.join().unwrap();
}แบบฝึกหัดที่ 2: move Closure
ใช้ move closure เพื่อส่ง data ไป thread
ดูเฉลย
use std::thread;
fn main() {
let data = vec![1, 2, 3, 4, 5];
let handle = thread::spawn(move || {
println!("Data in thread: {:?}", data);
let sum: i32 = data.iter().sum();
sum
});
let result = handle.join().unwrap();
println!("Sum: {}", result);
}แบบฝึกหัดที่ 3: Channel
ใช้ channel ส่งข้อมูลระหว่าง threads
ดูเฉลย
use std::sync::mpsc;
use std::thread;
fn main() {
let (tx, rx) = mpsc::channel();
thread::spawn(move || {
let messages = vec!["Hello", "from", "thread"];
for msg in messages {
tx.send(msg).unwrap();
}
});
for received in rx {
println!("Received: {}", received);
}
}แบบฝึกหัดที่ 4: Arc + Mutex
ใช้ Arc และ Mutex สำหรับ shared mutable state
ดูเฉลย
use std::sync::{Arc, Mutex};
use std::thread;
fn main() {
let counter = Arc::new(Mutex::new(0));
let mut handles = vec![];
for _ in 0..10 {
let counter = Arc::clone(&counter);
let handle = thread::spawn(move || {
let mut num = counter.lock().unwrap();
*num += 1;
});
handles.push(handle);
}
for handle in handles {
handle.join().unwrap();
}
println!("Count: {}", *counter.lock().unwrap());
}แบบฝึกหัดที่ 5: Multiple Producers
สร้าง multiple producers ที่ส่งข้อมูลไป receiver เดียว
ดูเฉลย
use std::sync::mpsc;
use std::thread;
fn main() {
let (tx, rx) = mpsc::channel();
// Producer 1
let tx1 = tx.clone();
thread::spawn(move || {
for i in 1..=3 {
tx1.send(format!("P1: {}", i)).unwrap();
}
});
// Producer 2
thread::spawn(move || {
for i in 1..=3 {
tx.send(format!("P2: {}", i)).unwrap();
}
});
// Receiver
for msg in rx {
println!("{}", msg);
}
}👉 บทที่ 16
แบบฝึกหัด: บทที่ 16 - Async/Await
แบบฝึกหัดที่ 1: Async Function
เขียน async function fetch_data ที่ return String
ดูเฉลย
async fn fetch_data() -> String {
// Simulate network delay
tokio::time::sleep(tokio::time::Duration::from_millis(100)).await;
String::from("Data from server")
}
#[tokio::main]
async fn main() {
let data = fetch_data().await;
println!("{}", data);
}แบบฝึกหัดที่ 2: Multiple Awaits
รัน 2 async functions ตามลำดับ
ดูเฉลย
async fn step1() -> i32 {
tokio::time::sleep(tokio::time::Duration::from_millis(100)).await;
println!("Step 1 done");
10
}
async fn step2(value: i32) -> i32 {
tokio::time::sleep(tokio::time::Duration::from_millis(100)).await;
println!("Step 2 done");
value * 2
}
#[tokio::main]
async fn main() {
let v1 = step1().await;
let v2 = step2(v1).await;
println!("Result: {}", v2);
}แบบฝึกหัดที่ 3: tokio::join!
รัน multiple futures พร้อมกัน
ดูเฉลย
async fn task_a() -> i32 {
tokio::time::sleep(tokio::time::Duration::from_millis(100)).await;
println!("Task A done");
1
}
async fn task_b() -> i32 {
tokio::time::sleep(tokio::time::Duration::from_millis(200)).await;
println!("Task B done");
2
}
#[tokio::main]
async fn main() {
let (a, b) = tokio::join!(task_a(), task_b());
println!("Results: {} + {} = {}", a, b, a + b);
}แบบฝึกหัดที่ 4: tokio::spawn
Spawn background task
ดูเฉลย
#[tokio::main]
async fn main() {
let handle = tokio::spawn(async {
tokio::time::sleep(tokio::time::Duration::from_millis(100)).await;
42
});
println!("Doing other work...");
let result = handle.await.unwrap();
println!("Background task result: {}", result);
}แบบฝึกหัดที่ 5: Async กับ Result
Handle errors ใน async function
ดูเฉลย
async fn fetch_user(id: i32) -> Result<String, String> {
if id > 0 {
Ok(format!("User {}", id))
} else {
Err(String::from("Invalid user ID"))
}
}
#[tokio::main]
async fn main() {
match fetch_user(1).await {
Ok(user) => println!("Found: {}", user),
Err(e) => println!("Error: {}", e),
}
// หรือใช้ ?
async fn get_users() -> Result<(), String> {
let user = fetch_user(1).await?;
println!("{}", user);
Ok(())
}
}👉 บทที่ 17
แบบฝึกหัด: บทที่ 17 - Unsafe Rust
แบบฝึกหัดที่ 1: Raw Pointers
สร้างและ dereference raw pointers
ดูเฉลย
fn main() {
let x = 10;
// สร้าง raw pointers
let ptr_const: *const i32 = &x;
let ptr_mut: *mut i32 = &x as *const i32 as *mut i32;
unsafe {
println!("Value via const ptr: {}", *ptr_const);
println!("Value via mut ptr: {}", *ptr_mut);
}
}แบบฝึกหัดที่ 2: Unsafe Function
สร้าง unsafe function ที่ swap ค่า 2 ตัว
ดูเฉลย
unsafe fn swap_raw(a: *mut i32, b: *mut i32) {
let temp = *a;
*a = *b;
*b = temp;
}
fn main() {
let mut x = 10;
let mut y = 20;
println!("Before: x={}, y={}", x, y);
unsafe {
swap_raw(&mut x, &mut y);
}
println!("After: x={}, y={}", x, y);
}แบบฝึกหัดที่ 3: Safe Abstraction
ห่อ unsafe code ด้วย safe function
ดูเฉลย
fn split_at_mut(slice: &mut [i32], mid: usize) -> (&mut [i32], &mut [i32]) {
let len = slice.len();
let ptr = slice.as_mut_ptr();
assert!(mid <= len);
unsafe {
(
std::slice::from_raw_parts_mut(ptr, mid),
std::slice::from_raw_parts_mut(ptr.add(mid), len - mid),
)
}
}
fn main() {
let mut arr = [1, 2, 3, 4, 5];
let (left, right) = split_at_mut(&mut arr, 2);
println!("Left: {:?}", left); // [1, 2]
println!("Right: {:?}", right); // [3, 4, 5]
}แบบฝึกหัดที่ 4: Static Mutable
ใช้ static mut (ระวัง!)
ดูเฉลย
static mut COUNTER: i32 = 0;
fn increment() {
unsafe {
COUNTER += 1;
}
}
fn main() {
increment();
increment();
increment();
unsafe {
println!("Counter: {}", COUNTER);
}
}หมายเหตุ: ไม่แนะนำใน production code! ใช้ Mutex หรือ AtomicI32 แทน
แบบฝึกหัดที่ 5: FFI
เรียก C function จาก Rust (concept)
ดูเฉลย
// ประกาศ external function
extern "C" {
fn abs(input: i32) -> i32;
}
fn main() {
unsafe {
println!("Absolute value of -5: {}", abs(-5));
}
}
// สร้าง function ให้ C เรียก
#[no_mangle]
pub extern "C" fn rust_function(x: i32) -> i32 {
x * 2
}👉 บทที่ 18
แบบฝึกหัด: บทที่ 18 - Macros
แบบฝึกหัดที่ 1: Declarative Macro
สร้าง macro say_hello! ที่ print “Hello!”
ดูเฉลย
macro_rules! say_hello {
() => {
println!("Hello!");
};
}
fn main() {
say_hello!();
}แบบฝึกหัดที่ 2: Macro with Parameters
สร้าง macro greet! ที่รับ name
ดูเฉลย
macro_rules! greet {
($name:expr) => {
println!("Hello, {}!", $name);
};
}
fn main() {
greet!("World");
greet!("Rust");
}แบบฝึกหัดที่ 3: Macro with Repetition
สร้าง macro sum! ที่รับหลายค่าและหาผลรวม
ดูเฉลย
macro_rules! sum {
($($x:expr),*) => {
{
let mut total = 0;
$(
total += $x;
)*
total
}
};
}
fn main() {
let result = sum!(1, 2, 3, 4, 5);
println!("Sum: {}", result); // 15
}แบบฝึกหัดที่ 4: Create HashMap Macro
สร้าง macro map! คล้าย vec!
ดูเฉลย
macro_rules! map {
($($key:expr => $value:expr),* $(,)?) => {
{
let mut m = std::collections::HashMap::new();
$(
m.insert($key, $value);
)*
m
}
};
}
fn main() {
let scores = map! {
"Alice" => 100,
"Bob" => 85,
"Charlie" => 90,
};
println!("{:?}", scores);
}แบบฝึกหัดที่ 5: dbg! Usage
ใช้ dbg! macro สำหรับ debugging
ดูเฉลย
fn factorial(n: u32) -> u32 {
if dbg!(n <= 1) {
dbg!(1)
} else {
dbg!(n * factorial(n - 1))
}
}
fn main() {
let result = dbg!(factorial(4));
println!("Result: {}", result);
}
// Output จะแสดง file:line และค่าของแต่ละ expression👉 บทที่ 19
แบบฝึกหัด: บทที่ 19 - Web Development
แบบฝึกหัดที่ 1: Hello World Server
สร้าง Axum server ที่ return “Hello, World!”
ดูเฉลย
use axum::{Router, routing::get};
async fn hello() -> &'static str {
"Hello, World!"
}
#[tokio::main]
async fn main() {
let app = Router::new()
.route("/", get(hello));
let listener = tokio::net::TcpListener::bind("127.0.0.1:3000")
.await
.unwrap();
println!("Server running on http://127.0.0.1:3000");
axum::serve(listener, app).await.unwrap();
}แบบฝึกหัดที่ 2: Path Parameters
สร้าง route /hello/:name ที่ทักทายตามชื่อ
ดูเฉลย
use axum::{Router, routing::get, extract::Path};
async fn greet(Path(name): Path<String>) -> String {
format!("Hello, {}!", name)
}
#[tokio::main]
async fn main() {
let app = Router::new()
.route("/hello/:name", get(greet));
let listener = tokio::net::TcpListener::bind("127.0.0.1:3000")
.await
.unwrap();
axum::serve(listener, app).await.unwrap();
}แบบฝึกหัดที่ 3: JSON Response
Return JSON response
ดูเฉลย
use axum::{Router, routing::get, Json};
use serde::Serialize;
#[derive(Serialize)]
struct User {
id: u32,
name: String,
email: String,
}
async fn get_user() -> Json<User> {
Json(User {
id: 1,
name: "John Doe".to_string(),
email: "john@example.com".to_string(),
})
}
#[tokio::main]
async fn main() {
let app = Router::new()
.route("/user", get(get_user));
let listener = tokio::net::TcpListener::bind("127.0.0.1:3000")
.await
.unwrap();
axum::serve(listener, app).await.unwrap();
}แบบฝึกหัดที่ 4: POST with JSON Body
รับ JSON body และ return response
ดูเฉลย
use axum::{Router, routing::post, Json};
use serde::{Deserialize, Serialize};
#[derive(Deserialize)]
struct CreateUser {
name: String,
email: String,
}
#[derive(Serialize)]
struct UserResponse {
id: u32,
name: String,
email: String,
message: String,
}
async fn create_user(Json(payload): Json<CreateUser>) -> Json<UserResponse> {
Json(UserResponse {
id: 1,
name: payload.name,
email: payload.email,
message: "User created successfully".to_string(),
})
}
#[tokio::main]
async fn main() {
let app = Router::new()
.route("/users", post(create_user));
let listener = tokio::net::TcpListener::bind("127.0.0.1:3000")
.await
.unwrap();
axum::serve(listener, app).await.unwrap();
}แบบฝึกหัดที่ 5: Multiple Routes
สร้าง REST API ที่มีหลาย routes
ดูเฉลย
use axum::{
Router,
routing::{get, post, delete},
extract::Path,
Json,
};
use serde::{Deserialize, Serialize};
#[derive(Serialize)]
struct Item {
id: u32,
name: String,
}
async fn list_items() -> Json<Vec<Item>> {
Json(vec![
Item { id: 1, name: "Item 1".to_string() },
Item { id: 2, name: "Item 2".to_string() },
])
}
async fn get_item(Path(id): Path<u32>) -> Json<Item> {
Json(Item { id, name: format!("Item {}", id) })
}
#[derive(Deserialize)]
struct CreateItem {
name: String,
}
async fn create_item(Json(payload): Json<CreateItem>) -> Json<Item> {
Json(Item { id: 3, name: payload.name })
}
async fn delete_item(Path(id): Path<u32>) -> String {
format!("Deleted item {}", id)
}
#[tokio::main]
async fn main() {
let app = Router::new()
.route("/items", get(list_items).post(create_item))
.route("/items/:id", get(get_item).delete(delete_item));
let listener = tokio::net::TcpListener::bind("127.0.0.1:3000")
.await
.unwrap();
println!("API running on http://127.0.0.1:3000");
axum::serve(listener, app).await.unwrap();
}👉 บทที่ 20
แบบฝึกหัด: บทที่ 20 - Final Project
แบบฝึกหัดที่ 1: Project Setup
สร้าง project structure สำหรับ CLI todo app
ดูเฉลย
cargo new todo_app
cd todo_app
cargo add clap --features derive
cargo add serde --features derive
cargo add serde_json
todo_app/
├── Cargo.toml
├── src/
│ ├── main.rs
│ ├── lib.rs
│ ├── todo.rs
│ └── storage.rs
└── data/
└── todos.json
แบบฝึกหัดที่ 2: Data Structure
สร้าง Todo struct
ดูเฉลย
// src/todo.rs
use serde::{Deserialize, Serialize};
#[derive(Debug, Serialize, Deserialize, Clone)]
pub struct Todo {
pub id: u32,
pub title: String,
pub completed: bool,
}
impl Todo {
pub fn new(id: u32, title: String) -> Self {
Self {
id,
title,
completed: false,
}
}
pub fn toggle(&mut self) {
self.completed = !self.completed;
}
}แบบฝึกหัดที่ 3: Storage Layer
สร้าง module สำหรับ save/load todos
ดูเฉลย
// src/storage.rs
use crate::todo::Todo;
use std::fs;
use std::path::Path;
const FILE_PATH: &str = "data/todos.json";
pub fn load_todos() -> Vec<Todo> {
if Path::new(FILE_PATH).exists() {
let data = fs::read_to_string(FILE_PATH).unwrap_or_default();
serde_json::from_str(&data).unwrap_or_default()
} else {
vec![]
}
}
pub fn save_todos(todos: &[Todo]) -> std::io::Result<()> {
fs::create_dir_all("data")?;
let json = serde_json::to_string_pretty(todos)?;
fs::write(FILE_PATH, json)
}แบบฝึกหัดที่ 4: CLI Interface
ใช้ clap สร้าง command line interface
ดูเฉลย
// src/main.rs
use clap::{Parser, Subcommand};
#[derive(Parser)]
#[command(name = "todo")]
#[command(about = "A simple todo app")]
struct Cli {
#[command(subcommand)]
command: Commands,
}
#[derive(Subcommand)]
enum Commands {
/// Add a new todo
Add { title: String },
/// List all todos
List,
/// Toggle todo completion
Toggle { id: u32 },
/// Delete a todo
Delete { id: u32 },
}
fn main() {
let cli = Cli::parse();
match cli.command {
Commands::Add { title } => {
println!("Adding: {}", title);
}
Commands::List => {
println!("Listing todos...");
}
Commands::Toggle { id } => {
println!("Toggling: {}", id);
}
Commands::Delete { id } => {
println!("Deleting: {}", id);
}
}
}แบบฝึกหัดที่ 5: Complete Implementation
รวมทุกอย่างเข้าด้วยกัน
ดูเฉลย
// src/main.rs
mod storage;
mod todo;
use clap::{Parser, Subcommand};
use storage::{load_todos, save_todos};
use todo::Todo;
#[derive(Parser)]
struct Cli {
#[command(subcommand)]
command: Commands,
}
#[derive(Subcommand)]
enum Commands {
Add { title: String },
List,
Toggle { id: u32 },
Delete { id: u32 },
}
fn main() {
let cli = Cli::parse();
let mut todos = load_todos();
match cli.command {
Commands::Add { title } => {
let id = todos.len() as u32 + 1;
todos.push(Todo::new(id, title.clone()));
save_todos(&todos).unwrap();
println!("✅ Added: {}", title);
}
Commands::List => {
if todos.is_empty() {
println!("No todos yet!");
} else {
for todo in &todos {
let status = if todo.completed { "✓" } else { " " };
println!("[{}] {} - {}", status, todo.id, todo.title);
}
}
}
Commands::Toggle { id } => {
if let Some(todo) = todos.iter_mut().find(|t| t.id == id) {
todo.toggle();
save_todos(&todos).unwrap();
println!("Toggled: {}", todo.title);
} else {
println!("Todo not found");
}
}
Commands::Delete { id } => {
let len = todos.len();
todos.retain(|t| t.id != id);
if todos.len() < len {
save_todos(&todos).unwrap();
println!("Deleted todo {}", id);
} else {
println!("Todo not found");
}
}
}
}Usage:
cargo run -- add "Learn Rust"
cargo run -- list
cargo run -- toggle 1
cargo run -- delete 1
🎉 ยินดีด้วย! คุณเรียนจบครบทุกบทแล้ว!
👉 Quiz
Quiz
ทดสอบความรู้หลังจากเรียนแต่ละบท
วิธีใช้
- ตอบคำถามด้วยตัวเองก่อน
- คลิกดูเฉลยหลังจากตอบแล้ว
- ถ้าตอบผิด กลับไปอ่านบทเรียนอีกครั้ง
Part 1: พื้นฐาน
Part 2: Core Concepts
- บทที่ 5: Ownership
- บทที่ 6: Structs
- บทที่ 7: Enums & Pattern Matching
- บทที่ 8: Collections
- บทที่ 9: Error Handling
Part 3: Advanced
- บทที่ 10: Generics & Traits
- บทที่ 11: Modules
- บทที่ 12: Testing
- บทที่ 13: Iterators & Closures
- บทที่ 14: Smart Pointers
Part 4: Concurrency & Advanced
Part 5: Real World
Quiz: บทที่ 1 - Getting Started
คำถามที่ 1
คำสั่งใดใช้ตรวจสอบว่า Rust ติดตั้งสำเร็จ?
A. rust --version
B. rustc --version
C. cargo version
D. rust-check
ดูเฉลย
B. rustc --version
rustc คือ Rust compiler ส่วน cargo --version ก็ใช้ได้เช่นกัน
คำถามที่ 2
Cargo คืออะไร?
A. Text editor สำหรับ Rust
B. Rust compiler
C. Package manager และ build tool
D. Testing framework
ดูเฉลย
C. Package manager และ build tool
Cargo ทำหน้าที่:
- จัดการ dependencies
- Build โปรเจกต์
- รัน tests
- สร้าง documentation
คำถามที่ 3
คำสั่งใดสร้างโปรเจกต์ Rust ใหม่?
A. cargo init project
B. cargo new project
C. rustc new project
D. rust create project
ดูเฉลย
B. cargo new project
cargo newสร้างโฟลเดอร์ใหม่cargo initสร้างในโฟลเดอร์ปัจจุบัน
คำถามที่ 4
ไฟล์ใดเก็บ dependencies ของโปรเจกต์?
A. main.rs
B. Cargo.lock
C. Cargo.toml
D. package.json
ดูเฉลย
C. Cargo.toml
Cargo.toml= ประกาศ dependenciesCargo.lock= lock versions ที่ใช้จริง
คำถามที่ 5
คำสั่งใดตรวจสอบโค้ดโดยไม่ build?
A. cargo run
B. cargo build
C. cargo test
D. cargo check
ดูเฉลย
D. cargo check
cargo check เร็วกว่า cargo build เพราะไม่สร้าง binary
Quiz: บทที่ 2 - Variables & Data Types
คำถามที่ 1
ตัวแปรใน Rust เป็น mutable หรือ immutable โดย default?
A. Mutable
B. Immutable
C. ขึ้นอยู่กับ type
D. ขึ้นอยู่กับ scope
ดูเฉลย
B. Immutable
ต้องใช้ mut เพื่อทำให้เป็น mutable:
let mut x = 5;คำถามที่ 2
type ใดเป็น default สำหรับ integer?
A. i8
B. i16
C. i32
D. i64
ดูเฉลย
C. i32
let x = 42; // i32 by defaultคำถามที่ 3
Shadowing คืออะไร?
A. การลบตัวแปร
B. การประกาศตัวแปรชื่อเดียวกันใหม่
C. การเปลี่ยน type ของตัวแปร
D. การสร้าง reference
ดูเฉลย
B. การประกาศตัวแปรชื่อเดียวกันใหม่
let x = 5;
let x = x + 1; // shadowคำถามที่ 4
const ต่างจาก let อย่างไร?
A. const เปลี่ยนค่าได้
B. const ต้องระบุ type
C. const ใช้ใน function เท่านั้น
D. ไม่มีความแตกต่าง
ดูเฉลย
B. const ต้องระบุ type
const MAX: u32 = 100; // ต้องระบุ type
let x = 100; // type inference ได้คำถามที่ 5
ผลลัพธ์ของ code นี้คืออะไร?
let x = 5;
let x = x + 1;
{
let x = x * 2;
}
println!("{}", x);A. 5
B. 6
C. 12
D. Error
ดูเฉลย
B. 6
x = 5x = 5 + 1 = 6(shadow)- ใน block:
x = 12(shadow เฉพาะ block) - หลัง block:
xกลับมาเป็น 6
Quiz: บทที่ 3 - Functions
คำถามที่ 1
Syntax ที่ถูกต้องสำหรับ function signature?
A. function add(a: i32, b: i32) -> i32
B. fn add(a: i32, b: i32) -> i32
C. def add(a: i32, b: i32) -> i32
D. func add(a: i32, b: i32) -> i32
ดูเฉลย
B. fn add(a: i32, b: i32) -> i32
Rust ใช้ fn keyword สำหรับ function
คำถามที่ 2
วิธีใดไม่ถูกต้องสำหรับ return ค่า?
A. return x;
B. x (ไม่มี semicolon)
C. x; (มี semicolon)
D. ทั้ง A และ B ถูกต้อง
ดูเฉลย
C. x; (มี semicolon)
x= expression = return ค่าx;= statement = return()
คำถามที่ 3
function นี้ return type อะไร?
fn greet() {
println!("Hello");
}A. String
B. ()
C. void
D. None
ดูเฉลย
B. ()
Unit type () คือ empty tuple หมายถึง “ไม่มีค่า return”
คำถามที่ 4
Parameter ต้องระบุ type หรือไม่?
A. ต้องระบุเสมอ
B. ไม่ต้อง compiler จะ infer
C. ระบุเฉพาะ reference
D. ระบุเฉพาะ generic
ดูเฉลย
A. ต้องระบุเสมอ
fn add(a: i32, b: i32) -> i32 { // ต้องระบุ
a + b // return type ก็ต้องระบุ
}คำถามที่ 5
ผลลัพธ์ของ code นี้?
fn double(x: i32) -> i32 {
x * 2
}
println!("{}", double(5));A. 5
B. 10
C. Error
D. 2
ดูเฉลย
B. 10
double(5) = 5 * 2 = 10
Quiz: บทที่ 4 - Control Flow
คำถามที่ 1
if expression ใน Rust ต้องมี condition เป็น type อะไร?
A. i32
B. bool
C. อะไรก็ได้
D. 0 หรือ 1
ดูเฉลย
B. bool
if true { } // ✅
if 1 { } // ❌ Error
```text
</details>
---
# คำถามที่ 2
loop ใดรันไม่รู้จบ?
A. `for`
B. `while`
C. `loop`
D. ทุกแบบ
<details>
<summary>ดูเฉลย</summary>
**C. `loop`**
`loop` รันตลอดจนกว่าจะ `break`
```rust,ignore
loop {
break; // ออกจาก loop
}คำถามที่ 3
for i in 0..5 วนกี่รอบ?
A. 4 รอบ
B. 5 รอบ
C. 6 รอบ
D. Error
ดูเฉลย
B. 5 รอบ
0..5 = 0, 1, 2, 3, 4 (exclusive 5)
0..=5 = 0, 1, 2, 3, 4, 5 (inclusive)
คำถามที่ 4
break สามารถ return ค่าได้ไหม?
A. ได้ ใน loop เท่านั้น
B. ได้ ทุก loop
C. ไม่ได้
D. ได้ แต่ต้องเป็น return
ดูเฉลย
A. ได้ ใน loop เท่านั้น
let result = loop {
break 42;
};
```text
</details>
---
# คำถามที่ 5
`continue` ทำอะไร?
A. หยุด loop
B. ข้ามไป iteration ถัดไป
C. Return ค่า
D. ไม่มี effect
<details>
<summary>ดูเฉลย</summary>
**B. ข้ามไป iteration ถัดไป**
```rust,ignore
for i in 0..5 {
if i == 2 { continue; }
println!("{}", i); // 0, 1, 3, 4
}Quiz: บทที่ 5 - Ownership
คำถามที่ 1
กฎ Ownership ข้อใดถูกต้อง?
A. ค่าหนึ่งมีได้หลาย owner
B. ค่าหนึ่งมีได้ owner เดียว
C. Owner ไม่สามารถ transfer ได้
D. ค่าไม่ถูก drop เมื่อ owner ออกจาก scope
ดูเฉลย
B. ค่าหนึ่งมีได้ owner เดียว
กฎ 3 ข้อ:
- ทุกค่ามี owner หนึ่งเดียว
- มีได้แค่ owner เดียว
- เมื่อ owner ออกจาก scope ค่าถูก drop
คำถามที่ 2
code นี้ถูกหรือผิด?
let s1 = String::from("hello");
let s2 = s1;
println!("{}", s1);A. ถูก
B. ผิด - s1 ถูก move
C. ผิด - syntax error
D. ผิด - type mismatch
ดูเฉลย
B. ผิด - s1 ถูก move
s1 ถูก move ไป s2 จึงใช้ไม่ได้
คำถามที่ 3
& หมายถึงอะไร?
A. Pointer
B. Reference (borrow)
C. Copy
D. Move
ดูเฉลย
B. Reference (borrow)
let s = String::from("hello");
let r = &s; // borrow แบบ immutableคำถามที่ 4
immutable reference มีได้กี่อัน?
A. 1 อัน
B. หลายอัน
C. ขึ้นอยู่กับ type
D. 0 อัน
ดูเฉลย
B. หลายอัน
let r1 = &s;
let r2 = &s; // ✅ OKแต่ mutable reference มีได้ 1 อัน
คำถามที่ 5
Slice &s[0..5] ทำอะไร?
A. Copy ค่า
B. สร้าง reference ไปยังส่วนหนึ่ง
C. ลบข้อมูล
D. สร้าง String ใหม่
ดูเฉลย
B. สร้าง reference ไปยังส่วนหนึ่ง
Slice คือ view เข้าไปในข้อมูลเดิม ไม่ copy
Quiz: บทที่ 6 - Structs
คำถามที่ 1
keyword ใดใช้สร้าง struct?
A. class
B. struct
C. type
D. data
ดูเฉลย
B. struct
struct User {
name: String,
age: u32,
}คำถามที่ 2
method ต่างจาก function อย่างไร?
A. ไม่ต่างกัน
B. method มี self parameter
C. method ไม่มี return
D. function ต้องอยู่ใน impl
ดูเฉลย
B. method มี self parameter
impl User {
fn greet(&self) { } // method มี self
fn new() -> Self { } // associated function ไม่มี self
}คำถามที่ 3
&self หมายถึงอะไร?
A. mutable reference to self
B. immutable reference to self
C. owned self
D. static method
ดูเฉลย
B. immutable reference to self
&self= immutable borrow&mut self= mutable borrowself= take ownership
คำถามที่ 4
Tuple struct คืออะไร?
A. Struct ที่มี tuple field
B. Struct ที่ไม่มีชื่อ field
C. Struct ที่เป็น generic
D. Struct ที่มี method
ดูเฉลย
B. Struct ที่ไม่มีชื่อ field
struct Color(u8, u8, u8);
let red = Color(255, 0, 0);
println!("{}", red.0); // access by index
```text
</details>
---
# คำถามที่ 5
`Self` ต่างจาก `self` อย่างไร?
A. ไม่ต่าง
B. `Self` คือ type, `self` คือ instance
C. `Self` คือ instance
D. `self` คือ type
<details>
<summary>ดูเฉลย</summary>
**B. `Self` คือ type, `self` คือ instance**
```rust,ignore
impl User {
fn new() -> Self { // Self = User type
Self { name: String::new() }
}
fn greet(&self) { } // self = instance
}Quiz: บทที่ 7 - Enums & Pattern Matching
คำถาม 7.1
Option<T> มี variants อะไรบ้าง?
A. Ok และ Err
B. Some และ None
C. True และ False
D. Value และ Null
ดูเฉลย
B. Some และ None
enum Option<T> {
Some(T),
None,
}คำถาม 7.2
if let ใช้แทนอะไร?
A. if else
B. match ที่มี pattern เดียว
C. loop
D. while
ดูเฉลย
B. match ที่มี pattern เดียว
// แทนที่จะเขียน
match value {
Some(x) => println!("{}", x),
None => (),
}
// ใช้ if let
if let Some(x) = value {
println!("{}", x);
}คำถาม 7.3
Enum variant สามารถมี data ได้ไหม?
A. ไม่ได้
B. ได้ แต่ต้องมี type เดียว
C. ได้ หลาย types
D. ได้ แต่ต้องเป็น struct
ดูเฉลย
C. ได้ หลาย types
enum Message {
Quit, // ไม่มี data
Move { x: i32, y: i32 }, // struct-like
Write(String), // tuple-like
ChangeColor(i32, i32, i32), // multiple values
}คำถาม 7.4
match ต้อง exhaustive หมายความว่าอะไร?
A. ต้องมี default case
B. ต้อง handle ทุก variants
C. ต้องมี guard
D. ต้อง return ค่า
ดูเฉลย
B. ต้อง handle ทุก variants
ถ้า enum มี 3 variants ต้อง match ทั้ง 3 หรือใช้ _ catch-all
คำถาม 7.5
_ ใน match หมายถึงอะไร?
A. Null value
B. Error case
C. Catch-all pattern
D. Empty tuple
ดูเฉลย
C. Catch-all pattern
match value {
1 => println!("one"),
2 => println!("two"),
_ => println!("other"), // catch all
}Quiz: บทที่ 8 - Collections
คำถาม 8.1
Vec::new() สร้างอะไร?
A. Fixed array
B. Empty vector
C. Linked list
D. HashMap
ดูเฉลย
B. Empty vector
let v: Vec<i32> = Vec::new();
// หรือ
let v = vec![1, 2, 3];
```text
</details>
---
# คำถาม 8.2
`String` ต่างจาก `&str` อย่างไร?
A. ไม่ต่าง
B. `String` เป็น owned, `&str` เป็น borrowed
C. `String` เร็วกว่า
D. `&str` ใหญ่กว่า
<details>
<summary>ดูเฉลย</summary>
**B. `String` เป็น owned, `&str` เป็น borrowed**
- `String` = เก็บบน heap, เป็นเจ้าของ, แก้ไขได้
- `&str` = reference ไป string slice
</details>
---
# คำถาม 8.3
`HashMap::get()` return อะไร?
A. ค่าตรงๆ
B. `Option<&V>`
C. `Result<V, E>`
D. `&V`
<details>
<summary>ดูเฉลย</summary>
**B. `Option<&V>`**
```rust,ignore
let value = map.get("key"); // Option<&V>
```text
Return `Some(&value)` ถ้าพบ, `None` ถ้าไม่พบ
</details>
---
# คำถาม 8.4
`vec.push(value)` ทำอะไร?
A. เพิ่มตัวแรก
B. เพิ่มตัวสุดท้าย
C. ลบตัวแรก
D. ลบตัวสุดท้าย
<details>
<summary>ดูเฉลย</summary>
**B. เพิ่มตัวสุดท้าย**
```rust,ignore
let mut v = vec![1, 2, 3];
v.push(4); // [1, 2, 3, 4]
```text
</details>
---
# คำถาม 8.5
`entry().or_insert()` ใช้ทำอะไร?
A. ลบค่าถ้ามี
B. แทรกค่าถ้ายังไม่มี
C. อัปเดตค่าเสมอ
D. ดึงค่าออกมา
<details>
<summary>ดูเฉลย</summary>
**B. แทรกค่าถ้ายังไม่มี**
```rust,ignore
let count = map.entry("key").or_insert(0);
*count += 1;Quiz: บทที่ 9 - Error Handling
คำถาม 9.1
Result<T, E> มี variants อะไร?
A. Some และ None
B. Ok และ Err
C. Success และ Failure
D. Value และ Error
ดูเฉลย
B. Ok และ Err
enum Result<T, E> {
Ok(T),
Err(E),
}คำถาม 9.2
? operator ทำอะไร?
A. Return None
B. Unwrap หรือ return error
C. Panic
D. Print error
ดูเฉลย
B. Unwrap หรือ return error
fn read_file() -> Result<String, Error> {
let content = std::fs::read_to_string("file.txt")?;
Ok(content)
}ถ้า error จะ return Err ออกจาก function ทันที
คำถาม 9.3
panic! ใช้เมื่อไหร่?
A. ทุก error
B. Unrecoverable errors
C. Network errors
D. User input errors
ดูเฉลย
B. Unrecoverable errors
panic! ใช้เมื่อโปรแกรมไม่สามารถดำเนินต่อได้อย่างปลอดภัย
คำถาม 9.4
unwrap() ต่างจาก expect() อย่างไร?
A. ไม่ต่าง
B. expect มี custom message
C. unwrap ไม่ panic
D. expect return Option
ดูเฉลย
B. expect มี custom message
let x = some_option.unwrap(); // generic message
let x = some_option.expect("msg"); // custom message
```text
</details>
---
# คำถาม 9.5
`unwrap_or()` ทำอะไร?
A. Panic ถ้า None
B. Return ค่า default ถ้า None
C. Return Result
D. แปลงเป็น Option
<details>
<summary>ดูเฉลย</summary>
**B. Return ค่า default ถ้า None**
```rust,ignore
let x = some_option.unwrap_or(0); // ใช้ 0 ถ้า NoneQuiz: บทที่ 10 - Generics & Traits
คำถาม 10.1
<T> หมายถึงอะไร?
A. Template
B. Type parameter (generic)
C. Tuple
D. Trait
ดูเฉลย
B. Type parameter (generic)
fn largest<T: PartialOrd>(list: &[T]) -> &T { ... }
```text
</details>
---
# คำถาม 10.2
Lifetime `'a` ใช้ทำอะไร?
A. กำหนดเวลารัน
B. บอก compiler ว่า reference อยู่นานแค่ไหน
C. สร้าง async
D. กำหนด thread
<details>
<summary>ดูเฉลย</summary>
**B. บอก compiler ว่า reference อยู่นานแค่ไหน**
```rust,ignore
fn longest<'a>(x: &'a str, y: &'a str) -> &'a str
```text
</details>
---
# คำถาม 10.3
Trait คล้ายกับอะไรในภาษาอื่น?
A. Class
B. Interface
C. Struct
D. Enum
<details>
<summary>ดูเฉลย</summary>
**B. Interface**
Trait define behavior ที่ types ต้อง implement
```rust,ignore
trait Summary {
fn summarize(&self) -> String;
}คำถาม 10.4
impl Trait ใช้ทำอะไร?
A. สร้าง trait
B. Implement methods
C. Return type ที่ implement trait
D. Delete trait
ดูเฉลย
C. Return type ที่ implement trait
fn returns_summarizable() -> impl Summary {
// return any type that implements Summary
}คำถาม 10.5
where clause ใช้ทำอะไร?
A. Filter data
B. Specify trait bounds
C. Create loops
D. Handle errors
ดูเฉลย
B. Specify trait bounds
fn some_function<T, U>(t: &T, u: &U)
where
T: Display + Clone,
U: Clone + Debug,
{ ... }Quiz: บทที่ 11 - Modules
คำถาม 11.1
pub keyword ทำอะไร?
A. ทำให้ private
B. ทำให้ public
C. สร้าง package
D. import module
ดูเฉลย
B. ทำให้ public
pub fn public_function() { }
fn private_function() { } // default private
```text
</details>
---
# คำถาม 11.2
`use crate::module::function` หมายถึง?
A. Import จาก external crate
B. Import จาก current crate
C. Export function
D. Delete function
<details>
<summary>ดูเฉลย</summary>
**B. Import จาก current crate**
- `crate::` = current crate root
- `super::` = parent module
- `self::` = current module
</details>
---
# คำถาม 11.3
`mod.rs` ใช้ทำอะไร?
A. Main file
B. Entry point ของ module
C. Test file
D. Config file
<details>
<summary>ดูเฉลย</summary>
**B. Entry point ของ module**
```text
src/
├── main.rs
└── my_module/
├── mod.rs # entry point
└── submodule.rs
```text
</details>
---
# คำถาม 11.4
`pub use` ทำอะไร?
A. Private re-export
B. Public re-export
C. Delete export
D. Test export
<details>
<summary>ดูเฉลย</summary>
**B. Public re-export**
```rust,ignore
pub use internal::helper::function;
// ตอนนี้ใช้ crate::function ได้เลยคำถาม 11.5
Crate กับ Package ต่างกันอย่างไร?
A. ไม่ต่าง
B. Package มีได้หลาย crates
C. Crate ใหญ่กว่า
D. Crate มี Cargo.toml
ดูเฉลย
B. Package มีได้หลาย crates
- Package = มี Cargo.toml
- Crate = compilation unit (lib หรือ bin)
Quiz: บทที่ 12 - Testing
คำถาม 12.1
Attribute ใดใช้ mark test function?
A. #[test]
B. #[unit_test]
C. @test
D. test!
ดูเฉลย
A. #[test]
#[test]
fn test_add() {
assert_eq!(2 + 2, 4);
}คำถาม 12.2
#[should_panic] ใช้ทำอะไร?
A. ทำให้ test panic
B. Test ผ่านถ้า function panic
C. ข้าม test
D. Print panic message
ดูเฉลย
B. Test ผ่านถ้า function panic
#[test]
#[should_panic]
fn test_divide_by_zero() {
divide(1, 0);
}คำถาม 12.3
Integration tests อยู่ที่ไหน?
A. src/ folder
B. tests/ folder
C. lib.rs
D. main.rs
ดูเฉลย
B. tests/ folder
project/
├── src/
│ └── lib.rs
└── tests/
└── integration_test.rs
```text
</details>
---
## คำถาม 12.4
`#[ignore]` ใช้ทำอะไร?
A. Delete test
B. Skip test by default
C. Run only this test
D. Mark as failed
<details>
<summary>ดูเฉลย</summary>
**B. Skip test by default**
```rust,ignore
#[test]
#[ignore]
fn expensive_test() { ... }
// รัน: cargo test -- --ignored
```text
</details>
---
## คำถาม 12.5
`assert_eq!(a, b)` ต่างจาก `assert!(a == b)` อย่างไร?
A. ไม่ต่าง
B. `assert_eq!` แสดง values เมื่อ fail
C. `assert!` เร็วกว่า
D. `assert_eq!` ใช้ได้เฉพาะ numbers
<details>
<summary>ดูเฉลย</summary>
**B. `assert_eq!` แสดง values เมื่อ fail**
```text
left: 5
right: 6
Quiz: บทที่ 13 - Iterators & Closures
คำถาม 13.1
Closure คืออะไร?
A. Function ที่ปิด scope
B. Anonymous function ที่ capture environment
C. Loop ที่หยุดเอง
D. Error handler
ดูเฉลย
B. Anonymous function ที่ capture environment
let x = 10;
let add_x = |y| y + x; // capture x
```text
</details>
---
# คำถาม 13.2
`.collect()` ทำอะไร?
A. รวม iterators
B. แปลง iterator เป็น collection
C. นับ items
D. กรอง items
<details>
<summary>ดูเฉลย</summary>
**B. แปลง iterator เป็น collection**
```rust,ignore
let v: Vec<i32> = (1..5).collect();
```text
</details>
---
# คำถาม 13.3
`Fn`, `FnMut`, `FnOnce` ต่างกันอย่างไร?
A. ไม่ต่าง
B. วิธี capture environment
C. Return type
D. Parameter count
<details>
<summary>ดูเฉลย</summary>
**B. วิธี capture environment**
- `Fn` - borrow (&)
- `FnMut` - borrow mutably (&mut)
- `FnOnce` - take ownership
</details>
---
# คำถาม 13.4
`.map()` ทำอะไร?
A. Filter elements
B. Transform each element
C. Sum all elements
D. Find first match
<details>
<summary>ดูเฉลย</summary>
**B. Transform each element**
```rust,ignore
let doubled: Vec<i32> = vec![1, 2, 3]
.iter()
.map(|x| x * 2)
.collect(); // [2, 4, 6]
```text
</details>
---
# คำถาม 13.5
Iterators ใน Rust เป็น lazy หมายความว่า?
A. ทำงานช้า
B. ไม่ทำงานจนกว่าจะ consume
C. ใช้ memory เยอะ
D. ต้องใช้ async
<details>
<summary>ดูเฉลย</summary>
**B. ไม่ทำงานจนกว่าจะ consume**
```rust
let iter = (1..1000).map(|x| x * 2);
// ยังไม่ทำอะไรเลย จนกว่าจะ .collect() หรือ .for_each()Quiz: บทที่ 14 - Smart Pointers
คำถาม 14.1
Box<T> ใช้เก็บข้อมูลที่ไหน?
A. Stack
B. Heap
C. Static memory
D. Register
ดูเฉลย
B. Heap
let b = Box::new(5); // เก็บ 5 บน heap
```text
</details>
---
# คำถาม 14.2
`Rc<T>` ต่างจาก `Box<T>` อย่างไร?
A. ไม่ต่าง
B. `Rc` มีได้หลาย owners
C. `Box` มีได้หลาย owners
D. `Rc` เร็วกว่า
<details>
<summary>ดูเฉลย</summary>
**B. `Rc` มีได้หลาย owners**
`Rc` = Reference Counting ใช้เมื่อต้องการ shared ownership
</details>
---
# คำถาม 14.3
`RefCell<T>` ทำอะไรได้?
A. Multi-threading
B. Interior mutability
C. Garbage collection
D. Network IO
<details>
<summary>ดูเฉลย</summary>
**B. Interior mutability**
`RefCell` ยอมให้ borrow mutably ทั้งที่เป็น immutable จากภายนอก
</details>
---
# คำถาม 14.4
`Weak<T>` ใช้แก้ปัญหาอะไร?
A. Memory leak
B. Reference cycles
C. Deadlock
D. Race condition
<details>
<summary>ดูเฉลย</summary>
**B. Reference cycles**
`Weak` ไม่เพิ่ม reference count ป้องกัน cycle ที่ทำให้ memory leak
</details>
---
# คำถาม 14.5
`Rc::clone()` ทำอะไร?
A. Deep copy ข้อมูล
B. เพิ่ม reference count
C. สร้าง Box ใหม่
D. ย้าย ownership
<details>
<summary>ดูเฉลย</summary>
**B. เพิ่ม reference count**
```rust,ignore
let a = Rc::new(5);
let b = Rc::clone(&a); // เพิ่ม count, ไม่ copy ข้อมูลQuiz: บทที่ 15 - Concurrency
คำถาม 15.1
thread::spawn ทำอะไร?
A. หยุด thread
B. สร้าง thread ใหม่
C. รวม threads
D. Lock thread
ดูเฉลย
B. สร้าง thread ใหม่
let handle = thread::spawn(|| {
// code ที่รันใน thread ใหม่
});
```text
</details>
---
# คำถาม 15.2
`Mutex` ใช้ทำอะไร?
A. สร้าง thread
B. ป้องกัน data race
C. ส่ง message
D. Copy data
<details>
<summary>ดูเฉลย</summary>
**B. ป้องกัน data race**
Mutex = Mutual Exclusion ยอมให้เข้าถึงได้ทีละ thread
</details>
---
# คำถาม 15.3
`Arc<T>` ต่างจาก `Rc<T>` อย่างไร?
A. ไม่ต่าง
B. `Arc` thread-safe
C. `Rc` thread-safe
D. `Arc` เร็วกว่า
<details>
<summary>ดูเฉลย</summary>
**B. `Arc` thread-safe**
- `Rc` = single-threaded
- `Arc` = Atomic Reference Counting (thread-safe)
</details>
---
# คำถาม 15.4
`mpsc::channel()` สร้างอะไร?
A. Thread
B. Sender และ Receiver
C. Mutex
D. File
<details>
<summary>ดูเฉลย</summary>
**B. Sender และ Receiver**
```rust,ignore
let (tx, rx) = mpsc::channel();
// tx = transmitter/sender
// rx = receiver
```text
</details>
---
# คำถาม 15.5
`move` closure ใช้เมื่อไหร่?
A. เมื่อต้องการ copy
B. เมื่อต้องการ move ownership เข้า closure
C. เมื่อต้องการ reference
D. เมื่อต้องการ print
<details>
<summary>ดูเฉลย</summary>
**B. เมื่อต้องการ move ownership เข้า closure**
```rust,ignore
let data = vec![1, 2, 3];
thread::spawn(move || {
println!("{:?}", data); // data moved here
});Quiz: บทที่ 16 - Async/Await
คำถาม 16.1
async fn return อะไร?
A. ค่าตรงๆ
B. Future
C. Promise
D. Task
ดูเฉลย
B. Future
async fn fetch() -> String {
// return impl Future<Output = String>
String::from("data")
}คำถาม 16.2
.await ทำอะไร?
A. หยุด program
B. รอให้ Future complete
C. สร้าง thread
D. Cancel operation
ดูเฉลย
B. รอให้ Future complete
let data = fetch().await;
```text
</details>
---
# คำถาม 16.3
Tokio คืออะไร?
A. Web framework
B. Async runtime
C. Database
D. Testing tool
<details>
<summary>ดูเฉลย</summary>
**B. Async runtime**
Tokio รัน async code และจัดการ tasks
</details>
---
# คำถาม 16.4
`tokio::spawn` ใช้ทำอะไร?
A. สร้าง thread
B. สร้าง async task
C. หยุด task
D. Join tasks
<details>
<summary>ดูเฉลย</summary>
**B. สร้าง async task**
```rust,ignore
tokio::spawn(async {
// background task
});
```text
</details>
---
# คำถาม 16.5
`tokio::join!` ทำอะไร?
A. รวม strings
B. รอหลาย futures พร้อมกัน
C. สร้าง channel
D. Lock mutex
<details>
<summary>ดูเฉลย</summary>
**B. รอหลาย futures พร้อมกัน**
```rust,ignore
let (a, b) = tokio::join!(task1(), task2());Quiz: บทที่ 17 - Unsafe Rust
คำถาม 17.1
unsafe block ทำอะไรได้?
A. ทำให้โค้ดเร็วขึ้น
B. ปิด borrow checker
C. Dereference raw pointers
D. ทำให้ compile ได้เสมอ
ดูเฉลย
C. Dereference raw pointers
Unsafe superpowers:
- Dereference raw pointers
- Call unsafe functions
- Access mutable statics
- Implement unsafe traits
- Access union fields
คำถาม 17.2
*const T คืออะไร?
A. Constant value
B. Raw immutable pointer
C. Smart pointer
D. Reference
ดูเฉลย
B. Raw immutable pointer
let x = 5;
let ptr: *const i32 = &x;
```text
</details>
---
# คำถาม 17.3
Raw pointer ต่างจาก reference อย่างไร?
A. ไม่ต่าง
B. Raw pointer ไม่ guaranteed valid
C. Reference เร็วกว่า
D. Raw pointer thread-safe
<details>
<summary>ดูเฉลย</summary>
**B. Raw pointer ไม่ guaranteed valid**
Raw pointers:
- อาจเป็น null
- อาจชี้ไปที่ invalid memory
- ไม่มี automatic cleanup
</details>
---
# คำถาม 17.4
`extern "C"` ใช้ทำอะไร?
A. Run C program
B. Define C-compatible ABI
C. Import extern crate
D. Export to JavaScript
<details>
<summary>ดูเฉลย</summary>
**B. Define C-compatible ABI**
```rust,ignore
extern "C" {
fn abs(input: i32) -> i32;
}คำถาม 17.5
Safe abstractions over unsafe คืออะไร?
A. ห่อ unsafe code ด้วย safe interface
B. ลบ unsafe code
C. แปลง unsafe เป็น async
D. ใช้ macros แทน
ดูเฉลย
A. ห่อ unsafe code ด้วย safe interface
pub fn split_at_mut(slice: &mut [i32], mid: usize) -> (&mut [i32], &mut [i32]) {
// unsafe inside, but function is safe
unsafe { ... }
}Quiz: บทที่ 18 - Macros
คำถาม 18.1
macro_rules! ใช้สร้าง macro แบบไหน?
A. Procedural
B. Declarative
C. Attribute
D. Derive
ดูเฉลย
B. Declarative
macro_rules! say_hello {
() => {
println!("Hello!");
};
}คำถาม 18.2
$x:expr หมายถึง?
A. Expression ที่ชื่อ x
B. Macro parameter ที่ match expression
C. Variable x
D. Type x
ดูเฉลย
B. Macro parameter ที่ match expression
Fragment specifiers:
expr= expressionident= identifierty= typestmt= statement
คำถาม 18.3
$(...)* หมายถึงอะไร?
A. Pointer
B. Zero or more repetitions
C. Multiplication
D. Reference
ดูเฉลย
B. Zero or more repetitions
macro_rules! vec_like {
($($x:expr),*) => { ... };
}คำถาม 18.4
Procedural macros ต่างจาก declarative อย่างไร?
A. ไม่ต่าง
B. Procedural ทำงานกับ token stream
C. Declarative เร็วกว่า
D. Procedural อยู่ใน file เดียว
ดูเฉลย
B. Procedural ทำงานกับ token stream
Procedural macros:
- รับ TokenStream
- Return TokenStream
- ต้องอยู่ใน crate แยก
คำถาม 18.5
#[derive(Debug)] คือ macro ประเภทไหน?
A. Declarative
B. Function-like
C. Derive macro
D. Attribute macro
ดูเฉลย
C. Derive macro
Derive macros auto-implement traits
Quiz: บทที่ 19 - Web Development
คำถาม 19.1
Axum เป็น?
A. Database
B. Web framework
C. Template engine
D. Testing tool
ดูเฉลย
B. Web framework
Axum เป็น web framework จาก Tokio team
คำถาม 19.2
Json<T> extractor ใช้ทำอะไร?
A. Return HTML
B. Parse JSON request body
C. Validate form
D. Handle cookies
ดูเฉลย
B. Parse JSON request body
async fn handler(Json(payload): Json<MyStruct>) { }
```text
</details>
---
# คำถาม 19.3
`Path<T>` ทำอะไร?
A. Read file
B. Extract URL path parameters
C. Return path string
D. Navigate to path
<details>
<summary>ดูเฉลย</summary>
**B. Extract URL path parameters**
```rust,ignore
async fn user(Path(id): Path<u32>) { }
// GET /users/123 -> id = 123
```text
</details>
---
# คำถาม 19.4
`Router::new().route()` ทำอะไร?
A. สร้าง file
B. กำหนด route และ handler
C. เริ่ม server
D. ปิด connection
<details>
<summary>ดูเฉลย</summary>
**B. กำหนด route และ handler**
```rust,ignore
Router::new()
.route("/", get(handler))
.route("/users", post(create_user))
```text
</details>
---
# คำถาม 19.5
`State<T>` ใช้ทำอะไร?
A. Save to database
B. Share application state
C. Manage sessions
D. Handle errors
<details>
<summary>ดูเฉลย</summary>
**B. Share application state**
```rust,ignore
async fn handler(State(db): State<DatabasePool>) { }Quiz: บทที่ 20 - Final Project
คำถาม 20.1
clap crate ใช้ทำอะไร?
A. Web server
B. Command line argument parsing
C. Database
D. Testing
ดูเฉลย
B. Command line argument parsing
#[derive(Parser)]
struct Cli {
#[arg(short, long)]
name: String,
}คำถาม 20.2
serde ใช้ทำอะไร?
A. Networking
B. Serialization/Deserialization
C. Logging
D. Compression
ดูเฉลย
B. Serialization/Deserialization
#[derive(Serialize, Deserialize)]
struct Data { /* ... */ }
```text
</details>
---
# คำถาม 20.3
`anyhow` crate ใช้ทำอะไร?
A. Async runtime
B. Easy error handling
C. Web framework
D. Database ORM
<details>
<summary>ดูเฉลย</summary>
**B. Easy error handling**
```rust,ignore
fn main() -> anyhow::Result<()> {
// ใช้ ? ได้กับทุก error types
Ok(())
}คำถาม 20.4
Project structure ที่ดีควรมีอะไร?
A. ทุกอย่างใน main.rs
B. แยก modules ตาม responsibility
C. ไม่ใช้ modules
D. ใส่ tests ใน main.rs
ดูเฉลย
B. แยก modules ตาม responsibility
src/
├── main.rs
├── lib.rs
├── models/
├── handlers/
└── utils/
คำถาม 20.5
cargo build --release ต่างจาก cargo build อย่างไร?
A. ไม่ต่าง
B. Optimized, production-ready
C. Debug mode
D. รันเร็วกว่า
ดูเฉลย
B. Optimized, production-ready
cargo build= debug, fast compilecargo build --release= optimized, slower compile
🎉 ยินดีด้วย! คุณทำ Quiz ครบทุกบทแล้ว!