การสร้าง Struct
นิยาม Struct
#![allow(unused)]
fn main() {
struct User {
    username: String,
    email: String,
    sign_in_count: u64,
    active: bool,
}
}- ใช้
structkeyword - ตั้งชื่อแบบ PascalCase (ตัวพิมพ์ใหญ่ขึ้นต้นแต่ละคำ)
- แต่ละ field มี
name: Type
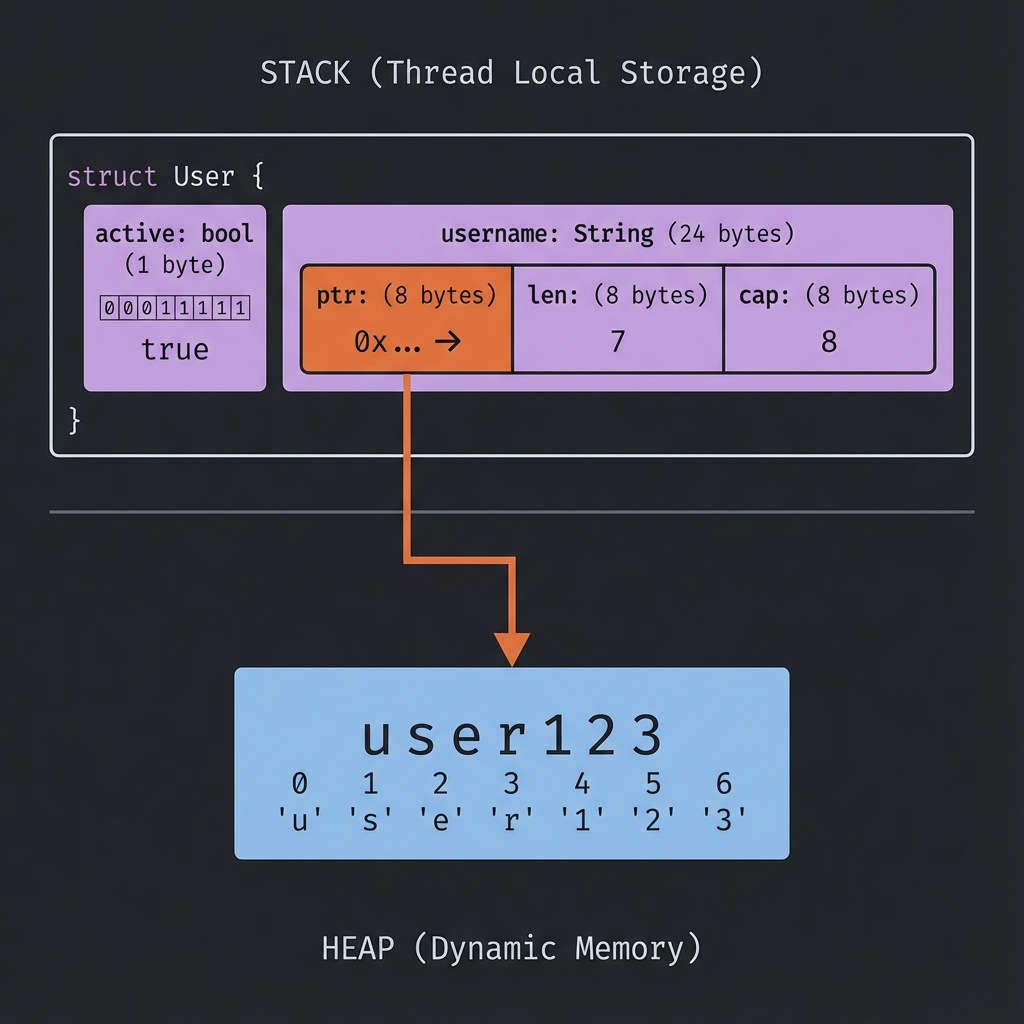
📦 Struct Memory Layout
สร้าง Instance
fn main() {
    let user1 = User {
        email: String::from("alice@example.com"),
        username: String::from("alice"),
        active: true,
        sign_in_count: 1,
    };

    println!("Username: {}", user1.username);
    println!("Email: {}", user1.email);
}

struct User {
    username: String,
    email: String,
    sign_in_count: u64,
    active: bool,
}
เข้าถึงและแก้ไข Fields
struct User {
    username: String,
    email: String,
    sign_in_count: u64,
    active: bool,
}

fn main() {
    let mut user1 = User {
        email: String::from("alice@example.com"),
        username: String::from("alice"),
        active: true,
        sign_in_count: 1,
    };

    // อ่านค่า
    println!("Email: {}", user1.email);

    // แก้ไขค่า (ต้อง mut)
    user1.email = String::from("new@example.com");

    println!("New email: {}", user1.email);
}
หมายเหตุ: ทั้ง instance ต้องเป็น
mutไม่สามารถ mut แค่บาง field ได้
Field Init Shorthand
ถ้าชื่อ parameter ตรงกับ field ไม่ต้องเขียนซ้ำ:
struct User {
    username: String,
    email: String,
    sign_in_count: u64,
    active: bool,
}

fn build_user(email: String, username: String) -> User {
    User {
        email,    // แทน email: email
        username, // แทน username: username
        active: true,
        sign_in_count: 1,
    }
}
Struct Update Syntax
สร้าง instance ใหม่จาก instance เดิม:
struct User {
    username: String,
    email: String,
    sign_in_count: u64,
    active: bool,
}

fn main() {
    let user1 = User {
        email: String::from("alice@example.com"),
        username: String::from("alice"),
        active: true,
        sign_in_count: 1,
    };

    // สร้าง user2 โดยใช้ค่าจาก user1
    let user2 = User {
        email: String::from("bob@example.com"),
        ..user1 // ใช้ค่าที่เหลือจาก user1
    };

    // ⚠️ user1.username ถูก move ไป user2 แล้ว!
    // println!("{}", user1.username); // ❌ Error
    println!("{}", user1.email); // ✅ OK (ไม่ได้ move)
}
Tuple Structs
Struct ที่ไม่มีชื่อ field:
struct Color(i32, i32, i32);
struct Point(i32, i32, i32);

fn main() {
    let black = Color(0, 0, 0);
    let origin = Point(0, 0, 0);

    println!("R: {}", black.0);
    println!("X: {}", origin.0);
}
หมายเหตุ:
ColorและPointเป็นคนละ type แม้จะมีโครงสร้างเหมือนกัน
Unit-like Structs
Struct ที่ไม่มี field:
struct AlwaysEqual;

fn main() {
    let subject = AlwaysEqual;
}
มีประโยชน์เมื่อต้องการ implement trait โดยไม่ต้องเก็บข้อมูล
Debug Printing
เพิ่ม #[derive(Debug)] เพื่อ print struct:
#[derive(Debug)]
struct Rectangle {
    width: u32,
    height: u32,
}

fn main() {
    let rect = Rectangle {
        width: 30,
        height: 50,
    };

    println!("{:?}", rect);   // Debug format
    println!("{:#?}", rect);  // Pretty debug format
}
Output:
Rectangle { width: 30, height: 50 }
Rectangle {
    width: 30,
    height: 50,
}
ลองทำดู! 🎯
- สร้าง struct
Bookที่มี title, author, pages - สร้าง struct
Pointสำหรับพิกัด 2D - ใช้
#[derive(Debug)]และ print struct
สรุป
| แนวคิด | ตัวอย่าง |
|---|---|
| Define | struct Name { field: Type } |
| Create | Name { field: value } |
| Access | instance.field |
| Shorthand | field แทน field: field |
| Update | ..other_instance |
| Debug | #[derive(Debug)] |
👉 ต่อไป: Methods