Slices
Slices ให้เราอ้างอิง ส่วนหนึ่ง ของ collection โดยไม่ต้อง copy
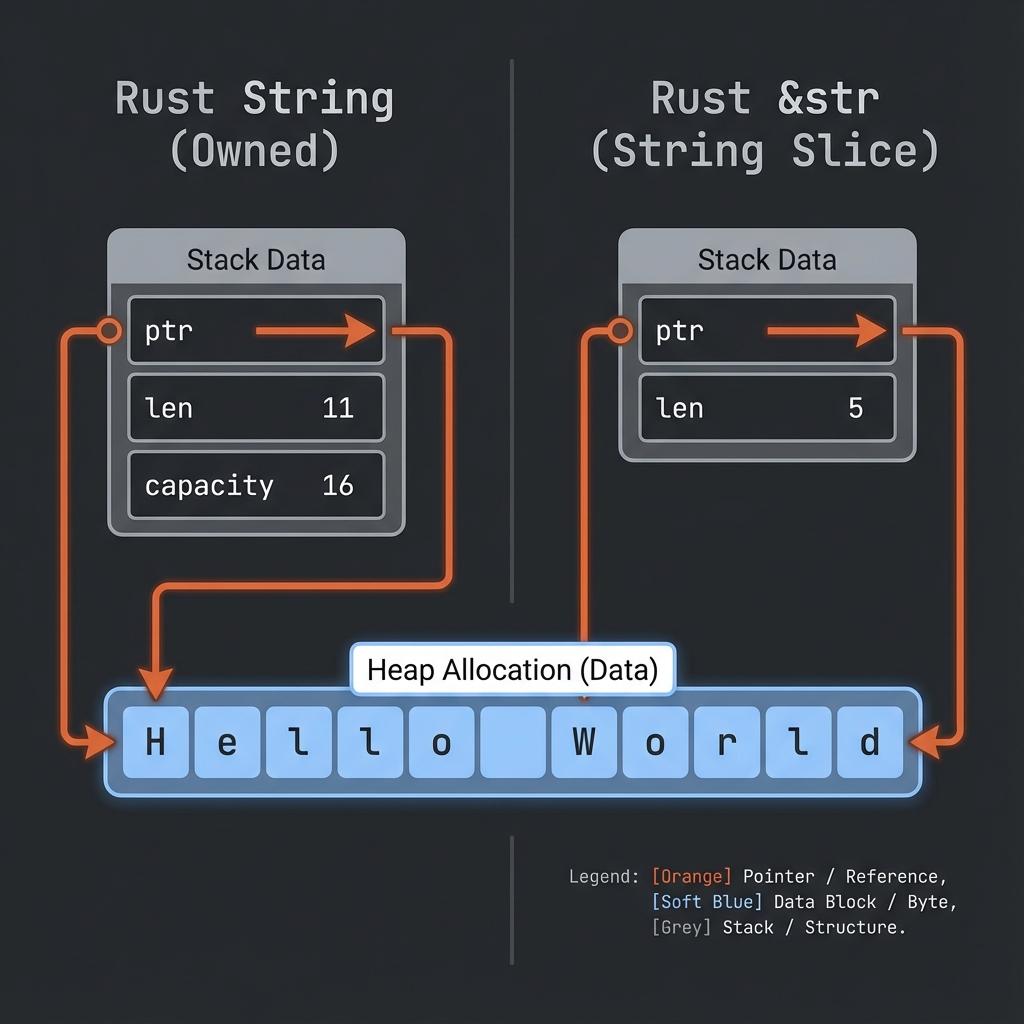
String Slices
fn main() {
    let s = String::from("Hello World");

    let hello = &s[0..5];  // "Hello"
    let world = &s[6..11]; // "World"

    println!("{} {}", hello, world);
}
Syntax
&s[start..end]  // start ถึง end-1
&s[start..]     // start ถึงท้าย
&s[..end]       // ต้นถึง end-1
&s[..]          // ทั้งหมด
ตัวอย่าง
fn main() {
    let s = String::from("Hello World");

    let slice1 = &s[0..5];   // "Hello"
    let slice2 = &s[..5];    // "Hello" (เหมือนกัน)

    let slice3 = &s[6..11];  // "World"
    let slice4 = &s[6..];    // "World" (เหมือนกัน)

    let slice5 = &s[0..11];  // "Hello World"
    let slice6 = &s[..];     // "Hello World" (เหมือนกัน)
}
&str Type
&str คือ string slice - reference ไปยังส่วนหนึ่งของ String:
fn main() {
    let s = String::from("Hello World");

    let word: &str = &s[0..5];

    println!("{}", word);
}
String Literals = &str
fn main() {
    let s: &str = "Hello World"; // string literal

    // s เป็น &str ที่ชี้ไปยังข้อมูลใน binary
}
ใช้ Slices กับ Functions
fn main() {
    let sentence = String::from("Hello World");

    let word = first_word(&sentence);

    println!("First word: {}", word);
}

fn first_word(s: &str) -> &str { // รับ &str แทน &String
    let bytes = s.as_bytes();

    for (i, &item) in bytes.iter().enumerate() {
        if item == b' ' {
            return &s[0..i];
        }
    }

    &s[..]
}
เคล็ดลับ: ใช้
&strเป็น parameter ดีกว่า&Stringเพราะรับได้ทั้งStringและ&str
fn main() {
    let my_string = String::from("Hello World");

    // ทำงานกับ slice ของ String
    let word = first_word(&my_string[0..6]);
    let word = first_word(&my_string[..]);
    let word = first_word(&my_string); // deref coercion

    // ทำงานกับ string literal (&str)
    let my_literal = "Hello World";
    let word = first_word(&my_literal[0..6]);
    let word = first_word(my_literal); // ส่งตรงได้เลย
}

fn first_word(s: &str) -> &str {
    // ...
    s
}
Slices ช่วยป้องกัน Bug
โดยไม่มี slices:
fn first_word_index(s: &String) -> usize {
    let bytes = s.as_bytes();
    for (i, &item) in bytes.iter().enumerate() {
        if item == b' ' {
            return i;
        }
    }
    s.len()
}

fn main() {
    let mut s = String::from("Hello World");

    let word_end = first_word_index(&s); // 5

    s.clear(); // s ว่างเปล่าแล้ว

    // word_end ยังเป็น 5 อยู่ แต่ไม่มีความหมายแล้ว!
    // Bug! 🐛
}
ใช้ slices:
fn first_word(s: &str) -> &str {
    let bytes = s.as_bytes();
    for (i, &item) in bytes.iter().enumerate() {
        if item == b' ' {
            return &s[0..i];
        }
    }
    &s[..]
}

fn main() {
    let mut s = String::from("Hello World");

    let word = first_word(&s);

    // s.clear(); // ❌ Error! cannot borrow as mutable

    println!("{}", word);
}
Rust ป้องกันไม่ให้แก้ไข s เพราะมี immutable borrow อยู่!
Array Slices
ใช้ได้กับ arrays ด้วย:
fn main() {
    let a = [1, 2, 3, 4, 5];

    let slice: &[i32] = &a[1..3];

    println!("{:?}", slice); // [2, 3]
}
ตัวอย่างจริง
fn main() {
    let text = "The quick brown fox jumps over the lazy dog";

    let words: Vec<&str> = text.split(' ').collect();

    for word in words {
        println!("{}", word);
    }

    // หรือใช้ slice โดยตรง
    let first_three = &text[0..15]; // "The quick brown"
    println!("First part: {}", first_three);
}
ลองทำดู! 🎯
- เขียน function ที่ return คำสุดท้ายของ string
- เขียน function ที่ return middle element ของ array
- ลองใช้ slice กับ Vec
สรุปบทที่ 5
| แนวคิด | คำอธิบาย |
|---|---|
| Ownership | ทุกค่ามีเจ้าของเดียว |
| Move | ย้าย ownership |
| Clone | Copy ข้อมูล |
&T | Immutable reference |
&mut T | Mutable reference |
| Slices | Reference ไปส่วนหนึ่งของ collection |
🎉 ยินดีด้วย! คุณผ่านบทที่ยากที่สุดแล้ว!
👉 ต่อไป: บทที่ 6: Structs